By default, KnowledgeOwl offers a basic syntax highlighting color scheme:

You might want to add a bit more color to your syntax, so that it matches your overall knowledge base theme, maybe something like this:
You can do this with a third-party syntax highlighter.
Below, we walk through using a third-party syntax highlighter called Prism, which we use in this knowledge base. We're not specifically endorsing Prism as a syntax highlighter, just using it as an example!
General setup
Each syntax highlighter may have a slightly different setup process, but generally speaking, there's a two-step setup process:
Step 1: Overall setup
This is a one-time setup to include the syntax highlighter's relevant files in your knowledge base in Settings > Style.
Most likely you'll need:
- One or more scripts provided as part of the syntax highlighter to actually complete the highlighting. Generally in the form of a minified .js file, though it can take other forms!
- One or more CSS files (usually provided as part of the syntax highlighter, often customizable) to handle the styling/theme of the highlighter.
- Additional scripts may be necessary for specific plugins, languages, or functionality from your syntax highlighter.
You'll also need to disable the default syntax highlighting in Settings > Basic.
Step 2: Add appropriate class, attribute, or tag in your content
As you add code in your content, add the appropriate formats to trigger the highlighting. Most syntax highlighters use the convention of code needing to be placed in a Preformatted block, and then placed within a code block. You can use our WYSIWYG editor to create this overall setup, but you may need to modify the code formatting.
Our built-in code functionality uses data-language attributes, and many syntax highlighters use different attributes. You'll need to pay attention to what your syntax highlighter uses and be comfortable hopping into the Code View in KnowledgeOwl to adjust it accordingly.
For example, Prism uses a class that is set to language-xxx where xxx is the language the code is in.
So if you used our WYSIWYG, what you'd see for a simple block of HTML code might look like this in Code View:

But you'd need to edit it to remove the data-language attribute and set it to class="language-css", like this:

Example setup: Prism syntax highlighter
To help you understand how to set up a sample syntax highlighter, we'll walk you through how we set up Prism. Note that these steps are specific to Prism and you should follow any instructions provided with your syntax highlighter.
The steps below include downloading your own Prism JS and CSS files. Prism has many of its files available on CDNJS, so you could also source them from there and just add references to those URLs in your Custom Head.
Step 1: Get your Prism JS and CSS
- Go to https://prismjs.com
- Review the instructions (it's especially helpful to look at the themes and the plugins).
- Once you have a sense for which options you'd like, select the Download option at the top of the page.
- For our purposes, we're using the minified version, since this keeps it fairly lightweight. You can choose whatever option you'd like.
- Prism's download gives you the option to select themes, languages, and extra plugins.We use these options:
- Theme: Tomorrow Night (because dark mode!)
- Languages: We kept the defaults (Markup + HTML + XML + SVG + MathML + SSML + Atom + R, CSS, C-like, and JavaScript) and also added JSON + Web App Manifest, Bash (which works for cURL highlighting), and PHP, since we occasionally show JSON examples and PHP examples.
- Extra plugins: Use what seems good to you. We like line numbers, inline color, toolbar, and copy to clipboard button--those are all in-use here in our knowledge base.
- At the bottom of the page, select Download JS and select Download CSS. This downloads the JS and CSS files based on your selections.
- If you'd like to customize the color choices in your theme, you'll need to make edits to the prism.css file directly. We tweaked ours a bit so that the syntax highlighting uses color hexes from our branded color palette, but that's not necessary! Just be sure you resave your css file if you do make changes.
Step 2: Add your Prism JS and CSS to KnowledgeOwl
Prism has many of its files available on CDNJS, so you could also source them from there and just add references to those URLs in your Custom Head. That page includes links to copy the script files directly, but you'd need to select all the files you needed--each language, plugin, etc.
- In KnowledgeOwl, go to Library > Files.
- Select Add files and upload your prism.js and prism.css files.
- Once you've added them, you'll need the URL for each file. See Find a file's URL for more information--we recommend copying and pasting the URLs to a text editor for now.
- Go to Settings > Style.
- Below the preview pane, select Custom <head>.
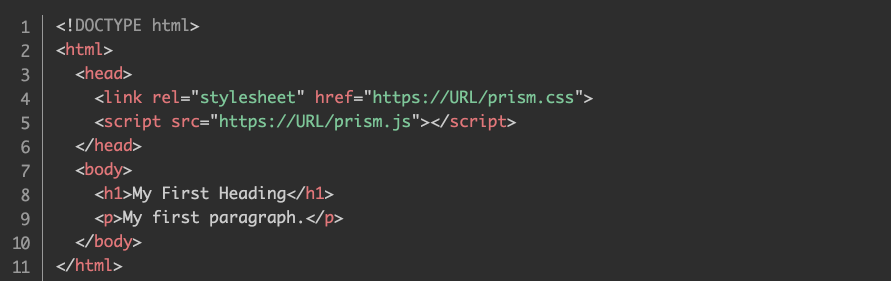
- Copy the code below and paste it into your Custom head:
<link rel="stylesheet" href="https://myurl.cloudfront.net/app/image/id/id/prism.css"> <script src="https://myurl.cloudfront.net/app/image/id/id/prism.js"></script> - Replace the stylesheet href URL in row 1 with the URL of your prism.css file, copied in step 4.
- Replace the src URL in row 2 with the URL of your prism.js file, copied in step 4. You should have something like this:

- Save your changes.

Step 3: Disable default syntax highlighting
- Go to Settings > Basic.
- In the Website settings section, check the box next to "Disable the default code syntax highlighter":

- Save your changes.

Step 4/ongoing: Use the correct format in your code blocks
As mentioned above, Prism will only apply syntax highlighting to code that's in a preformatted text section, in a code block, with class set to language-xxx where the language references a code/format it understands.
So the format you'll need to appear in your code blocks is:
<pre><code class="language-xxx">
    Actual code goes here
</code></pre>
Where language-xxx is replaced by a valid language code in Prism's formatting, like "language-html" or "language-css". You can see the supported language formats on their site in the Supported Languages section. They do loosely align to the code data-language our WYSIWYG uses.
Preformatted text that doesn't have a code block in it--or code blocks that lack the class="language-xxx" format--will not be highlighted.
The fastest way to get to this setup using our WYSIWYG is to:
- Paste your code into the editor.
- Highlight the code and select the Preformatted Text option in the formatting dropdown (or use Ctrl + Alt + 7).
- With the code still highlighted, use the Code Block control to add a Code block with whatever language formatting you want.
- Then shift into Code View to edit the code to change data-language="whatever" to class="language-whatever", or whatever format your syntax highlighter uses.
Some plugins, like the line numbers plugin, require additional formatting.
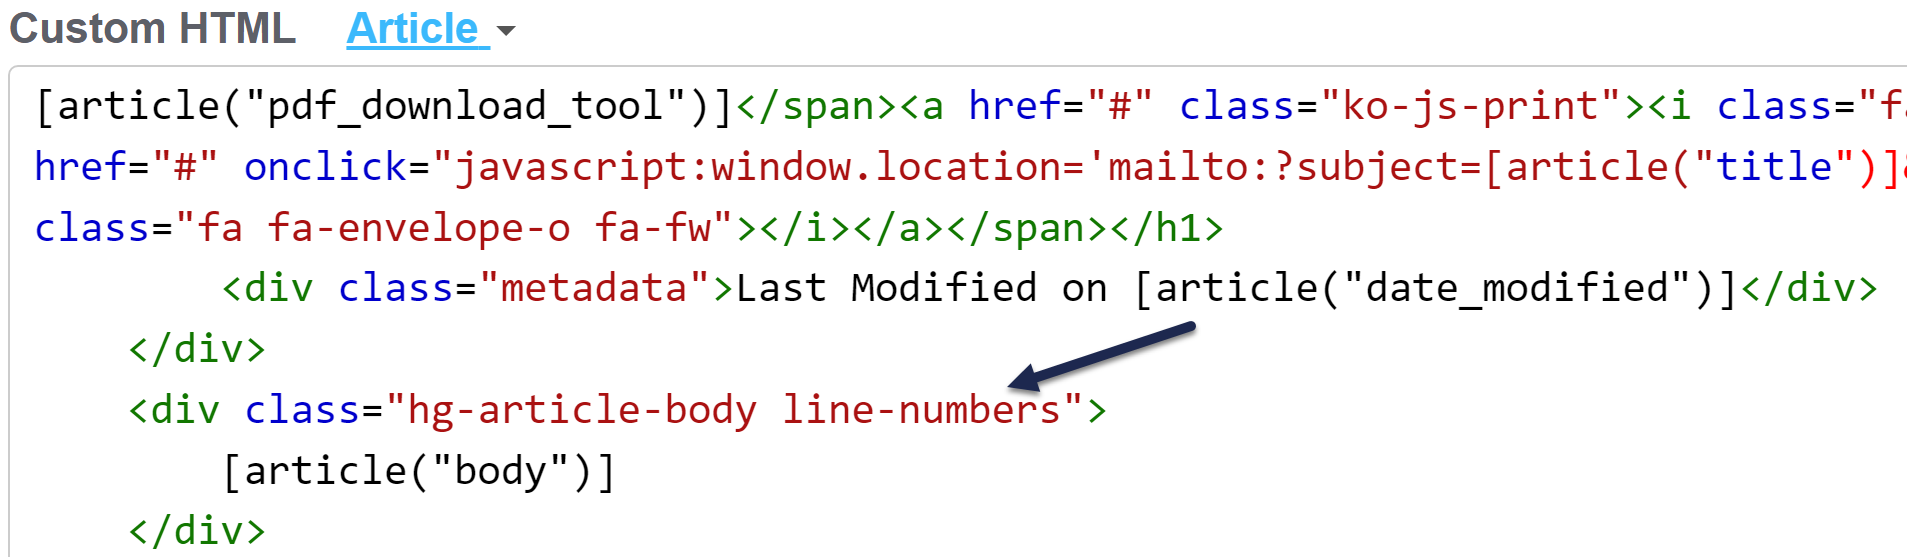
For the easiest use of the line numbers plugin, we found that editing Settings > Style, Custom HTML > Article to add the "line-numbers" class to the div that contains the article body template worked easiest, as that automatically adds line-numbers to all blocks of code: