
The cookbook contains examples of how to use the API. Our aim is to provide examples for a range of common tasks, as well as help getting started with more complex operations. If this is your first time using the KnowledgeOwl API, refer to Using the KnowledgeOwl API for guidance on authentication and pagination.
All our recipes include a curl example, which you can copy-paste. Make sure to replace any placeholder text with your own values. Placeholder text is indicated with angle brackets, like this: <your-value-here>
Wherever possible, the recipes use the minimum possible parameters. Most recipes either just use the parameters required for the request to succeed, or only use ones we believe you will always want to include. For example, the Create a category recipe shows how to create a category using just the required parameters. You will often want to set more parameters. Refer to the Endpoint reference for a full list of available parameters for each endpoint.
We also provide a Postman Collection:
We welcome feedback and requests. Please contact support to request an example, or give any other feedback. We would also love to know what programming languages you are using to work with our API.
Try out our Postman collection
We recommend Postman for trying out API requests. Once you have signed up for a free account, you can get our Postman Collection
This imports a collection containing all our cookbook examples.
You need to set up the collection with your own API key and knowledge base ID.
- Select New > Environment to create a new environment. A Postman environment lets you use variables for things like your API key and knowledge base ID. Our collection is set up to use certain variable names, allowing you to add your credentials in one place (your environment), and have them work throughout the collection.
- Set up the environment:
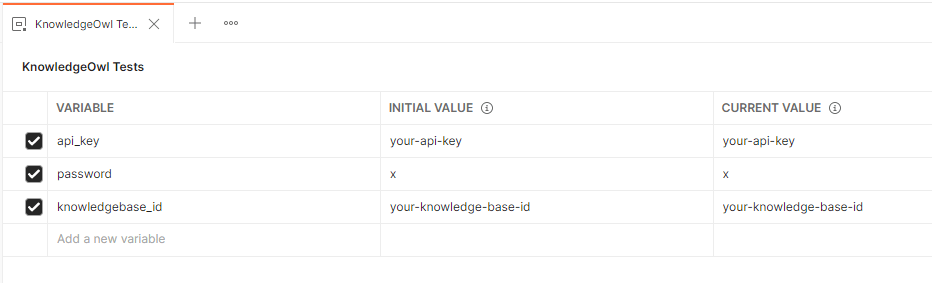
- Give it a name. We called ours "KnowledgeOwl Tests" for these examples, but you can use any name you like.
- Create three variables. These are used in all requests:
- api_key
- password
- knowledgebase_id
- Add your credentials. Your environment should look like this:
- Depending on which examples you want to test, add more variables:
Variable Used in . . . Value category_parent_id Create a new subcategory The category ID of the parent category file_name Upload a new file to the Files page, Update a file in the Files page File name, including suffix. For example, "my-image.png" file_id Update a file in the Files page The KnowledgeOwl ID for the file you want to update
- Save the environment with ctrl + s.
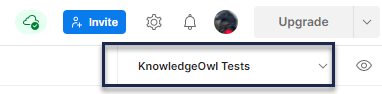
- Select the new environment in the Environment drop down:


Create a new top level category:
curl --location --request POST 'https://app.knowledgeowl.com/api/head/category.json' \
--header 'Authorization: Basic <your-api-key>' \
--header 'Content-Type: application/json' \
--data-raw '{
    "project_id": "<your-knowledge-base-id>",
    "name": {"en": "<your category title>"},
    "status": "active"
Create a new subcategory:
curl --location --request POST 'https://app.knowledgeowl.com/api/head/category.json' \
--header 'Authorization: Basic <your-api-key>' \
--header 'Content-Type: application/json' \
--data-raw '{
    "project_id": "<your-knowledgebase-id>",
    "name": {"en": "<your category title>"},
    "status": "active",
    "parent_id": "<your-parent-category-id>"
}To use the examples we provide in our Postman collection, you must do some extra setup:
- Either place the file you want to upload in your Postman working directory, or enable reading all files. Refer to the Postman documentation for more information.
- Open the example you want to use, and choose the file you want to upload by clicking Select Files.
- To update a file, either add the ID of the file you want to replace to the file_id environment variable, or place it directly in the URL, in place of {{file_id}}.
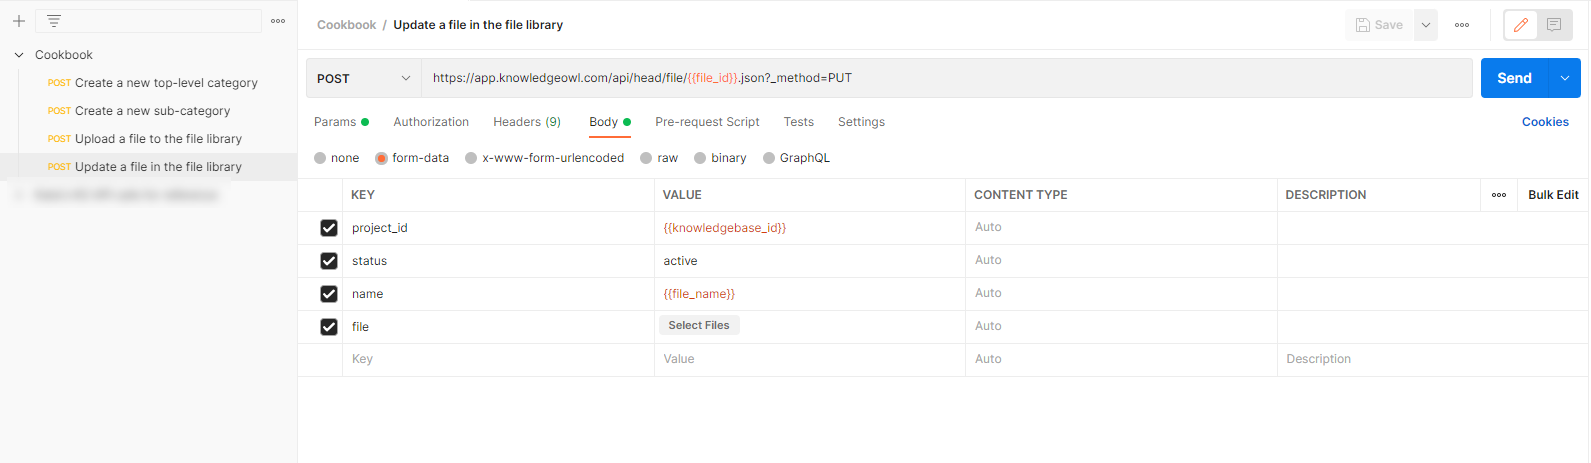

Upload a new file to the Files page
curl --location --request POST 'https://app.knowledgeowl.com/api/head/file.json' \
--header 'Authorization: Basic <your-api-key>' \
--form 'project_id="<your-knowledge-base-id>"' \
--form 'status="active"' \
--form 'name="<file.suffix>"' \
--form 'file=@"<path/to/file.suffix>"'
Update a file in the Files page
As with all PUT (update) requests to the KnowledgeOwl API, you must specify the ID of the object you want to update as part of the URL endpoint. In this case, the URL endpoint looks like: https://app.knowledgeowl.com/api/head/file/<file_id>.json
However, due to some constraints on how KnowledgeOwl's backend infrastructure works, uploading a new file via the API to replace an existing file must be sent as a POST request instead of a PUT.
In order to signify that the request should be treated as a PUT (update) despite being sent as a POST (create), the parameter "_method=PUT" must be included.
If "_method=PUT" is missing from the request body, the API will return an error, because object IDs should not normally be included in POST requests.
If the request is sent as a PUT request instead of POST, the file meta data such as the "name" field will be updated, but the file content itself will be untouched.
Here is the curl request:
curl --location --request POST 'https://app.knowledgeowl.com/api/head/file/<your-file-id>.json?_method=PUT' \
--header 'Authorization: Basic <your-api-key>' \
--form 'project_id="<your-knowledge-base-id>"' \
--form 'status="active"' \
--form 'name="<file.suffix>"' \
--form 'file=@"<path/to/file.suffix>"'In October 2023, we added a number of additional metadata fields to versions:
- created_author: The ID of the author who created the version
- date_activated: The date the version was activated (if applicable)
- activating_author: The ID of the author who activated the version
- date_deactivated: The date the version was deactivated (if applicable, by activating a different version)
- deactivating_author: The ID of the author who deactivated the version
These fields are then used to populate the version PDF.
Since these fields didn't exist before October 2023, though, you can see different metadata depending on when the version was created, activated, or deactivated:
- Version created before 11 October 2023
- No created_author
- If activated and/or deactivated before 11 October 2023, no date_activated, activating_author, date_deactivated, or deactivating_author.
- Activation and deactivation fields will be populated if the activation/deactivation action occurred after 11 October 2023.
- Version created after 11 October 2023
- All fields will be populated, including created_author.
If you want to update pre-existing versions to have any of these fields, you can use the API to do this. This step is only necessary if you want to populate historical data for versions that existed before 11 October 2023.
For those of you familiar with APIs, you'd use a PUT call against the articleversion endpoint to update things.
If you're unfamiliar with APIs but want to make some updates to pre-existing versions, we've put together a Postman collection that has preformatted calls you can use. You'll need a free Postman account to be able to use the collection. Click the button below to get started with the collection.
Initial setup
Once you have forked or imported the collection, you'll need to complete some initial setup so you can work with the collection.
- In Postman, click on the Versions collection
- In the main pane, click on the Variables tab. These variables pass through to all of the API calls in the collection.
- First, let's update the api-key variable:
- In KnowledgeOwl, go to Your Account > API. You'll need an API key that has appropriate permissions (GET to run the first two calls; PUT to run the second two calls).
- Either copy an existing key that has appropriate permissions or generate a new one. See API keys for more information.
- Copy that API key from KnowledgeOwl. Paste your API key into the
api-keyvariable's initial and current value. - Save the collection (Ctrl+S works!). You should not need to update this again.
- Next, let's update the kb-id variable:
- In KnowledgeOwl, get the ID of the knowledge base you're going to be working with. See Find your knowledge base ID or project ID for more info.
- Copy that ID.
- In Postman, in Versions > Variables, paste your knowledge base ID into the
kb-idinitial and current value. - Save the collection. You should not need to update this again, unless you're working in multiple KBs.
Using the collection
As you use the collection, you'll need to update the article_id and/or version_id variables to view or update versions. You can do this following the same process we used above in the initial setup: click on the Versions collection, open the Variables tab, then paste the appropriate ID in.
To find an article ID:
- Open the article for editing.
- Copy the portion of the URL that comes after /aid. This is the article's ID.
- In Postman, Versions > Variables, paste that ID in as the current_value of the
article_idvariable.
To find a version ID, you can either use the API or the editor:
Version ID API instructions
- Update the article_id variable with the ID of the article whose version you want to update.
- Click to open the View all versions for an article GET call in the collection.
- Hit the Send button.
- The API's output will appear in the window below. Find the version you're looking for and copy the ID.
- In Versions > Variables, paste that ID in as the current_value of the
version_idvariable. - We recommend running the View metadata for single version GET call to confirm you have the correct version_id before you make any other changes!
Version ID editor instructions
- Open the article for editing.
- Use the versions menu to open the version you're interested in.
- Copy the portion of the URL that comes after /language/en/version/. This is the version's ID.
- In Postman, Versions > Variables, paste that ID in as the current_value of the
version_idvariable. - We recommend running the View metadata for single version GET call to confirm you have the correct version_id before you make any other changes!
Update a version's metadata
Once you've updated the version_id variable and confirmed that the View metadata for single version call is returning the correct version, you are ready to update some metadata for that version! We've pre-built two calls for this. The calls are formatted slightly differently to handle different date formats:
- Update metadata for single version, readable date format: This one is easier for beginners to use.
- Update metadata for single version, UNIX date format: This one is easier if you want to use a UNIX timestamp. If you're unfamiliar with UNIX timestamps, we recommend using a Unix timestamp converter like https://www.unixtimestamp.com to get the correct timestamp format.
Below, we walk through each of these in more detail.
Update metadata for single version, readable date format
To use this call to update a version's metadata:
- In Postman, click to open the call.
- This should open the call to the Params tab. If for some reason that tab doesn't open, click it.
- You'll see something like this (though probably not in dark mode!):
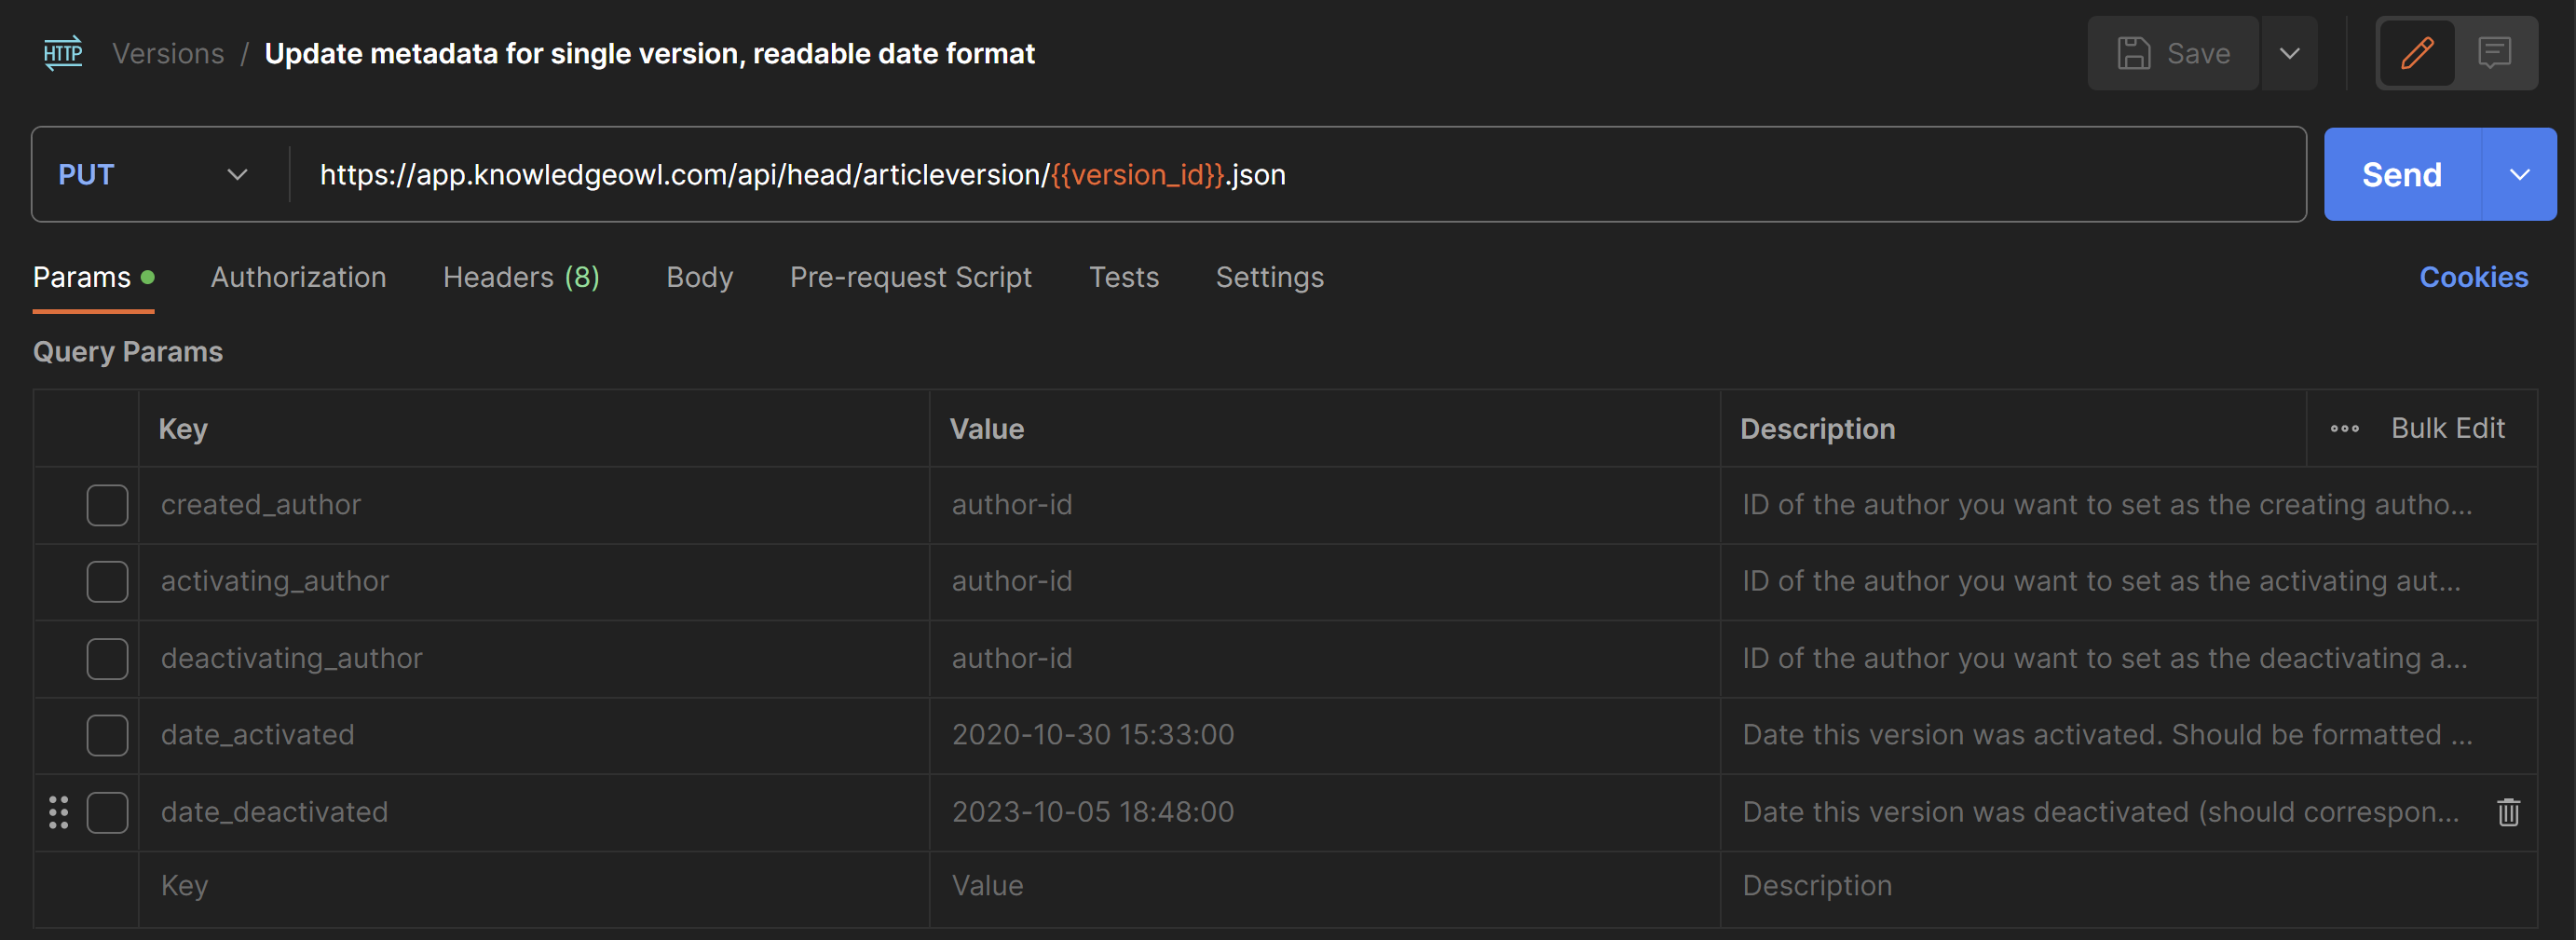
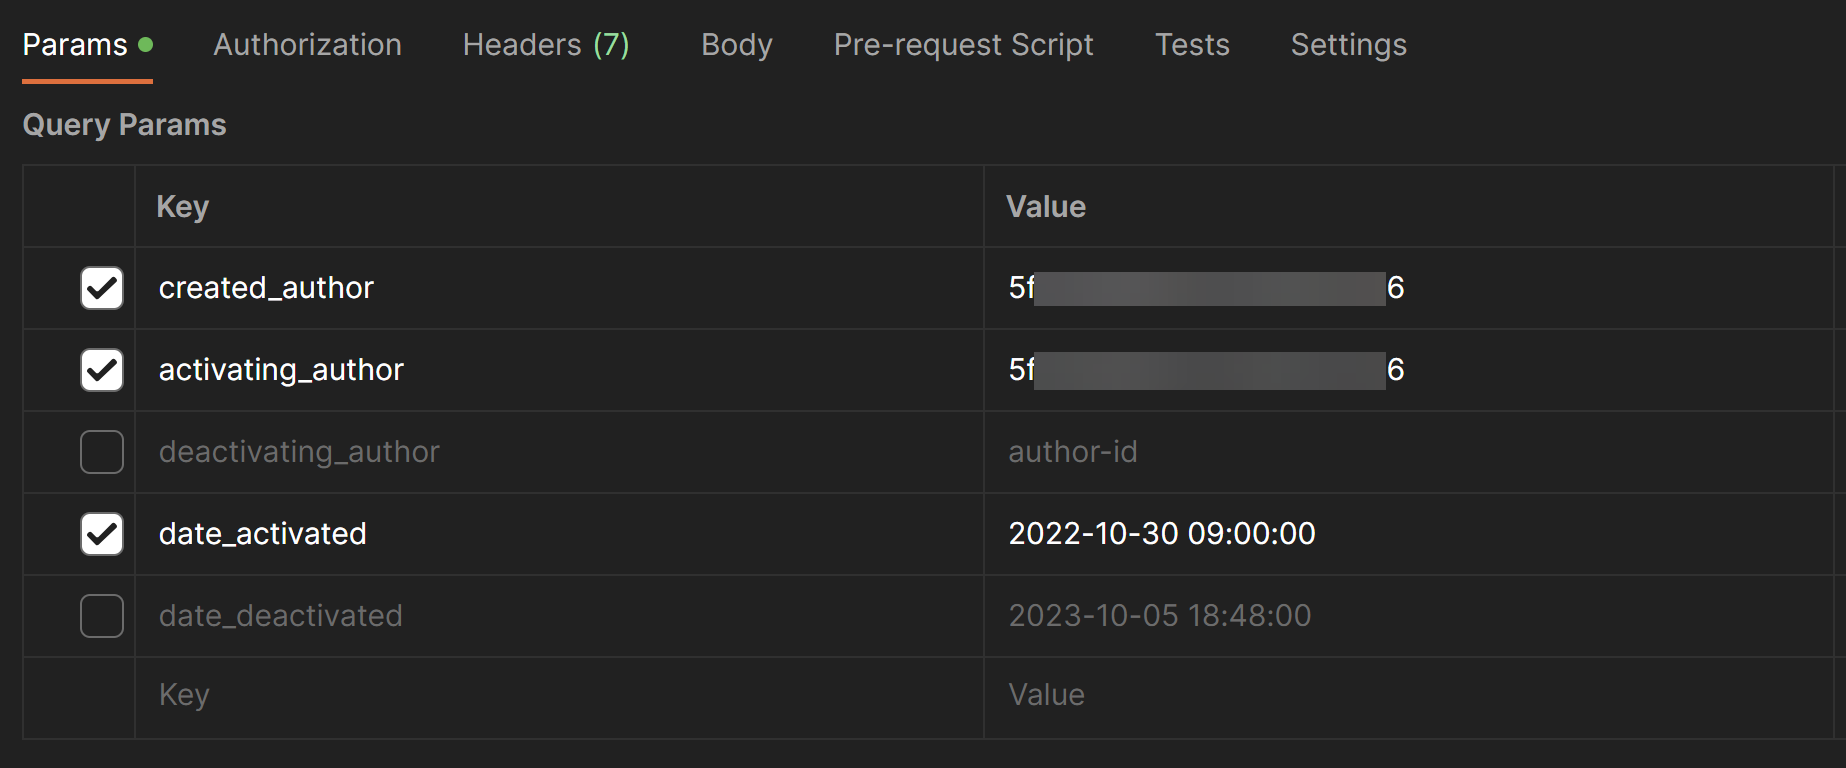
- In the Query Params table, check the boxes next to the fields you want to update.
- For the fields you've selected, update the Valueto be the value you want to set the version to have.
- For any of the author fields: Enter the author's ID. To get an author's ID:
- In KnowledgeOwl, go to Your Account > Authors.
- Click to open the details of the author you want to add.
- Copy the portion of the url that comes after /aid/. This is the author's ID.
- Paste that into the Value in Postman for whichever author field this author should be assigned to.
- For any of the date fields: Enter the date. We've prepopulated some sample date formats as examples. They should be formatted as yyyy-mm-dd hh:mm:ss.
- Use Greenwich Mean Time, so you may need to do some time zone conversion (don't worry, you can rerun this call with an edited date if you get it wrong!)
- So if we wanted to update something to be 21 August 2023 at 09:00:00am Eastern, that's 2pm in GMT time. We'd use this value:
2023-08-21 14:00:00.
- For any of the author fields: Enter the author's ID. To get an author's ID:
- So, for example, here we're adding a created_author and activating_author, as well as a date_activated:
- Once you've finished updating values for the checkboxes you selected, click the Send button. This will send the PUT call using the data you specified.
- The window at the bottom will update to show you the new data for the version (it basically returns a GET call for that version after the updates go through), so you can verify if the data you entered was correct.
- If you Save changes, it will save the parameters you've checked as well as the values you entered. If you close the call and discard changes, it will go back to the original unchecked/fake values setup when you first got the collection. The choice is yours!


Update metadata for single version, UNIX date format
To use this call to update a version's metadata:
- In Postman, click to open the call.
- This should open the call to the Params tab. For this call, we don't want Params. Click to open the Body tab instead.
- You'll see something like this (though probably not in dark mode!):
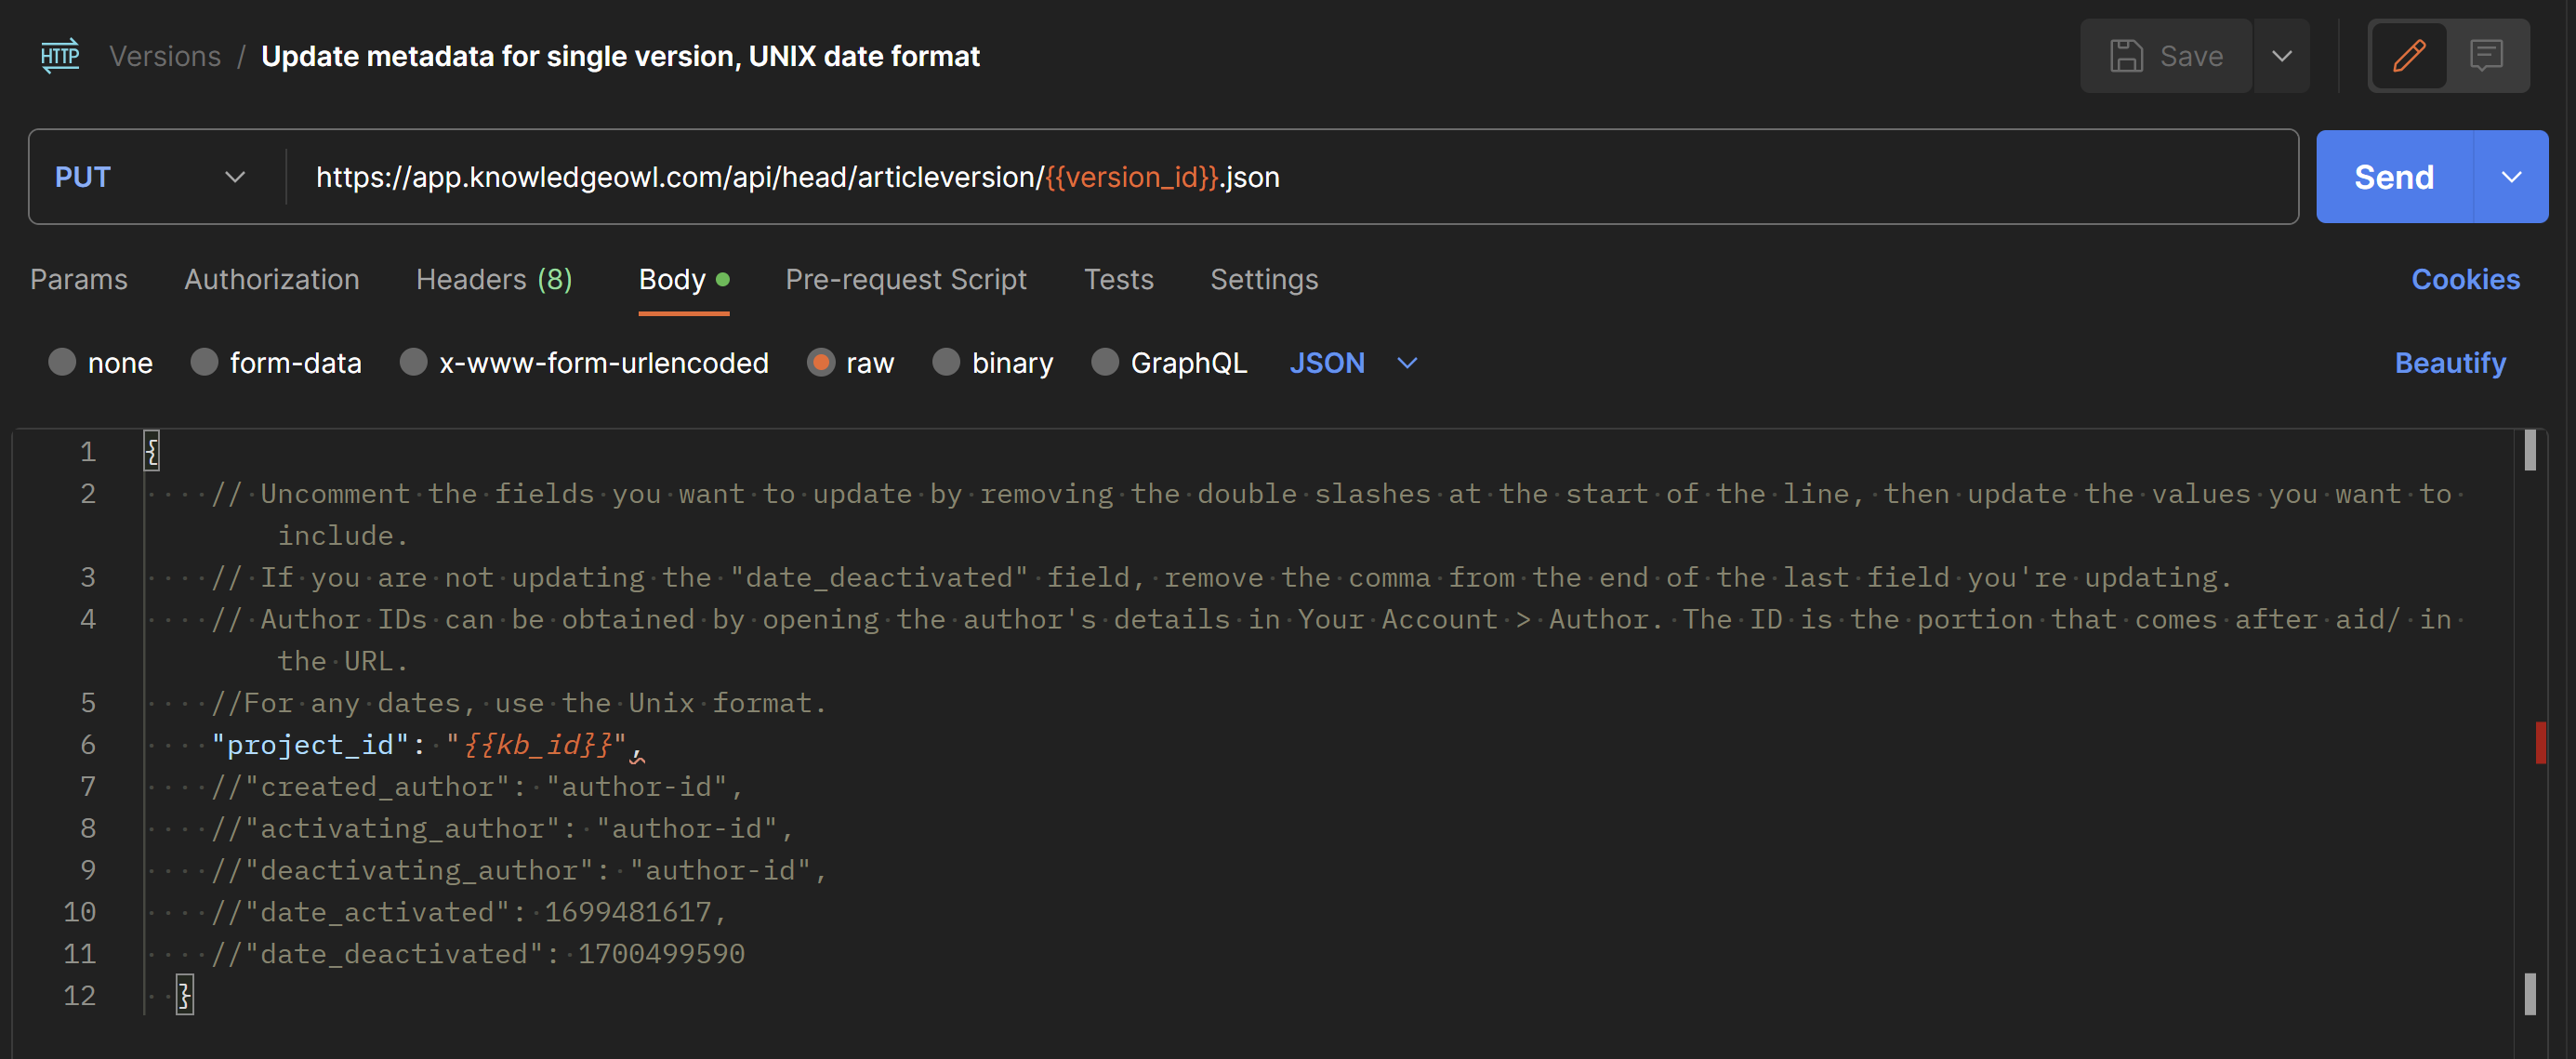
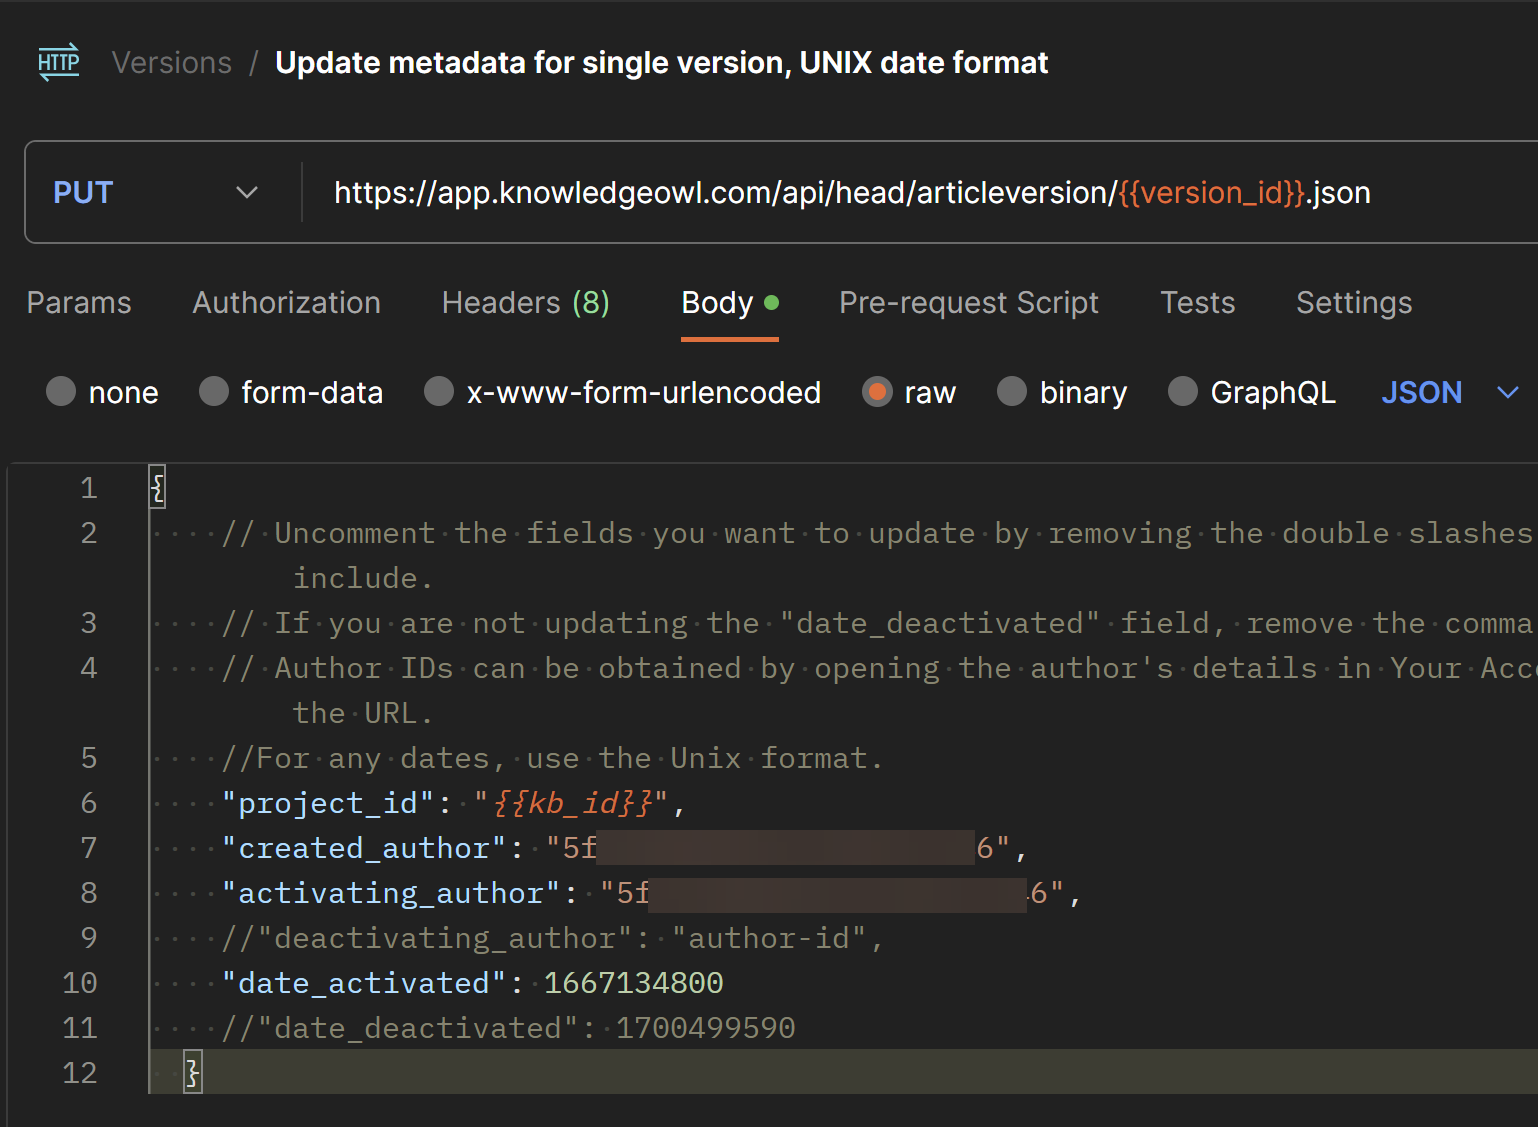
- This call functions very similarly to the previous one, except each parameter is in a commented-out line with a comma after it. To update these parameters:
- Remove the "//" before the fields you want to update
- For authors, add the author ID between the "", so "created_author": "author-id", becomes "created_author": "1234567abcd" if that's my author's ID.
- For dates, use a Unix timestamp. we recommend using a Unix timestamp converter like https://www.unixtimestamp.com to get the correct timestamp format. This won't require any time conversion. Copy the Unix timestamp exactly as it appears in the converter and override the default values we've put in. So if we wanted to use November 21, 2022, at 09:00:00 GMT time as our "date_activated", that would be "date_activated": 1669039200,
- Once you've finished updating uncommenting/commenting out the parameters you want to pass and updating the values for them, be sure that your last uncommented/active parameter does not have a comma after it. (We removed the comma from after "date_deactivated" so you can see how that looks.) JSON lists need to not end with a comma. 😉 Postman will put a little red squiggle under it if the comma needs to be removed.
- So, for example, here we're updating the created_author, activating_author, and the date_activated to use the same settings we used in the previous call's example:
- Once you're done with that, click the Send button. This will send the PUT call using the data you specified.
- The window at the bottom will update to show you the new data for the version (it basically returns a GET call for that version after the updates go through), so you can verify if the data you entered was correct.
- If you Save changes, it will save the parameters you've uncommented as well as the values you entered. If you close the call and discard changes, it will go back to the original commented/fake values setup when you first got the collection. The choice is yours!

