Depending on your audience and the size of your knowledge base, you may want to open your categories in the table of contents by default.
To set this up:
- Go to Settings > Basic.
- In the Table of contents section, check the option to that says "All categories open by default".
- Save and your categories will be open by default.Note: You can also set individual categories and sub-categories to show as open or closed by editing them and choosing the appropriate override in the Table of contents display section in the righthand column:
See Website Settings for more information on other settings available in Settings > Basic.
While your uploaded logo is automatically linked to your knowledge base homepage, you might want to add a button or a link for readers to easily navigate back.
To add a home button to the top of your table of contents:
- Go to Settings > Basic.
- In the Website Settings section, look for the Table of contents header.
- Check the box next to Add a homepage link to the top of the table of contents.
- Save. You should now see the Home link in your TOC.
See Website Settings for more information on other settings available in Settings > Basic.
Though most themes include a search bar in the top navigation, you might want to include a search bar in your table of contents, as well.
To add a search bar to the top of your table of contents:
- Go to Settings > Basic.
- In the Table of contents section, check the box next to "Add a search bar to the top of the table of contents".
- Save. You should now see the search bar at the top of your TOC.
See Website Settings for more information on other settings available in Settings > Basic.
If you're using the Glossary, you can add a link to the glossary to your table of contents.
To add a glossary link to the top of your table of contents:
- Go to Settings > Basic. (Or, from the Glossary page, click the Edit in settings link next to "Link in the table of contents.")
- In the Table of contents section, check the box next to "Add a glossary link to the top of the table of contents".
- Save. You should now see the glossary at the top of your TOC.
See Website Settings for more information on other settings available in Settings > Basic.
If you're using a Standard PDF export (Full PDF Download) of your knowledge base, you can add a download link for the PDF to your table of contents.
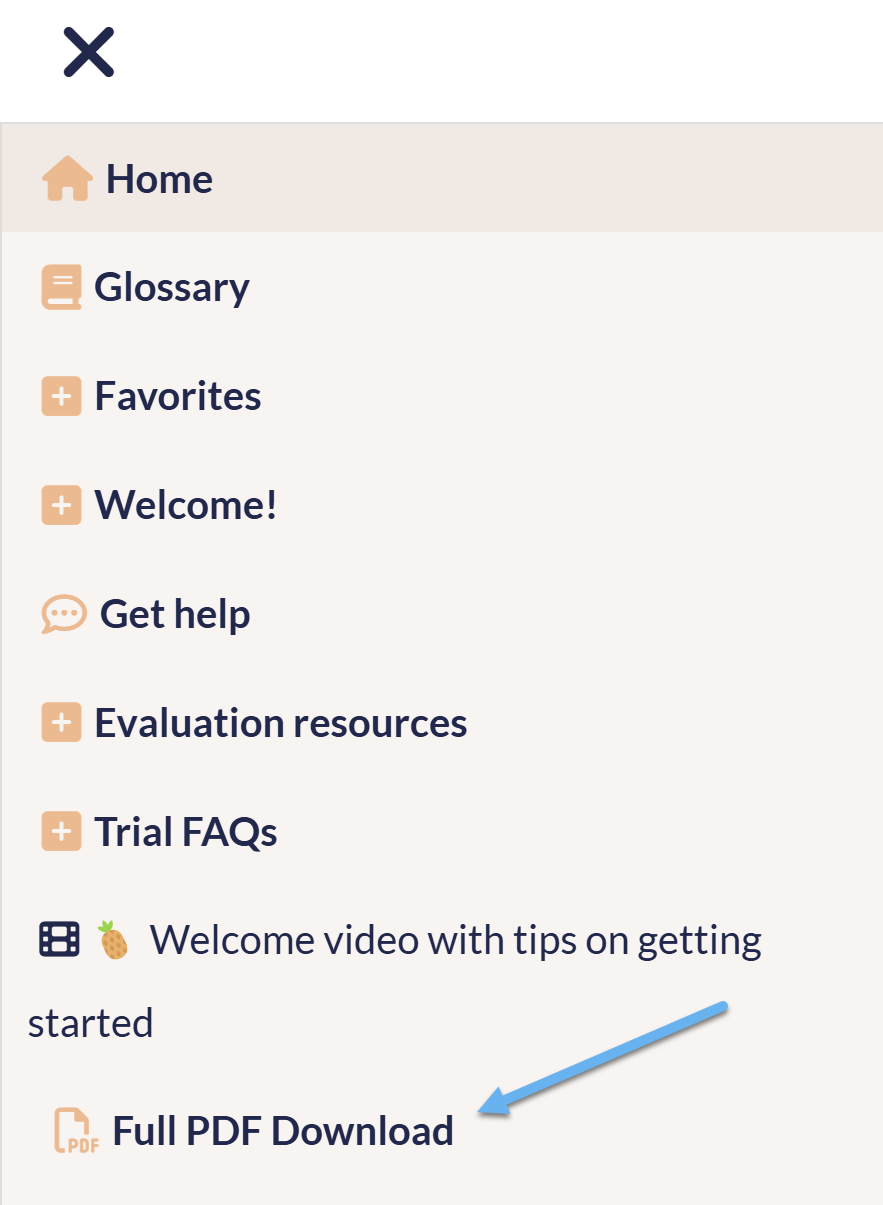
There are two different ways you can add a link to the full PDF download to the bottom of your table of contents; one is through the Standard PDF configuration; the other is through Customize > Website. Below, we describe how to add it through the Standard PDF configuration; refer to Website Settings for adding it from Customize > Website.
- In the left navigation, go to Tools > Exports.
- In the Standard PDF tab, check the Display to readers box to Add a full PDF download link to the knowledge base table of contents.
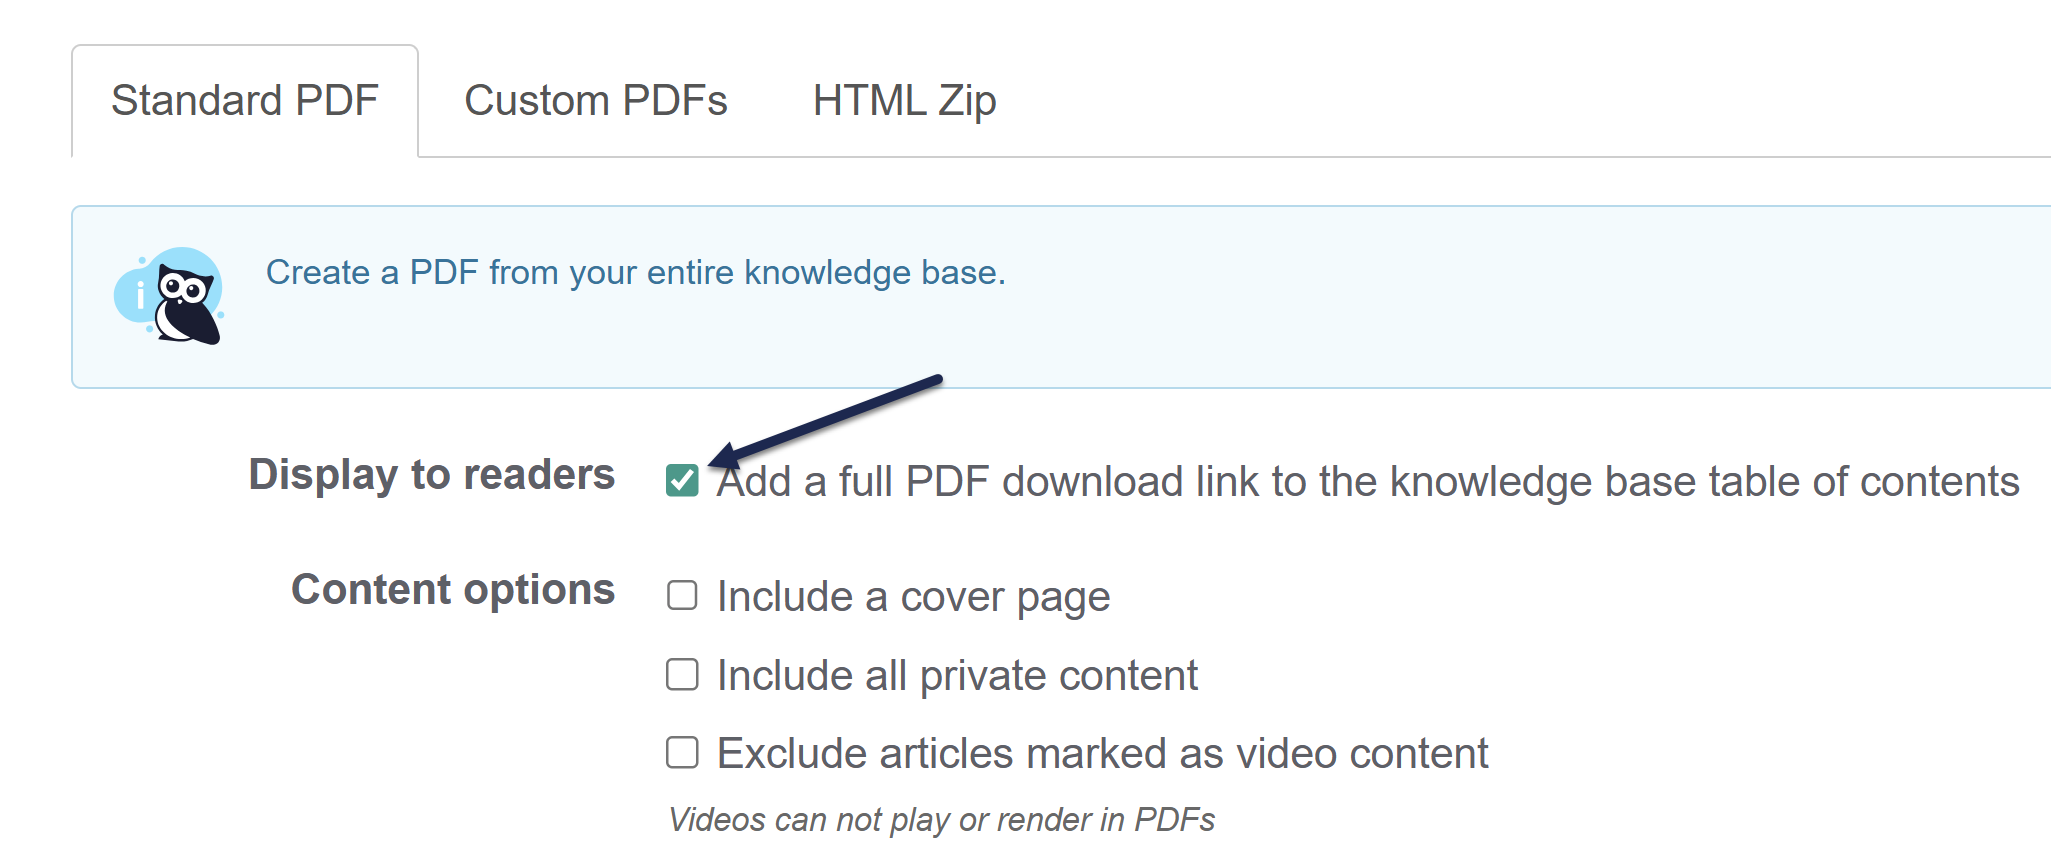
- Save and regenerate the PDF. You should now see the PDF link at the bottom of your table of contents.
- By default, the table of contents link text is "Full PDF Download." If you'd like to change that wording, use the Table of Contents section of Customize default text to update it!
Refer to Website Settings for more information on other settings available in Customize > Website.
Manual updates required
This PDF will not automatically update as you update content. You must manually regenerate the PDF!
If you'd like to add links to your table of contents, you can do so in two ways:
- To add a link in with your categories, create a URL redirect category with the link of your choice.
- To add a link to the very top or bottom of your table of contents, see the instructions below.
If you're using the contact form, you might want to add a link to the contact form in your table of contents, so let's use that as an example:
Prep work
Before you begin, you'll need a few things:
- The link you'd like to add to your table of contents.
- A free FontAwesome icon you'd like to use for that link. We already have a few icons used, like home, or the book used next to glossary. You'll need to know the FontAwesome class for the icon.
- Where you'd like the link placed. The scripts we provide below will put it:
- At the top of the table of contents, above all other links (including Home, if it's enabled)
- Below the Home link but above everything else in the table of contents, if Home link is enabled
- At the very bottom of the table of contents
Setup
- Go to Settings > Style.
- Below the Preview Pane, be sure Custom HTML is selected.
- In the Custom HTML dropdown, be sure Body is selected.
- Choose your script:
- If you'd like to add this link to very top of your table of contents, even above the Home link (if it's enabled) copy this script and paste it into the editor:
<script> //Add Contact Support link to top of table of contents, before Home link $(function(){ $(".documentation-outter-list").prepend('<li data-type="category" class="category-container nav-header nav-header-sub level-0"><div class="category-link-container "><a href="/help/contact-us"><i class="home-icon fa fa-life-ring"></i></a><a class="documentation-category" href="/help/contact-us">Contact Support</a></div></li>'); }); </script>
- If you have the Home link enabled and you'd like this new link to appear right below the Home link, copy this script and paste it into the editor:
<script> //Add Contact Support link to top of table of contents, after Home link $(function(){ $(".documentation-outter-list li:eq(1)").before('<li data-type="category" class="category-container nav-header nav-header-sub level-0"><div class="category-link-container "><a href="/help/contact-us"><i class="home-icon fa fa-life-ring"></i></a><a class="documentation-category" href="/help/contact-us">Contact Support</a></div></li>'); }); </script>
- If you'd like your new link to appear at the bottom of your table of contents after your final category, copy this script and paste it into the editor:
<script> //Add Contact Support link to bottom of table of contents $(function(){ $(".documentation-outter-list").append('<li data-type="category" class="category-container nav-header nav-header-sub level-0"><div class="category-link-container "><a href="/help/contact-us"><i class="home-icon fa fa-life-ring"></i></a><a class="documentation-category" href="/help/contact-us">Contact Support</a></div></li>'); }); </script>
- If you'd like to add this link to very top of your table of contents, even above the Home link (if it's enabled) copy this script and paste it into the editor:
- If you'd like to send this to your contact form, regardless of which script you chose above, if your knowledge base uses /docs or /home in the URL instead of /help, update the
href="/help/contact-us"
to be the appropriate URL (such as "/docs/contact-us" or "/home/contact-us"). - To use a link that's not the Contact Form, replace the URL in
href="/help/contact-us"
with the URL you'd like to use. This can be a link to something else in your knowledge base (such ashref="/help/add-a-category"
) or to something outside of your knowledge base (likehref="https://www.knowledgeowl.com/terms-and-conditions"
) - We used the text label "Contact Support" for our example. To display a different text label, replace Contact Support with the text of your choice.
- To use a different FontAwesome icon, replace the
fa-life-ring
in your script with the FontAwesome class for that icon. - You can Preview Changes to see how your code looks.
- Be sure to Save your changes once you're done.
For example, here, we've chosen the 4a script, which will place our new link at the very top of the table of contents, above Home. We've adjusted the icon to use the phone icon ("fa-phone") and the text to read "Contact us". Here's how the script looks:
And here's how it displays in our table of contents:
The default table of contents icons use right-pointing and down-pointing arrows to indicate category navigation.
If you take a look in our table of contents in this knowledge base, you'll see different icons:
- A plus + icon when a category can be expanded to view content
- A minus - icon to collapse a category
- And a solid square when a category contains no content
If you'd like to use a similar treatment in your own table of contents, here's how we did it.
The steps below should work in any of our default knowledge base themes.
Setup to change right/down chevrons to plus/minus icons:
To change the right and down chevrons/arrows to plus and minus icons:
- Go to Settings > Style.
- Below the Preview Pane, be sure Custom CSS is selected.
- Copy the code below and paste it into your Custom CSS editor (at the bottom is fine). This code will replace the right-chevron with the plus-square and the down-chevron with the minus-square:
/* Adjust TOC icons, part one: */ /* Change TOC chevron-right to plus-square */ .documentation-categories .fa-chevron-right:before { content: "\f0fe" !important; } /* Change TOC chevron-down to minus-square */ .documentation-categories .fa-chevron-down:before { content: "\f146" !important; }
- You can Preview Changes to see the effect.
- Be sure to Save your changes once you're done.
Tweaks
The code above uses free FontAwesome icons. You can update the code to use different icons.
To do so:
- In Step 3, replace the
content
values we used in rows 4 and 8 with the content values for other FontAwesome icons. - You can see the content value if you open an icon in FontAwesome. Near the top, they'll list a Unicode value (they often begin with f). You can copy that Unicode value and replace the content values in rows 4 and 8. Be sure to keep the slash and the quotes, so your value should still have "\fxxx" in the format.
- For example, if we wanted to use the circle plus icon instead of the square plus:
We would use this code in row 4:content: "\f055" !important;
Setup to change the "empty" category icon
To change the icon for "empty" categories so it's not the right-chevron:
- Go to Settings > Style.
- Below the Preview Pane, be sure Custom HTML is selected.
- In the Custom HTML dropdown, be sure Body is selected.
- Copy the code below and paste it into the bottom of your Body Custom HTML editor. This code will check to see if the category is empty; if it is empty, it will remove the chevron-right and add the plain square icon.
<script> $(function(){ //Adjust TOC icons, part 2: For Table of Contents items with no content, change chevron-right to plain square $('.nav-header-sub').each(function() { if($(this).find('ul').find('li').length < 1) { $(this).find('i:not(".fa-home,.fa-envelope-o,.fa-book")').removeClass("fa-chevron-right").addClass("fa-square"); }; }); }); </script>
- You can Preview Changes to see your table of contents update.
- Be sure to Save your changes once you're done.
Tweaks
The code above uses free FontAwesome icons. You can update the code to use an icon other than the plain square:
- In Step 6, replace the
fa-square
class being added at the end of row 6 with the class of the icon you'd like to use instead. - To find the class of a FontAwesome icon, open the details for the icon and look at the HTML being used. For the
circle-plus
displayed above, the class isfa-circle-plus
. So we could update row 6 of our script to be:$(this).find('i:not(".fa-home,.fa-envelope-o,.fa-book")').removeClass("fa-chevron-right").addClass("fa-circle-plus");
The Minimalist theme uses a slideout Table of Contents, which is set to 360px by default.
If you'd like to change the width of that Table of Contents:
- Go to Settings > Style.
- Below the preview pane, select Custom HTML.
- In the Custom HTML dropdown, select Body.
- Copy and paste the code below anywhere into your Body Custom HTML, changing the value="number" to be the pixel width you'd like to use (here, we use 450):
<input type="hidden" class="slideout-width" value="450">
- Now go to Custom CSS.
- Copy and paste the code below into your Custom CSS, changing the width pixel number to match the width you used above (here, we're using 450 again):
.slideout-menu { width: 450px; }
- Save.
For comparison, here's what the knowledge base looked like before these changes, with the default 360px width:
And here's what it looked like after, with the custom 450px width:
You might want to hide the table of contents completely in your knowledge base--maybe to save some screen real estate, or to force people to work through navigation, or simply because your knowledge base isn't complex enough to need a table of contents everywhere.
To do so, you'll need to use the Single Column layout:
- Go to Settings > Style.
- Expand the Layouts section.
- Click on the One Column layout option.
- The Preview pane should update. Click the Save button to save these changes.
Depending on the Theme you're using, you may see other changes in various pages. We recommend doing a quick review of a few pages to be sure the new layout looks good. If you find specific pages that seem to need adjustment, contact us for help making those changes.