
Want to display some of the required articles directly on your homepage? You can do that, too.
We've created an article list merge code specifically for this purpose!
Reader accounts required
The Required Reading feature and list only work with individual reader accounts. Knowledge bases with Security and access > Security settings > Content authentication set to public, IP address, or shared password can't use this feature.
How the Required Reading article list works
To set it up, you'll add the merge code for the list where you'd like the information to be displayed. KnowledgeOwl displays up to 10 of the most recently required articles in the list, and the See more.. link at the bottom will navigate readers directly to the Required Reading page to view a full list of articles they need to acknowledge.
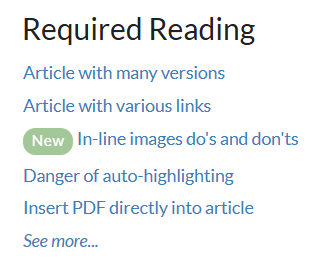 Sample Required Articles list
Mixed access knowledge bases
If your knowledge base allows a mixture of public and private content, the Required Reading Article List will show as empty/blank for anyone who hasn't logged in.
Change number of articles displayed
By default, the 5 most recently required articles will be displayed. You can change this to display between 1-10:
- Go to Customize > Website.
- Scroll to the Article list settings section.
- Use the Required reading dropdown to select the number of articles you'd like the list to display (1-10). If you don't see this dropdown, you haven't Set up Required Reading.
- Be sure to Save your changes.
Change the article list wording
You can change most of the default text used in this list, including:
- The Required Reading article list title
- The "None" text displayed when no required reading exists
- The "See more..." link that opens the full Required Reading page
Refer to Change the Required Reading text for more information on changing text related to Required Reading.
Setup
Some assembly required
We do not add this list to any section of your knowledge base by default.
If you'd like to add the required reading list to your knowledge base, you'll add two merge codes into either the Customize > Homepage custom content editor or into the Customize > Style > Custom HTML of the relevant layouts:
[translation("required-reading:required-reading-list-heading")]: This merge code grabs the Required Reading list heading in Customize > Default text, making it so no one has to edit the code in the future to update the title.[template("required-articles")]: This merge code generates the required articles list.
To add the list to your homepage:
- Edit Customize > Style > Custom HTML (most common setup)
- Edit Customize > Homepage custom content editor (less common)
Refer to the more detailed instructions below for each setup.
Add the Required Articles List to Customize > Style homepage
Newer knowledge bases have their entire homepage set in Customize > Style (HTML & CSS). If your knowledge base uses this layout, follow these instructions to add the Required Articles List there. (If your knowledge base doesn't show any article lists in Customize > Style (HTML & CSS) > Custom HTML > Homepage, skip these and follow the next set of instructions!)
- Go to Customize > Style (HTML & CSS).
- In the Customize HTML, CSS, and JS section, select Custom HTML.
- Select Homepage from the Select HTML section to edit dropdown.
- Near the bottom of the code editor, find the
div class="homepage-widgets row", usually on or around row 9: - Create a new line where you'd like the Required reading list to go. Copy the code below and paste it onto that new line:
<div class="col-md-4 col-sm-6"><h3>[translation("required-reading:required-reading-list-heading")]</h3>[template("required-articles")]</div> - For example, your code would look like this if you added Required reading as the final list:
<div class="homepage-widgets row"> <div class="col-md-4 col-sm-6"><h3>[translation("article-lists:popular-articles")]</h3>[template("pop-articles")]</div> <div class="col-md-4 col-sm-6"><h3>[translation("article-lists:new-articles")]</h3>[template("new-articles")]</div> <div class="col-md-4 col-sm-6"><h3>[translation("article-lists:updated-articles")]</h3>[template("up-articles")]</div> <div class="col-md-4 col-sm-6"><h3>[translation("required-reading:required-reading-list-heading")]</h3>[template("required-articles")]</div> </div> - This will add the Required Reading list on a separate row from the other three lists. If you'd like them all on one row, adjust all four divs to have
col-md-3instead ofcol-md-4. - Be sure to Save your changes once you're done!
Add the Required Articles List to Customize > Homepage
If your article lists aren't in Customize > Style > Homepage:
- Go to Customize > Homepage.
- Copy one of the other homepage lists and paste it in again.
- Replace the title merge code with:
[translation("required-reading:required-reading-list-heading")] - Replace the list merge code with:
[template("required-articles")] - Save.
Your homepage might now look like this:
 Sample Homepage editor layout with Required Articles list added