
Our knowledge base theme builder allows you to choose from a variety of fonts, sizes, and weights. We even have pre-built font pairs picked by a designer.
You can also specify a custom font, either from a publicly-available website/CDN, or by uploading your own custom font files to KnowledgeOwl.
To do so, you'll follow two general steps:
- Get your font file URL
- Add your font in your Custom CSS
We walk through each step in more detail below.
Get your font file URL
To use a custom font, you need to have a URL for that font. You can either:
- Use a public URL for a web font: Public font sources like Google Fonts usually have an "Embed font" option that provides a URL to the font style sheet. Copy that font style sheet and then you're ready to Add your font.
- Upload a font file you already have to KnowledgeOwl and reference that file's URL. Refer to the Upload your own font file instructions below.
Upload your own font file
You might already have existing font files, for example:
- Your company has its own set of official fonts available in a media, design, or marketing kit.
- You downloaded font files from a web font source or CDN.
- You paid for a proprietary font.
In these cases, you should add the font files to KnowledgeOwl:
- In the left navigation, select Files.
- Select + Add Files. The Upload Files modal opens.
- Either drag and drop font files in or browse to them, select, and select Open to add them to the Upload Files modal.
- Once you've added all the font files you need, select Upload Files....
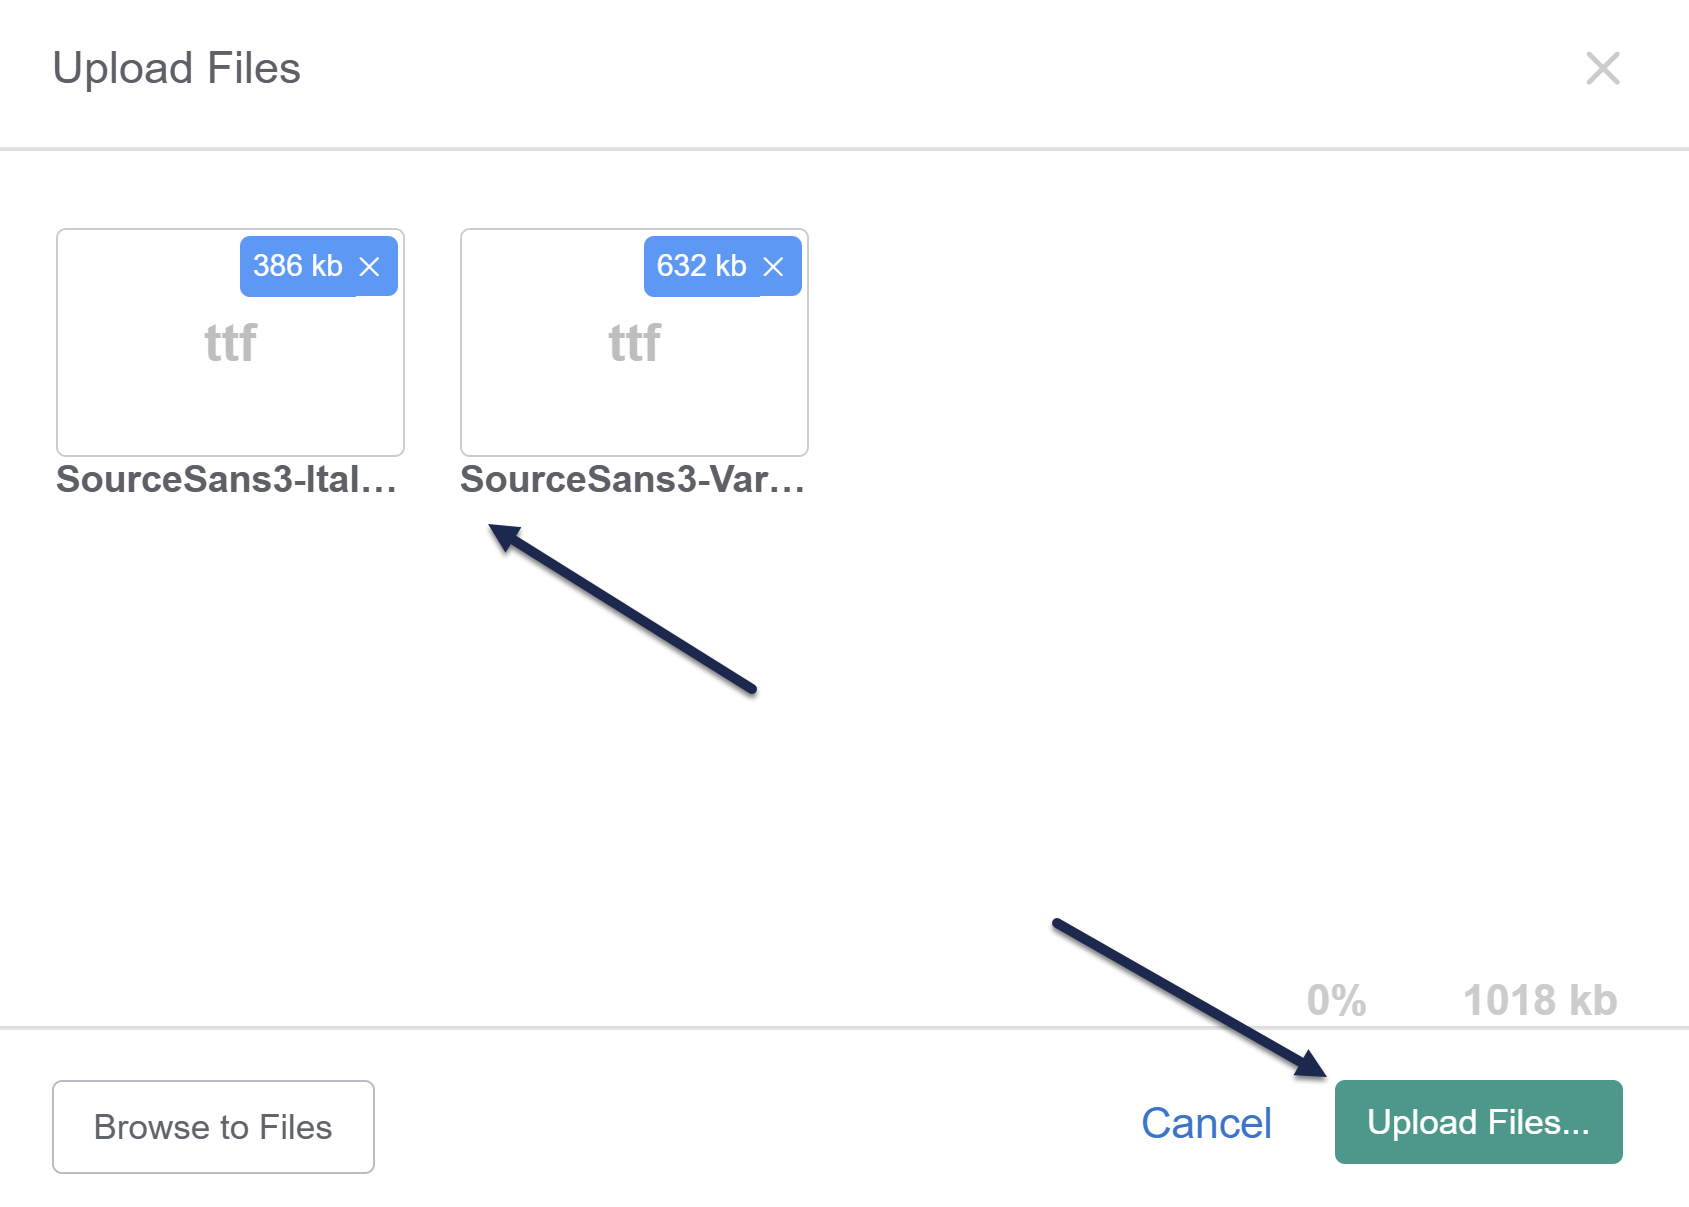 Sample font files for upload for Source Sans 3
 - Copy the URL for each font file and save them somewhere--you'll need them. To get the URL, select the file to open its metadata at the bottom of the page, then select Copy Link to copy the URL to your clipboard. Refer to Find a file's URL for more detailed instructions.
- You can now follow the Add your font instructions.

Add your font
Once you have a URL for your font, add some Custom CSS to ensure your knowledge base uses that font:
- Go to Customize > Style (HTML & CSS).
- In the Customize HTML, CSS, and JS section, select Custom CSS.
- Copy the CSS below and paste it into the top of your Custom CSS:
/* Define custom font */ @font-face { font-family: "My Font Family"; src: url(/app/image/id/677ed16d4b482f10ae044946/n/sourcesans3-variablefont-wght.ttf); } /* Use custom font */ /* For headings level 1-6 */ .documentation-article h1, .cke_editable h1, .documentation-article h2, .cke_editable h2, .documentation-article h3, .cke_editable h3, .documentation-article h4, .cke_editable h4, .documentation-article h5, .cke_editable h5, .documentation-article h6, .cke_editable h6, /* Article body text, lists, and paragraphs */ .hg-article-body, .hg-article-body p, .cke_editable, .cke_editable p, .hg-site .hg-project-name, /* Footer, search results, and other general text */ body, /* Placeholder text, like the search placeholder, contact form, and comments text boxes */ .form-control { font-family: "My Font Family", sans-serif; } - Replace
My Font Familyin rows 4 and 23 with the name of the font you're using. - Replace the src url in row 3 with the URL for the font file:
- If you're using an external URL, enter it in full.
- If you're using a font file stored within KnowledgeOwl, remove the portion before
/app/image/id. So if the file URL looks like this:https://dyzz9obi78pm5.cloudfront.net/app/image/id/5d3f365dec161c2860e78829/n/sourcesanspro-regular.otf
I would use this URL:/app/image/id/5d3f365dec161c2860e78829/n/sourcesanspro-regular.otf
- If you don't want to use this font for all text, adjust the CSS block to remove what you don't want. Use the comments as a guide.
- You can Preview your changes to see how they look.
- Be sure to Save once you've finished making changes.
Refer to Best practices for additional tips.
Best practices
Over the years, we've set up a lot of custom fonts for customers. Here are some of the tricks we recommend following.
Use @font-face rules rather than Custom head
Many tutorials on basic website layout tell you to add custom fonts into the Custom <head>. We don't recommend this in KnowledgeOwl because loading fonts this way does not load them into the Article Editor. If you use Custom <head>, what your content writers and editors will see will be a different font/display than what is displayed on your live knowledge base to your readers.
Test your PDFs and fix fonts that don't load
Some custom fonts won't load in PDFs.
To fix this, choose one of these solutions:
- Leverage an online tool to encode your font in base64.
- Add Custom CSS so that PDFs use a font provided in KnowledgeOwl. To set a different fallback default for PDFs, add something like this to your Custom CSS:
.hg-pdf .hg-article-body,
.hg-pdf .hg-article-body p,
.hg-pdf .documentation-article h1 {
    font-family: sans-serif;
}
Use relative URLs when loading fonts from within KnowledgeOwl
Some font files require the font URL and the website domain to match.
This is why we recommend uploading your font file to KnowledgeOwl and using a relative link in your @font-face rule, for example:
@font-face {
  font-family: Abingdon;
  src: url(/app/image/id/5cc205568e121c6a65ffb076/n/abingdon-regular.otf);
}