Edit an article

Add images and files to articles

Images, screenshots, and sample files can add examples and detail to your documentation. The process of adding files and images to articles differs a little between the Modern Editor and the Legacy Editor.

Modern Editor: files

Select the Upload File icon. You can choose to upload a new file or add an existing file from your library.

Upload file icon

To upload a new file, drag and drop the file into this pop-up, or click anywhere in the Drop file box to browse to a file for upload.

To add an existing file from your library, select the Add from library icon.

Add from Library icon

This will open a pop-up where you can search for files, with the most recent files first. Select the image you want to add, then select Insert File.

Add from Library pop-up

Modern Editor: images

To add images to your articles, select the Add Image icon, or use Ctrl + P.

Add Image button

You can choose to upload a new image, add an image by URL, or add an existing image from your library: 

  • To upload a new image, click the icon with the arrow pointing up. You can drag and drop an image into this pop-up, or click the window to browse to an image for upload.
  • To add an image by URL, click the chain links, add the URL for the image, and select Insert:

    Add from URL icon/pop-up

  • To add an existing image from your library, click the folder icon:

    Add from Library icon

    This will open a pop-up where you can search for files, with the most recent images first. Select the image you'd like to upload, then select Insert File.

    Sample Add from Library pop-up

Legacy Editor: images and files

To add images or files into your articles using our Legacy editor:

  1. Open your article in edit mode.
  2. Click on the Add File / Image button near the top.Screenshot showing the Legacy Editor with a callout to the Add File / Image button
    Legacy Editor Add File / Image button
  3. This will open the Add from Library pop-up, displaying the most recent files first.
    Screenshot showing the Add from Library pop-up that opens once Add File / Image is clicked
    Sample Add from Library pop-up in Legacy Editor
  4. To use an existing file in the library:
    1. If necessary, use the search bar at the top to search for the file you want to add.
    2. Click on the file or image to select it.
    3. Click the Insert File button to insert the file into your article.
      Add from Library search, selection, and button
    4. Select Save once you've added the files or images you want.
  5. To add a new file to your article and the library:
    1. Click the Upload New File button in the lower left corner.
      Upload New File button in lower left
    2. This will open an explorer window; navigate to the file you wish to upload, select it, and click the Open button in the lower right.
      Sample explorer window to find and select the file you want to upload
    3. You'll see the name of the file you selected for upload in the lower left. Make sure it's what you wanted. Then click the Insert File button to insert the file into your article.
      Uploaded file name replaces the Upload File button in lower left
    4. Select Save once you've added the files or images you want.

Edit and update files in articles

Every file you add to an article in your knowledge base is stored in your File Library. If you'd like to update the name, the file itself, or the labels associated with the file, see Editing and updating files in the File Library.

You cannot ever edit the URL of a file.

Working with links to other websites

There are two different ways you can link to websites outside of KnowledgeOwl:

  • URL redirects, in which an entire article or category in your knowledge base redirects to another site
  • links included within the text of an article

This article will walk you through working with both types of links.

URL redirects

In some cases, you may want clicking on an article or category in your knowledge base to redirect someone to an external website, such as your company's employee portal or help desk. To get this behavior, you'll set up the content as a URL redirect. You can set up redirects at the category and article level.

Category URL redirects: New category

You can create a new category from scratch as a URL redirect by checking the URL Redirect option when you create the category. This will prompt you to add the URL you want to redirect the category to:
Sample new category URL redirect configuration

If you click Add and Edit (or save the category and later open it for editing), you'll see the Category Type listed as URL Redirect and two new fields under the Category Description:

  • Redirect URL: the URL this category will redirect to
  • Redirect Link Behavior: determines whether clicking on this article in your knowledge base will open the URL in a new tab or the same tab (default selection is Open link in same tab)

Once you Save, anyone opening this category will be redirected to the URL you've entered in the Redirect URL.

For example, this category will redirect to the KnowledgeOwl pricing page:

Sample category editor with URL redirect configured

Category URL redirects: Update existing category

You can also change any existing category to a URL redirect by changing the Category Type dropdown. If your existing category has subcategories or articles in it, though, this may make it hard for people to navigate to that content.

Article URL redirects

Create the article as you would normally.

In the article editor, check the box under URL Redirect:

URL Redirect option in article editor

This will add two new fields under your Full Article title:

  • Redirect URL: enter the URL you want this article to redirect to here
  • Redirect Link Behavior: determines whether clicking on this article in your knowledge base will open the URL in a new tab or the same tab (default selection is Open link in new tab)

Once you've filled out both fields, click Save.

Sample article set up as URL redirect

Note: As the warning on this page says, any content in the editor will be ignored when a URL redirect has been enabled.

Insert link to another website in your article body

To insert links to other websites, click the Insert Link button or press Ctrl + K on your keyboard:

This will open a pop-up where you can enter the information for your link:

Here's what each field does:

  1. URL (required): the URL of the site you wish to link to
  2. Text (required): the text that will be displayed in the article 
  3. Title (optional): the text that will be displayed when a reader hovers their mouse over the link without clicking it
  4. Name (optional): if you'd like to reference this link as an anchor for quick navigation in your article, or to link from somewhere else
  5. Open in New Tab (optional): when a reader clicks on this link, should they be redirected to it in the current tab, or should they be redirected to a new tab?

Once you've set the traits for your link, click Insert. Your link should now be visible.

Here's a sample link: See how amazing owls are

Tip: If you already have a line of text in your article you want to use for a link, you can highlight that text before clicking the Insert Link option. This will auto-populate the Text field.

Testing links to other websites

Once a link is in an article, you can quickly see what URL it's pointing to:

  • Click anywhere in the text of the link to get a small pop-up menu
  • Click the Open Link option

Editing links to other websites

Once you've already inserted a link, you can edit it:

  • Click anywhere in the text of the link to get a small pop-up menu
  • Click the Edit Link option
  • Make any changes you need and click Update

Removing links to other websites

If you want to remove a link and it's related text, you can simply delete it as you would any other text in an article. But if you'd like to remove the link and keep the text:

  • Click anywhere in the text of the link to get a small pop-up menu
  • Click the Unlink option

Use action links with # or javascript:void(0)

Sometimes, hyperlinks are used to trigger a particular action rather than opening to a given page or resource (such as opening the widget Open widget to a specific article or category.)

If you've imported content from somewhere else, there is a chance you may have added links with this format (or you may have them there on purpose for specific functionality!).

Standard conventions for these types of hyperlinks are to set the link's URL to be either # or javascript:void(0).

The problem

Our editor will usually try to encode that HTML on-save, so instead of getting javascript:void(0), it gets converted to javascript%3Avoid(0), which breaks the link's underlying action.

Solutions

There are two ways to resolve this issue:

  1. Adjust the link URL to use #instead.
    1. This can typically be used in exactly the same way as javascript:void(0) and won't be stripped out by the editor.
  2. Create a snippet that contains the javascript:void(0) text and use that snippet merge code as the URL for these links.

We recommend using the first approach wherever possible, since it is very simple and you can quickly update the URL directly in the article editor. But if you'd like to try the second:

  1. Go to Library > Snippets.
  2. Select the + Create New Snippet button.
  3. When the create snippet page appears give your snippet a Name, like Javascript Void.
  4. Add a snippet Description.
  5. Next to Snippet Content, select Code Editor from the dropdown:
    Image Caption

  6. Copy the code below and paste it into the Snippet Content editor.
    javascript:void(0)
  7. DO NOT toggle the Snippet Content back to WYSIWYG Editor; keep it in Code Editor.
  8. Your final snippet should look something like this:
    Sample Javascript Void snippet
  9. Once you're done making changes, select Create to finish creating your snippet.

With your snippet created, you can use the full merge code as the URL for any hyperlink that you want to use javascript:void(0) in, like this:

Sample hyperlink using the javascriptVoid snippet. Note that the full snippet merge code is used for the URL.


Edit permalinks

When you make changes to a permalink, there are a few considerations:

  • Is the new permalink valid? (Does it avoid duplicating another permalink, contain valid characters, and so on?)
    See below for the direct editor feedback KnowledgeOwl offers to help with this question!
  • If the content is published, should you redirect readers from the old permalink to the new one?
    See our functionality on Old Links to manually or automatically add redirects for previous permalinks!

When you edit a permalink for a category or article, we'll provide some visual feedback as to its validity.

A green checkmark means it's available:

A red exclamation point means it cannot be used. The Save button will be disabled and you'll see a popover to provide more information about why it can't be used.

Here are some examples:

  • Permalink duplicates a permalink that exists somewhere else:
  • Permalink matches one of this article or category's existing old links, which can create an infinite redirect loop:
  • Permalink contains invalid characters:
  • Permalink matches something KO reserves for built-in functionality:

Add anchors within articles

Anchors are a great way to navigate between or link to specific sections in your article, like manually inserting invisible bookmarks. To use anchors, you'll need to:

  1. Create the anchor itself: this is a hyperlink with an id. The id is the URL hash that will be the anchor.
  2. Insert a link pointing to the anchor: For same-page links, add a link that starts with # followed by the id. For links to anchors on other pages, use the full link with # and the id.

So if I create an anchor with id=troubleshooting-tips, the hyperlink I insert to navigate to it would be #troubleshooting-tips.

Thankfully, we have a tool to create the anchor, but you will need to create the hyperlink to jump to it!

If you're thinking of using anchors to create clickable navigation like a table of contents at the top of a long article, consider using a Topic Display category. Or try our Article Table of Contents snippet instead! It will update automatically as you add and edit content.

Creating anchors

To create an anchor in an article:

  1. Put your cursor where you'd like to add the anchor.
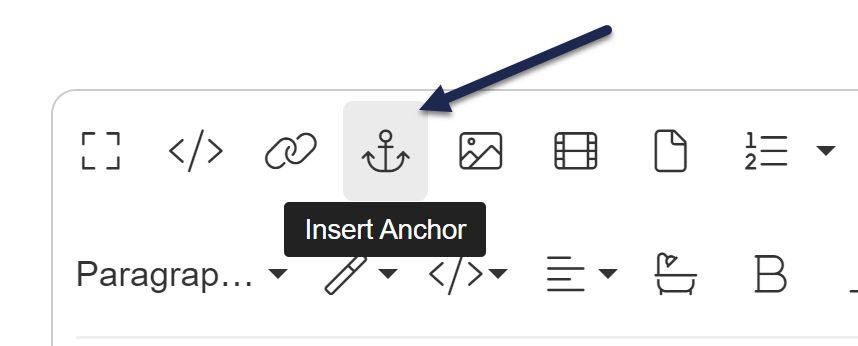
  2. Select the Insert Anchor option (which is in the shape of an anchor, between Insert Link and Insert Image)The Insert Anchor option
  3. This will open a small pop-up where you can type in the Anchor Hash you'd like to use. This is the id for the anchor. It can only contain numbers, letters, -, and _.
  4. Once you've finished adding your anchor hash, select Insert.
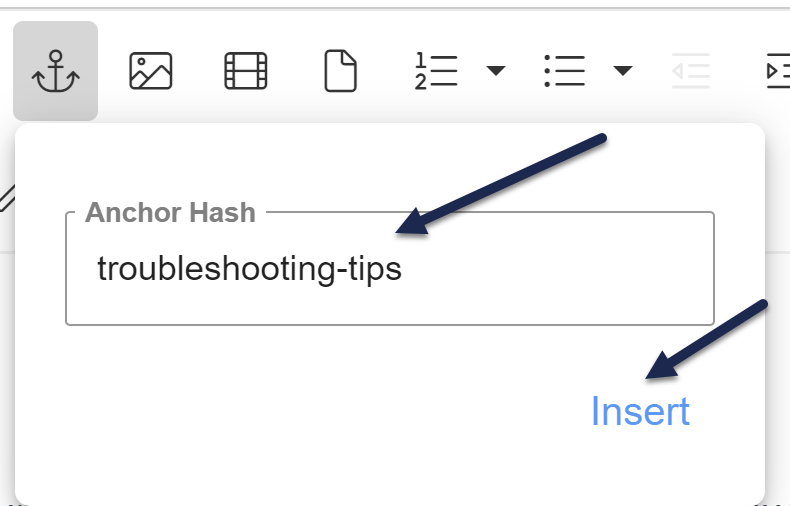
    Sample anchor hash
  5. The editor will display an anchor icon where you added the anchor. You can click on this icon at any time to review or edit the anchor hash, or remove the anchor entirely. (This icon will not be displayed in the live article, only the editor!)
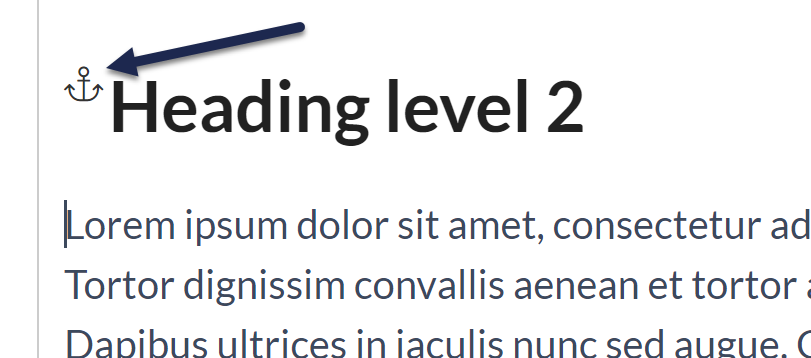
    Sample anchor icon in editor showing there is an anchor here
  6. Select Save.

Once that anchor exists, you can insert links to it either from the same article or from a different article.

Insert a link to an anchor within the same article

  1. Select Insert Link.
  2. Type the anchor hash into the URL field, and add a # in front of it (for example, #troubleshooting-tips).
  3. Type the text you want to display for the link into the Text field (for example, Jump to troubleshooting tips).
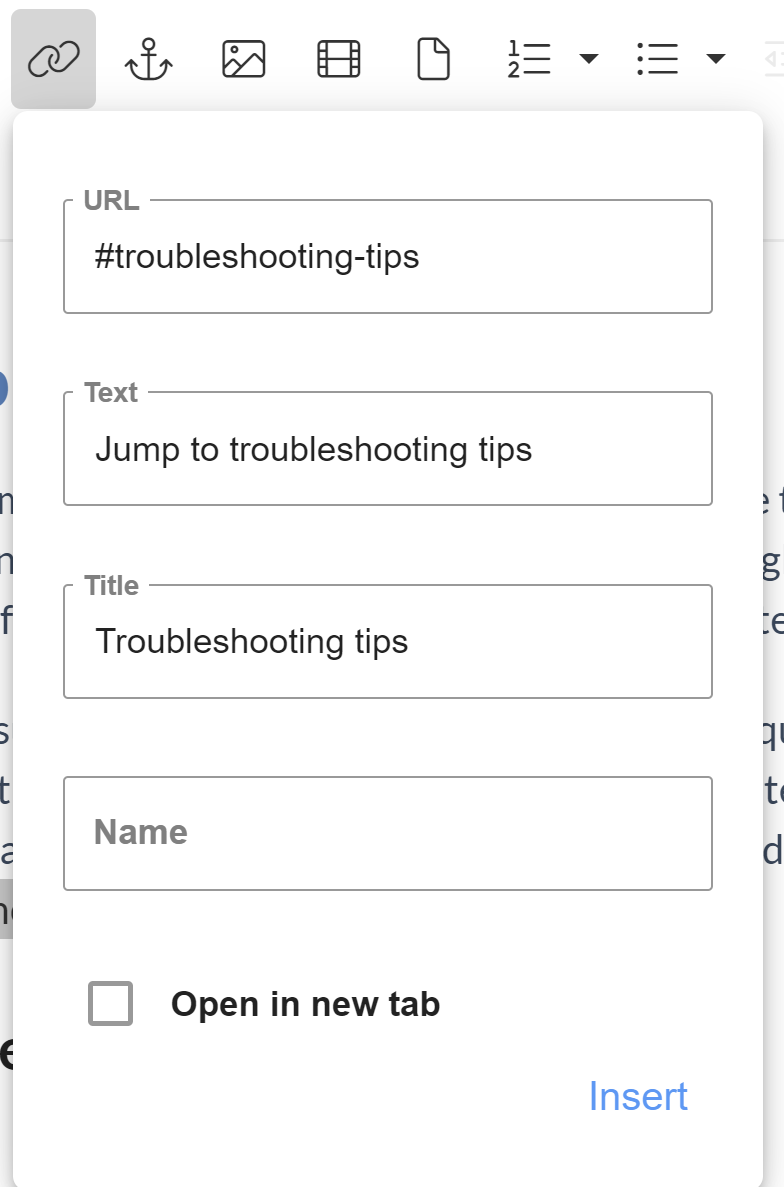
    Sample same-page anchor link
  4. If you'd like any text to display when someone hovers over the text, enter that text into the Title field.
  5. Be sure to Save your changes.

Insert a link to an anchor in another article

Before you start, you'll need to know:

  • The anchor hash
  • The article's name

Once you have this information handy:

  1. Open the article where you want to add the link for editing.
  2. Select Insert Link to Article or Category. See Link to article or category for more information on this feature.
    Insert Link to Article or Category option
  3. Type the name of the article you want to link to and set the link text. Insert the link. 
  4. Then click the link and select Edit Link.
  5. In the URL field you'll see an #badLink field rather than a true URL. This is how we handle references to other KnowledgeOwl articles.
  6. Add a # and the text of the anchor hash (for example, #troubleshooting-tips) after the closing ] bracket for the hg-id: Sample hg-id link with an anchor hash added to the end
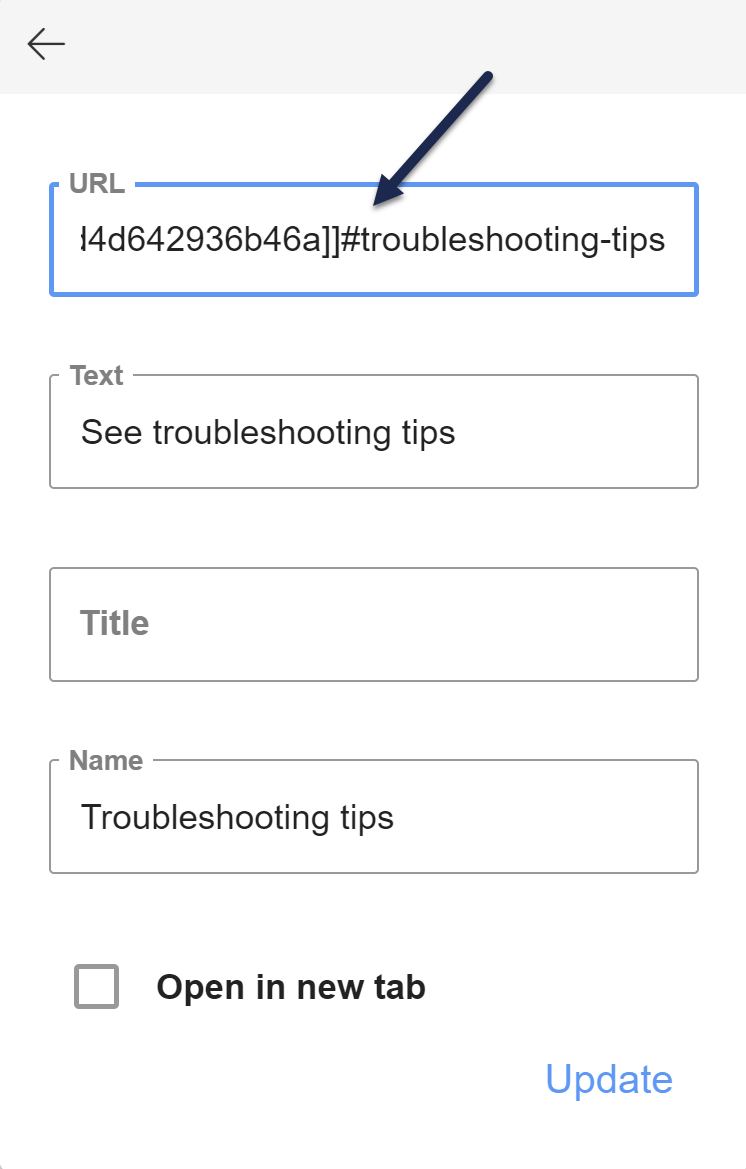
  7. Select Update to save your changes.
  8. Be sure to Save your article once you're done!

Use cases

Most commonly, anchors are used to handle navigation within or between articles. If you're trying to create a set of clickable headings like a table of contents at the top of an article, see Article Table of Contents or Topic display categories. But they can be great for quick navigation back to the beginning of an article, or for getting people directly to an often-used section.

Case one: quick navigation

Linus, our trusty Owl Documentarian, knows that some steps aren't always completed in order. Some articles have multiple headings and subheadings and he wants to be sure that people can easily find referenced steps or information.

For these kinds of articles, inserting a link to an anchor in the same article allows him to quickly cross-reference concepts in the same article and encourage exploratory navigation.

Case three: frequently-referenced information

There are some steps or pieces of information in the middle of an article that Linus finds himself sending to readers often. In his article "Your first 2 weeks as a KnowledgeOwl owl," he finds that owl recruits often need to be reminded to "Always look before you leap." An anchor is a fast and easy way to handle this. Now, instead of telling his owl recruits to go review the entire article, or to scroll to the "Always look before you leap" section, he can give them an explicit link to myknowledgebase/help/first-2-weeks#look-before-you-leap.

So instead of telling you to go find our "It's Owl Good" article and read the bottom about search feedback, we can just send you straight to the feedback section: https://support.knowledgeowl.com/help/its-owl-good#search-feedback

Let us know if you're using anchors in other ways that would make good use cases!

Adding code

Sometimes you may want to display code for your readers to copy and paste from an article. Here's how:

  1. Select Code View in your WYSIWYG editor.
  2. Paste the code you want to display into the code view.
  3. If you're using our default syntax highlighter, wrap the code using the following format: <pre><code data-language="language"></code></pre> tags.
    1. If you're using a custom syntax highlighter, most of those use code class="language-xxxx" or a similar format. Check with the syntax highlighter you're using!
  4. Replace "language" with the language of the code. For example: data-language="javascript"

Note: If you are showing a full script, you will want to HTML encode the opening and closing script tags so that the code does not run as is shown above. Here's an online tool you can use to encode your script.

Here's what the above code looks like when shown in an article:


Adding banners and thumbnails

You can set images as banners or thumbnails for your articles.

To add a file for either field:

  1. Click the appropriate Select button. This opens a pop-up.

  2. In the pop up, search your existing image files in the File Library, or upload a new image file.

  3. Once you've finished adding the files, be sure to Save your article.

Thumbnails and banners do not display automatically. You need to add them to your article template. Refer to Use thumbnails and banner images for more information.

URL redirect article

What if the content you'd like to include in your knowledge base isn't IN your knowledge base? Maybe you'd like to reference the page of another site, or a press packet your PR department has put together.

You can set up both categories and articles as URL redirects. For articles, this means you can administer the article as an article (restrict it to groups, restrict editing to teams, use the article call-outs, assign related articles) but when someone clicks on the title of the article or navigates to the URL, they'll be redirected to the URL you set up, instead.

URL redirects can be great when used with:

  • Links to external sites/files you don't want or can't move into KnowledgeOwl
  • Links to files stored within KnowledgeOwl, where you want the file to open directly (See the KnowledgeOwl W-9 for an example of this type!)
URL redirect articles will not display in the Popular Articles Report or the Published Articles with 0 Views report, since we do not currently track view data for this article type.

You can create a new article as a URL redirect or convert an existing article to be a URL redirect. To do so:

  1. In the URL Redirect section of the righthand menu of the article editor, check the box next to Redirect this article to a different URL.
    The URL Redirect section is located between Article Callouts and Inherited Restrictions
  2. Once checked, this will add a section between the full article title and the editor where you can add the URL you'd like to redirect to:
  3. Now, add the URL you'd like to redirect to.
    1. For external URLs, type or paste the URL you'd like to use into the Redirect URL field. Here, we're redirecting to the International Owl Center's Owl Glossary page:
      Sample external redirect URL
    2. To redirect to a file uploaded to KnowledgeOwl (or to directly upload a file to KnowledgeOwl to redirect to), click the Redirect to File button:
      Click the Redirect to File button
      1. This will open an Add file from Library pop-up where you can select the file you'd like to insert. Browse or search for the file. (Or click Upload New File to add a new one.) Click on it to select it, then click the Insert File button in the lower right.
        Select the file you'd like to redirect to and click Insert File
      2. The URL of the file will be added to the Redirect URL field:
        Redirect article with a KO file URL used
  4. Set whether you'd like the redirect link to open in a new tab or in the same tab. (Open link in new tab is used by default.)
  5. Save your article.
URL redirect articles do not work within topic display categories that use the Override Article Links setting. This is because the override gets applied before the URL redirect.

To switch an article from being a URL redirect to being a normal article, uncheck the "Redirect this article to a different URL" box. Once you save, the article will function normally and display whatever content is in the editor.

Anything included in the body of the article will still be indexed for search even though it won't be displayed. You can use this to your advantage to help provide additional words or terminology to help people find this article!

For example, if you're using a file stored within KnowledgeOwl, the content of that URL redirect file will not automatically be indexed for search. If you'd like it to be:

  • For PDFs, you can insert the PDF into the body of the article using the Upload File option. When you save the article, we'll scrape the contents of the PDF for search.
  • For non-PDF files, you can open the file, copy text in it, and paste that into the article body. You don't have to worry about how weirdly it's formatted, since it's not displayed, but having the text here will help it get indexed for search!

Editor keyboard shortcuts

Keyboard (or keystroke) shortcuts can make your content creation and editing go just a bit faster. You can see a lot of the shortcuts available in the Modern Editor by clicking the ? icon on the lower bar, but we have a few that aren't shown there. Here's a list of the keystroke shortcuts we find the most useful.

Text formatting shortcuts

Formatting
Windows shortcut
Mac shortcut
Paragraph
Ctrl + Alt + 0
Cmd + Option + 0
Header 1
Ctrl + Alt + 1
Cmd + Option + 1
Header 2
Ctrl + Alt + 2
Cmd + Option + 2
Header 3
Ctrl + Alt + 3
Cmd + Option + 3
Header 4
Ctrl + Alt + 4
Cmd + Option + 4
Header 5
Ctrl + Alt + 5
Cmd + Option + 5
Header 6
Ctrl + Alt + 6
Cmd + Option + 6
Preformatted text
Ctrl + Alt + 7
Cmd + Option + 7
Div
Ctrl + Alt + 8
Cmd + Option + 8
Blockquote
Ctrl + Alt + 9
Cmd + Option + 9
Bold
Ctrl + B
Cmd + B
Italics
Ctrl + I
Cmd + I
Underline
Ctrl + U
Cmd + U
Strikethrough
Ctrl + S
Cmd + S
Decrease Indent
Ctrl + [
Cmd + [
Increase Indent
Ctrl + ]
Cmd + ]

Action shortcuts

Action
Windows shortcut
Mac shortcut
Insert link
Ctrl + K
Cmd + K
Insert Image
Ctrl + P
Cmd + P
Ordered List
Ctrl + Shift + 7
Cmd + Shift + 7
Unordered/Bulleted List
Ctrl + Shift + 8
Cmd + Shift + 8
Undo
Ctrl + Z
Cmd + Z
Redo
Ctrl + Shift + Z
Redo


Autosave

When you edit a category or article, autosave creates a backup every 30 seconds.

If you leave without saving your changes, autosave will let you know the next time you come back to the category or article. You'll see a Recover autosave link just above the editor:

The Recover autosave link appears just above the editor

Click this link to open a pop-up where you can choose whether to delete or recover that autosave:

Delete or Recover the auto save.

Once you've recovered the autosave, you'll still need to Save the article to permanently save those changes.

Modern WYSIWYG editor vs legacy editor

Modern editor looking weird? Try a hard refresh: Shift+F5 on a PC and Command+R on a Mac.

The modern WYSIWYG editor is here to stay! If you aren't sure which editor you are using, here's a quick visual guide:


New KnowledgeOwl WYSIWYG Editor
Modern WYSIWYG Editor in KnowledgeOwl


Legacy KnowledgeOwl WYSIWYG Editor
Legacy WYSIWYG Editor in KnowledgeOwl

Is the legacy editor going away?

Not anytime soon. We never want to make any change to negatively impact our customers, and we understand that many of your have grown accustomed to and work effectively in our legacy editor. What's more, the modern editor is not supported in older browsers like Internet Explorer 9, so if you are still using that, you will want to be using the legacy editor until you are able to upgrade to a newer browser.

Will you be upgrading the legacy editor?

We will not be making any enhancements to the legacy editor; all modern WYSIWYG features and functionality will be done solely in the modern editor, which is one of the main reasons we wanted to make the switch. We want to be able to add awesome new features and functionality to the editor based on your feedback, and the modern editor makes it much easier for us to do that.  We will do our best to fix any bugs that arise in the legacy editor, but our focus will be on improving the modern editor moving forward.

What are the benefits of the modern editor?

There's lots to love. In additional to a slick, modern, and clear interface, there's also better support for...

  • Images
    • Copy and paste
    • Add captions
    • Easily center
    • Choose between block (break text) or inline
    • Drag and drop responsive resize
    • Quick styles (rounded corners, circular, thumbnails, or responsive)
    • Quick alt text
  • Video
    • Embed via third-party URL or embed code without going to Source
    • Upload to KO  and embed in HTML5 video
  • Copy and paste
    • Copy and paste images
    • Copy and paste text cleanly from Word or Google Docs
  • Spacing
    • Enter/return now creates line breaks, making it easy to add manual spacing in your content
  • Styles
    • Magic wands allows you to quickly add wells, alerts, leads, and blockquotes
    • Keyboard shortcuts for common tools (more info coming soon!)
  • Tables
    • Responsive tables (percentage widths!)
    • Helpful styles such as condensed, striped, bordered, and highlight on hover

What's not working in the Modern editor?

  • Windows 7 Internet Explorer 11 has some modern editor issues, including the articles not automatically scrolling or resizing and glossary items being added to the end of the articles rather than where you put them. Probably best to use another browser or stick with the legacy editor until we sort this out.
  • Small screens are not showing all the options in the WYSIWYG. If you are on a tablet, smaller laptop, or a phone, the editor probably is missing some thing right now.
  • Anchors are not currently available in the modern editor unless you want to venture into the HTML. Best use the legacy editor for that for now! 
  • Code blocks are not currently available. While you can use the preformatted text block in the paragraph dropdown for code snippets, we do not currently have a code editor with language highlighting.
  • There is currently no tool to add iFrames. Use the legacy editor for now unless you want to dive into the HTML.
  • The link tool is missing an Email option to create mailtos. You can use the legacy editor or specify a email option by prepending "mailto:" to the email address in the URL field, like "mailto:support@knowledgeowl.com".
  • Lists currently do not have the ability to choose list styles; it's currently bullets or numbers. Use the legacy editor or HTML to specify different options. 
  • Some of the legacy inline styles are missing, including keyboard, typewriter, and computer code. 
  • We are missing a div tool to wrap content and specify a class name.
  • You cannot specify your own hex colors in the color picker.
  • There's no find and replace.
  • Some articles from the legacy editor, especially ones with complex tables, don't convert well to the modern editor. If you switch to the modern editor and your articles look wrong, switch back before saving and let us know so we can help you get it converted.

SCAYT Spell Check

The SCAYT option is only for those using the Legacy editor. The Modern editor uses the built-in browser spell-check.

Spell check can be enabled by default under Settings > Basic. The spell checker tool in the editor is SCAYT, which stands for "spell check as you type".

The SCAYT feature allows you to specify a variety of options, including:

  • Ignore All-Caps Words
  • Ignore Domain Names
  • Ignore Words with Mixed Case
  • Ignore Words with Numbers

You can also choose from the following languages:

  • American English (default)
  • Brazilian Portuguese
  • British English
  • Canadian English
  • Canadian French
  • Danish
  • Dutch
  • Finnish
  • French
  • German
  • Greek
  • Italian
  • Latin
  • Norwegian
  • Portuguese
  • Spanish
  • Swedish

It also allows for an author-generated dictionary that is stored in a browser cookie. Once too large for a cookie, you can store the dictionary in your library.  

Most modern browsers have a built in spell checker, which is why the feature is off by default.

Sharing "draft" articles

Except in true lone writer setups, at some point, you're probably going to need to share a draft or in-progress article with other people to get input. These might be other KO editors and admins, but it might just as readily be a Subject Matter Expert (SME), someone in your support or marketing department, or a manager.

There are two ways to quickly share an in-progress article with others. The option you choose depends on two factors:

  • Is the person you're sharing with able to log in to app.knowledgeowl.com and view the article in edit mode?
  • Would you rather they review it in edit mode or view it as it will appear live to readers of the knowledge base?

For other KnowledgeOwl authors

For other KnowledgeOwl authors (i.e. people who log in to app.knowledgeowl.com and can see the content in edit mode):

  1. For the article you want reviewed, copy the app.knowledgeowl.com URL for that article. It will look something like:
    /55aaaaabbbbbbb55555577777
  2. Share that link with the person you'd like to review the article.
  3. Opening that link will take them directly to the article in edit mode; they could then click the Preview button in the upper right to view the article more or less how it will appear live.
    The Preview button lets you view an article in a Draft state as it will appear when published

Preview links are not persistent, so you can't copy the Preview link and share it with another author. Preview mode doesn't support all snippet logic, so if you're using a series of snippets, try the next option.

For reviewers without KnowledgeOwl author access

For reviewers who do not have author accounts at app.knowledgeowl.com, you'll need to share the article as it appears in the live knowledge base. We recommend hiding the article from search and navigation, publishing it, and sharing the direct URL to the article. The advantages to this approach:

  • All reviewers see the article exactly as readers will
  • You don't have to use additional author seats for people who aren't editing content
  • This is basically like a hidden published article. It won't show up in the table of contents or search, and only people with the direct URL can view it.

To share an article this way:

  1. Open the article in edit mode.
  2. Scroll to the Display Settings section and check the boxes next to Exclude from search resultsHide from table of contents, Hide from category landing page, and Hide from widgets. See Display Settings for more information on these options.
    Select the Exclude from search results and Hide from... options
    You can skip this step if you don't mind the article showing up in search, navigation, the table of contents, and the widgets, but most people don't like in-progress articles to show there!
  3. Change the Publishing Status to Published.
  4. Click the Save button.
    Set Publishing Status to Published and click Save
  5. Now your article is published, but hidden from search and navigation. Click the View Article link to the left of the Save button to view the article as it appears in your knowledge base.
    The View Article link appears once an article is published--it will open the live article in a separate tab
  6. This will open the article within the knowledge base in a separate tab. Copy the URL it opens to.
  7. Share that URL with your reviewers.
  8. Once your review is done, you can uncheck any of the Display Settings boxes you checked in Step 2 to make the article publicly visible, Save, and continue with your normal workflow.

Using versions? Versions have a "Make Visible to Groups" option so you can share an inactive version in the live knowledge base for review, too!