
Have an article that might fit in two different categories? Instead of creating those two articles independently, create a Shared content article. The content (body) of the article as well as all versions stay in sync across all shared articles.
Each article can have its own title, restrictions, and callouts. Body edits to any one of the synced articles will update all the others. This is a great way to have the same content appear in multiple categories or even in multiple knowledge bases.
To create a new article synced to an existing article:
- On the Articles page, navigate to the location where you wish to add the article.
- Select + Add, then select Article.
- Select Sync with an existing article. Two additional fields appear.
- Use the dropdown to select the knowledge base where the article you want to sync from is located. If you only have one knowledge base, ignore this dropdown.
- Next, in the Search for an article by its title field, start typing part of the article's name. This is an autosuggest search. As you type, a list of articles matching your type appear.
- Once the article you wish to sync content with appears, select it.
- This will copy the article Title field at the top, based on the synced article's title. You can change this if you wish.
- Once you're done selecting the article and editing the title (if needed), select Create to create the synced article. Your new synced article opens in the article editor in Draft status so you can make any other adjustments. Remember that any changes to the article body will be updated in all shared content articles.
You can always tell if an article is synced to another article by checking for banners in the article editor. Use the links in the banner to quickly navigate to the synced article or knowledge base where it's located.
Refer to Synced articles for more information on how these article types work and how to work with them.
You can set any article in your knowledge base to be a Topic Article.
Topic articles appear in search and the table of contents like any other article. But they can also be embedded within other articles. When they're embedded, topic articles display the body of their article without the title. This is great for content that needs to be displayed as a set of preliminary or introductory steps, hidden from certain groups, and so on.
Create a topic article
The information below varies based on whether you're using our 2026 new editor or old editor.
To figure out which instructions to follow:
- Open any article for editing.
- If the lefthand navigation is collapsed and there's a link near the top of the page to Switch to old editor, follow the New editor documentation.
- If the lefthand navigation is expanded and the top of the editor and the righthand column have a heavier grey background, follow the Old editor documentation.
Here are side-by-side examples of the new editor and the old editor:
 Sample New editor
 Sample Old editor
Try out the new editor
We'd love your feedback on the new editor. To switch to the new editor, open any article for editing and select the Switch to new editor link at the top of the editor.
Create a topic article in new editor
To turn any article in the new editor into a topic article:
- Open the article for editing.
- In the Other section of the righthand column, select anywhere in the Can't be used as a topic article text next to Topic article:
 Select anywhere in the text next to Topic articleThe topic article modal opens.
 - Select Can be used as a topic article:
The modal should automatically close once you make your selection. Select Can be used as a topic article
 - Be sure to Save your article changes.


Create a topic article in old editor
To turn any article in the old editor into a topic article:
- Open the article for editing.
- In the Reuse Flags section, check the Topic Article box:
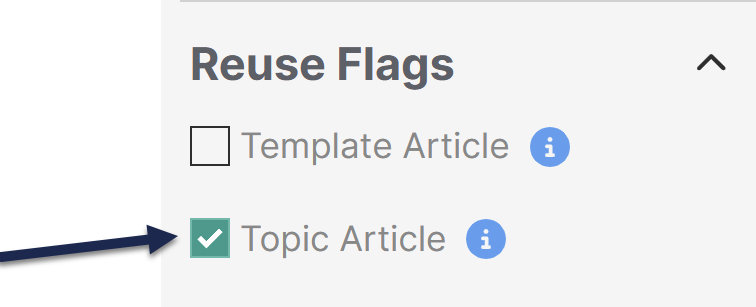 The Topic Article checkbox in the Reuse Flags section of the righthand column
 - Be sure to Save your changes.

Insert a topic article into another article
Once you have one or more topic articles created, insert them in other articles.
The information below varies based on whether you're using our 2026 new editor or old editor.
To figure out which instructions to follow:
- Open any article for editing.
- If the lefthand navigation is collapsed and there's a link near the top of the page to Switch to old editor, follow the New editor documentation.
- If the lefthand navigation is expanded and the top of the editor and the righthand column have a heavier grey background, follow the Old editor documentation.
Here are side-by-side examples of the new editor and the old editor:
Sample New editorSample Old editorTry out the new editor
We'd love your feedback on the new editor. To switch to the new editor, open any article for editing and select the Switch to new editor link at the top of the editor.
Insert a topic article in the new editor
To insert a topic article in the new editor, open the article where you want to add the topic article for editing. Then:
- Select Insert Topic Article (the document icon) in the editor controls or select Insert > Insert topic article:
The Insert topic article body modal opens. Select Insert topic article
 - If you only have one or two topic articles, use the dropdown to select the correct topic article. If you have many topic articles, start typing the name of the topic article you want to insert.
- As you type, the dropdown updates to show topic articles matching your text. Once you find the topic article you want to insert, select it from the list.
- Then select Insert topic article:
- The editor inserts something like this:
[[ko-topic:xxxxx]]. This is your topic article merge code. - Be sure to Save your changes.

The body of your topic article will display in the live article where that merge code appears.
Insert a topic article in the old editor
To insert a topic article in the old editor, open the article where you want to add the topic article for editing. Then:
- Select Insert Topic Article (the document icon) in the editor controls:
 Select Insert Topic Article
The Insert Topic Article Body modal opens. - Start typing the name of the topic article you want to insert.
- As you type, the modal suggests existing topic articles. Once you find the topic article you want to insert, select it from the list.
- Then select Insert Topic Article:
- The editor inserts something like this:
[[ko-topic:xxxxx]]. This is your topic article. - Be sure to Save your changes.
The body of your topic article will now display within the main article.
Tips and tricks for using topic articles
There are a few tricks to using topic articles:
- Search indexing: When a topic article is embedded within another article and a reader searches for text within the topic article, search results only list the topic article, not the article(s) it's embedded in.
- Glossary term highlighting: Automatic highlighting of glossary terms won't work in embedded topic articles; use manually inserted glossary definitions instead.
- Topic article daisy chains: Topic articles embedded within other topic articles will not display wherever that additional topic article is embedded. So, for example:
- Topic Article A contains information on your pricing structure.
- Topic Article B contains information on your subscription plans and discounts. Topic Article A is embedded in Topic Article B. Content should load properly.
- Topic Article B is then embedded in Topic Article C. Topic Article B's own content will load properly, but the content of Topic Article A won't show here.
- If you need to do something like this, consider using a snippet in place of one of these topic articles.
- Version review: If you use versions in your topic article, you cannot mark these as ready for review and view them within the article where the topic article has been embedded--you can only review them within the topic article itself.
- Reader groups: If you restrict your topic articles to reader groups: in your live knowledge base, the topic article will only be visible to readers who belong to the reader group(s).
- Topic articles and pdfs: Topic articles get a somewhat special treatment when they are embedded in other articles and that other content is downloaded to PDF. Since the PDF generator is reader-agnostic, we use this logic:
- If the topic article has no reader group restrictions, it will be included in all PDF downloads.
- If the topic article has reader group restrictions, it will only be included in a PDF download if that content has a matching reader group that is assigned in the Restrict to Groups or Add More Restrictions section. (It cannot depend only on an Inherited Restriction.)
- In all cases, for reader groups to work properly, the topic article must have the reader groups added using the Restrict to Groups checkboxes (if it has no inherited restrictions) OR if it has inherited restrictions, the group is also checked in the Add More Restrictions section.
- If the article where it's embedded has no inherited reader group restrictions, but has Restrict to Groups boxes checked, those checkboxes must match what's used in the topic article.
- If the article where it's embedded has inherited reader group restrictions only, the topic article won't be displayed unless you explicitly add the reader group in the Add More Restrictions section of the article.
- For PDFs where the topic article is not displayed, the text of the topic article will be completely omitted, as when you view the article in the live knowledge base without belonging to the appropriate reader group.
- For example: let's say I have a topic article that is restricted to my Support reader group, and I have embedded it in several articles. Here's what I can expect in the PDF download of those articles:
| Article title | Reader group restrictions | Article PDF result |
|---|---|---|
| How to Fly | None | Topic article not displayed |
| Dare to be Birds | Restricted to Customer reader group in Restrict to Groups | Topic article not displayed |
| It's Owl Good | Restricted to Support reader group in Restrict to Groups (matches my topic article) | Topic article displayed |
| Welcome Owlboard | Inherited restriction to Support reader group | Topic article not displayed |
| Lions and Tigers and Owls | Inherited restriction to Support reader group and restricted to Support reader group in Add More Restrictions (matches my topic article) | Topic article displayed |
As you can see from this information: if the article that you're embedding your topic article within only has inherited reader group restrictions, you have to also explicitly assign those same reader groups to the article in order for the topic article to show up in the article PDF.
Alternative solutions
If you're looking for a solution that's not searchable on its own, but is still a reusable element, consider using snippets instead!
Use cases
There are three main use cases for topic articles.
Reused text
As Linus works on his documentation, he has an article that details a series of steps all of his support agents have to go through every time they access customer information. This set of steps appears at the start of roughly half of his documentation. Rather than copy and paste these steps into every other document or link out to those steps, he can set the login steps article as a Topic article. Then he can insert this topic article into each of the documents where those are preliminary steps.
There are two advantages to this: it saves him time (inserting a topic article takes only a couple seconds) and it keeps the steps more consistent. If the steps change, he only needs to edit the topic article and all the related articles will display those new, updated steps.
Customer-facing documentation with internal-only text
One of the knowledge bases Linus works on is a customer-facing product support knowledge base. But Linus also has a team of customer support agents who reference these documents. He wants to be able to include support-specific steps in those customer-facing documents, without having to create copies or a separate knowledge base.
Topic articles, like all articles, can be shown or hidden based on the Restrict to Groups settings. Linus can create the support-specific steps as a topic article. When he inserts that topic article into his customer-facing documentation, he can put it in the section of the customer documentation it's most relevant for. Customers won't be able to see it, but his support agents will be able to see it.
Video or file libraries
Linus has a knowledge base where each video is its own article, in different categories. But he wants to be able to display a collection of his videos in one place, as a kind of video library. He can set each video article to be a topic article, and then he can create a single longer article and insert each of his video library topic articles into it.
This allows each of his videos to be searchable and navigable independently, but also makes it easy for him to have a consolidated library of all of his resources.
While you can use automatic suggestions for your related articles, for the best control, you'll want to manually add and order them.
The information below varies based on whether you're using our 2026 new editor or old editor.
To figure out which instructions to follow:
- Open any article for editing.
- If the lefthand navigation is collapsed and there's a link near the top of the page to Switch to old editor, follow the New editor documentation.
- If the lefthand navigation is expanded and the top of the editor and the righthand column have a heavier grey background, follow the Old editor documentation.
Here are side-by-side examples of the new editor and the old editor:
Sample New editorSample Old editorTry out the new editor
We'd love your feedback on the new editor. To switch to the new editor, open any article for editing and select the Switch to new editor link at the top of the editor.
Add a Related Article in the new article editor
To add a Related Article in the new article editor:
- Open the article for editing.
- In the Other section of the righthand column, select anywhere in the Add related articles text next to Related articles:
The Related articles modal opens. - Type all or part of a name of an article or category you want to add. The modal suggests articles as you type.
- Select the article or category:
- Be sure to Save the article.
Add a Related Article in the category editor or old article editor
To add a Related Article in the old article editor or in a category:
- Open the article or category for editing.
- In the Related Articles section, select Add article. The Add Related Article modal opens.
- Enterthe article or category title you want to add as a related article. The dropdown autosuggests articles or categories based on what you've typed.
- Select the article or category, then select Add Related Article:
- Be sure to Save the article.
To reorder or remove related articles, follow the instructions in Reorder or remove Related Articles.
Refer to the Related Articles guide for more information on this feature.
When people first start using KnowledgeOwl, to create a link to another article or category, their instinct is to use the Insert Link option and to paste in the full URL of the article or category.
Don't do this! We have a specially built tool to insert links to another article or category within KnowledgeOwl. It dynamically creates the links based on the unique ID of the articles, so you never have to worry about changed permalinks breaking links in your knowledge base. This is the Insert Link to Article or Category option in the editor (square box icon with an arrow pointing diagonally up and to the right):
 Modern Editor
To create a link to another article:
- Open the article for editing.
- Select the Insert Link to Article or Category control (a square icon with an arrow pointing diagonally up and to the right). The Add Link to Article or Category modal opens.
- Start typing in the article or category title you'd like to link to in the Title of Article or Category field. Articles and categories matching what you've typed in will appear below. Select the article you'd like to link to:
- The Link Text, Link Name, and Link Title are automatically set to the article or category's title. Overwrite these if you wisht:
- Link Text is the text that appears in your article. We recommend adjusting this if the article title doesn't make sense in the context of the article, to change capitalization, and so on.
- Link Title is text that displays when someone hovers over the link.
- Link Name is a largely unused link field in modern web design, but may still be used by some accessibility tools. We recommend using identical text for the Link Title and the Link Name.
- Link Text is the text that appears in your article. We recommend adjusting this if the article title doesn't make sense in the context of the article, to change capitalization, and so on.
- By default, links open in the same tab. Set them to open in a new tab by checking the box to Open in new browser tab.
- Once you've finished editing the link, select Add Link to insert the link into your article.
Once inserted, you can edit the hyperlink in the future as you would any other hyperlink.
Identify hyperlinks created using Link to Article or Category
Hyperlinks inserted from Insert Link to Article or Category don't use the normal article URL in the hyperlink. Instead, they use a specially-structured code that references the article ID that begins with hg-id.
If you'd like to check if a hyperlink was created using this method:
- Select the hyperlink to open the hyperlink contextual menu.
- Select Edit Link (the box containing a pencil icon).
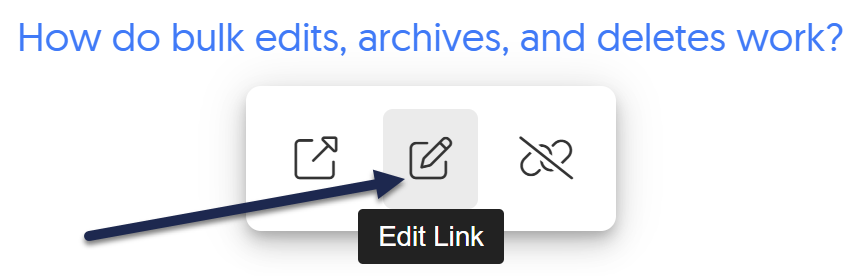 Select Edit Link for the hyperlink
A small modal opens to display the hyperlink's details. - If the hyperlink URL includes
[[hg-id:followed by a long string of letters and numbers, it was created using Link to Article or Category: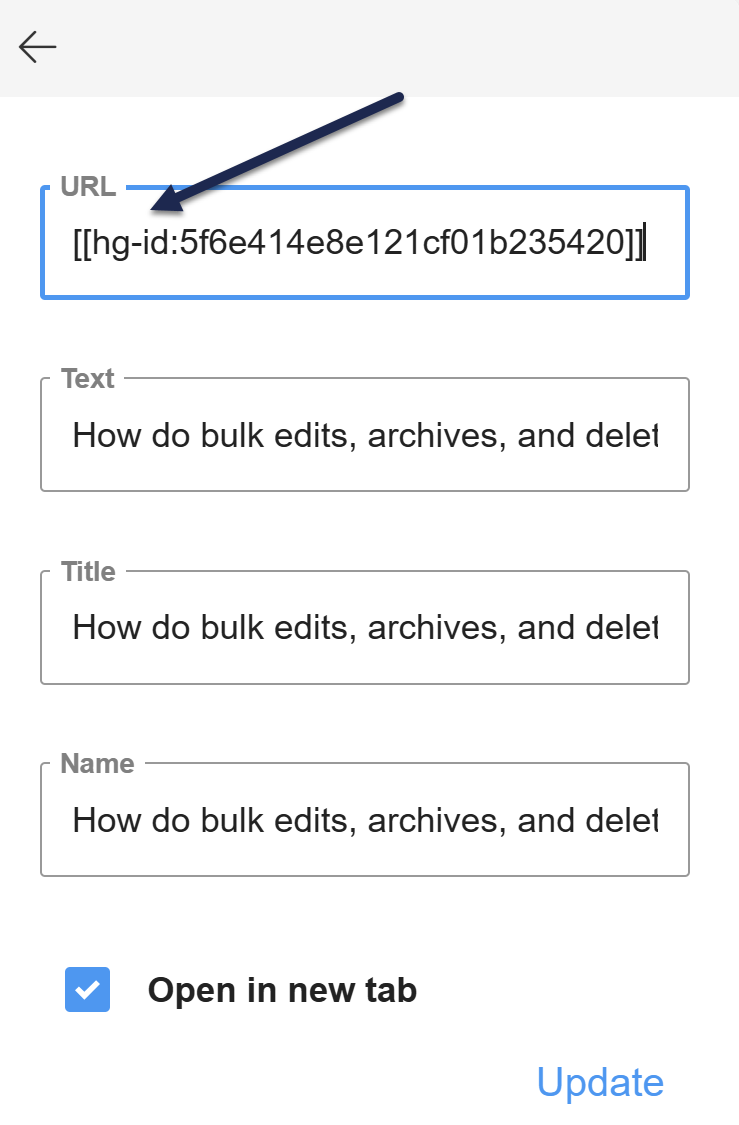 Note the hg-id: in the URL; this URL uses the Link to Article or Category

If you're using the Contextual Help Widget (2.0), you can use the Recommend On Pages section of the old article editor or the Contextual help widget section of the new article editor to set which pages in your website or application this article should be recommended on.
Refer to Use widget for contextual help for more information on setup and usage of this feature. This feature is available on select plans.