
If you're following accessibility best practices, informative images in your documentation should include an Alternative Text (also known as alt text) to provide a short description conveying the essential information presented by the image. This text can be used by screen readers and other assistive devices to help convey the information the image presents.
You can add alternative text in two ways:
- For existing files: From the Files page as the File description. If a File description exists when you insert an image from library, the file description is automatically added as the alt text! Refer to Add a File description for information on working with file descriptions.
- For new files: When you upload the image into your content. Refer to the instructions below.
To add an alternative text to an image in your content:
- Select the image to open the image pop-up menu.
- Select the "i" icon for Alternative Text.
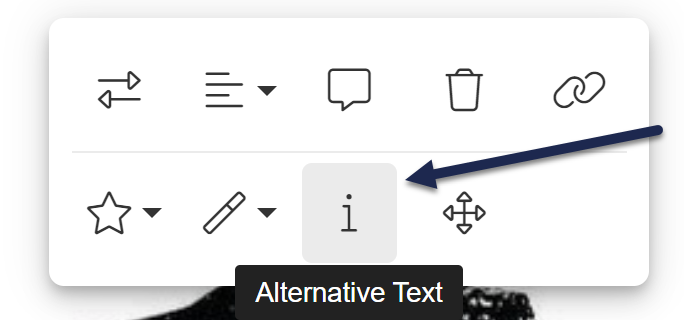 The Alternative Text icon is a small "i" in the image pop-up menu
 - This will open a small pop-up where you can you enter the text description.
- Once you've entered your text description, select Update to apply the text to the image.
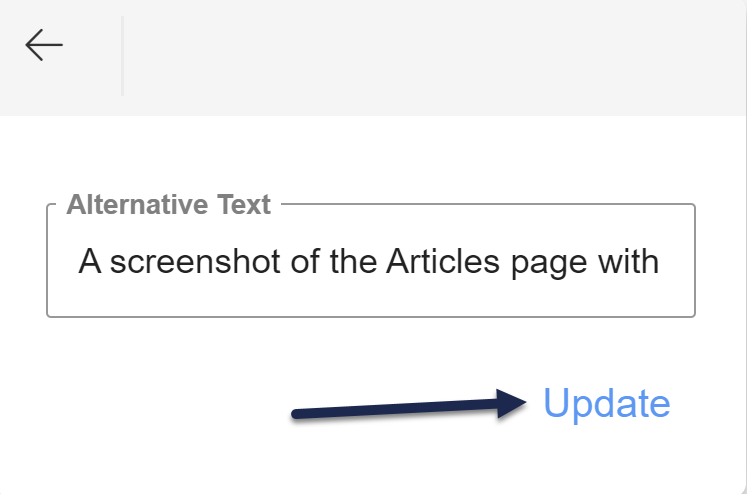 Once you've entered Alternative Text, select "Update" to save the text
 - Be sure to Save your article once you're done!

Level up your alt text skills
Refer to our Image best practices Accessible images section for more detailed guidance.
Remove alt text
Decorative images--those that don't convey information but just add decoration--should include an empty Alternative Text. If your file previously had alt text added or you want to confirm that the alt text is being set as empty, follow these instructions.
- Select the image to open the image pop-up menu.
- Select the "i" icon for Alternative Text.
The Alternative Text icon is a small "i" in the image pop-up menu
- This will open a small pop-up where you can you enter the text description.
- Remove any text that might exist.
- Select Update. This will save an
alt=""behind the scenes, which designates the image as for presentation rather than information. - Be sure to Save your article once you're done!