
If you have an internal knowledge base and use Google Workspace as a shared login, integrate KnowledgeOwl with Google Workspace SSO so your employees can log into the knowledge base using their Google credentials. This feature is available on select plans.
In order to set up your knowledge base to use SSO with Google Workspace (formerly G Suite and/or Google Apps), you'll need to:
- In Google Workspace, create a SAML app for SSO and add some KnowledgeOwl info.
- Update info in KnowledgeOwl to capture that SAML app info.
You'll do the KnowledgeOwl steps in the SAML setup: go to Security and access > Access & SSO and, in the Login methods card, select Set up or Manage next to SAML.
OpenID Connect is also an option
You can also connect Google Workspace using OpenID Connect (OIDC) instead of SAML. Google doesn't send groups over OpenID Connect, so use SAML if you need to assign reader groups from Google. Refer to Configure OpenID Connect SSO.
Step 1: Create a Google SAML app for SSO
When in doubt, check Google's docs for this section
These instructions are adapted from the Google Workspace instructions to create your own custom SAML app in Google Workspace. We don't actively maintain the Google steps of these instructions; when in doubt, review Google's own documentation: Set up your own custom SAML application
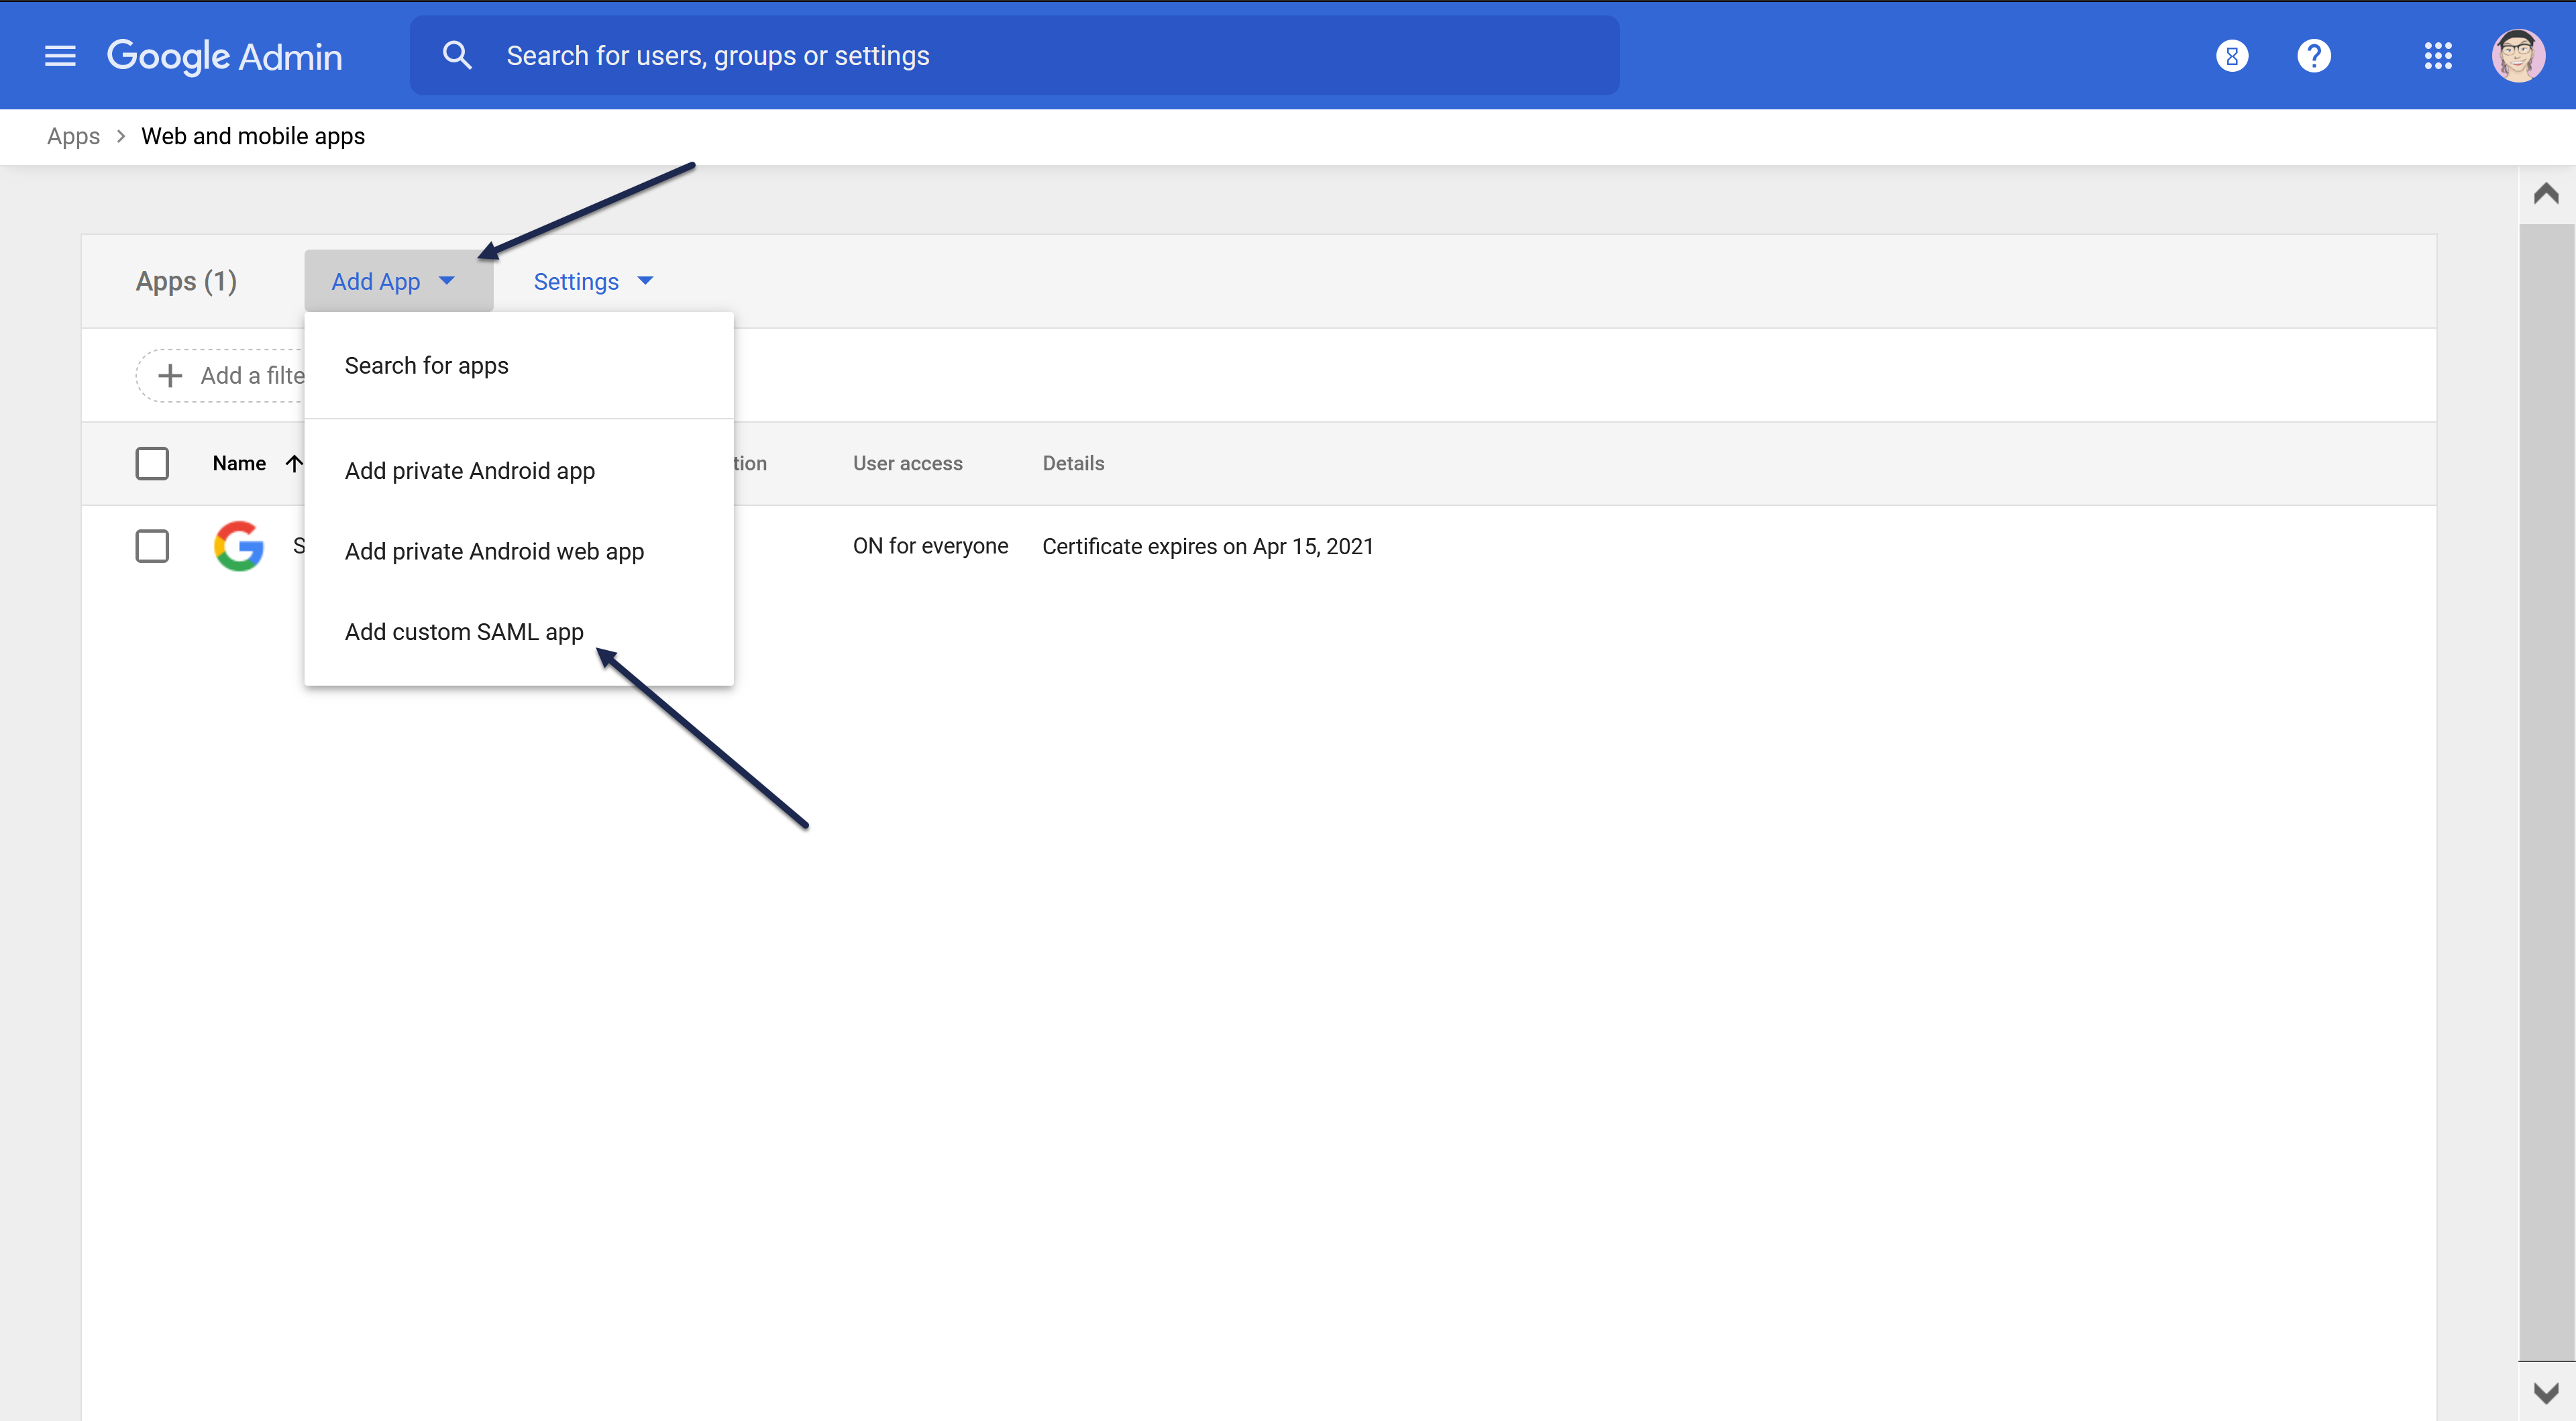
- In Google Workspace Admin Console, go to Apps > Web and mobile apps.
- Select Add app.
- Select Add custom SAML app.
- In the App name field, add a name that will help you identify this SAML app as belonging to your knowledge base, like KnowledgeOwl SSO. Here, we use Sample KB:
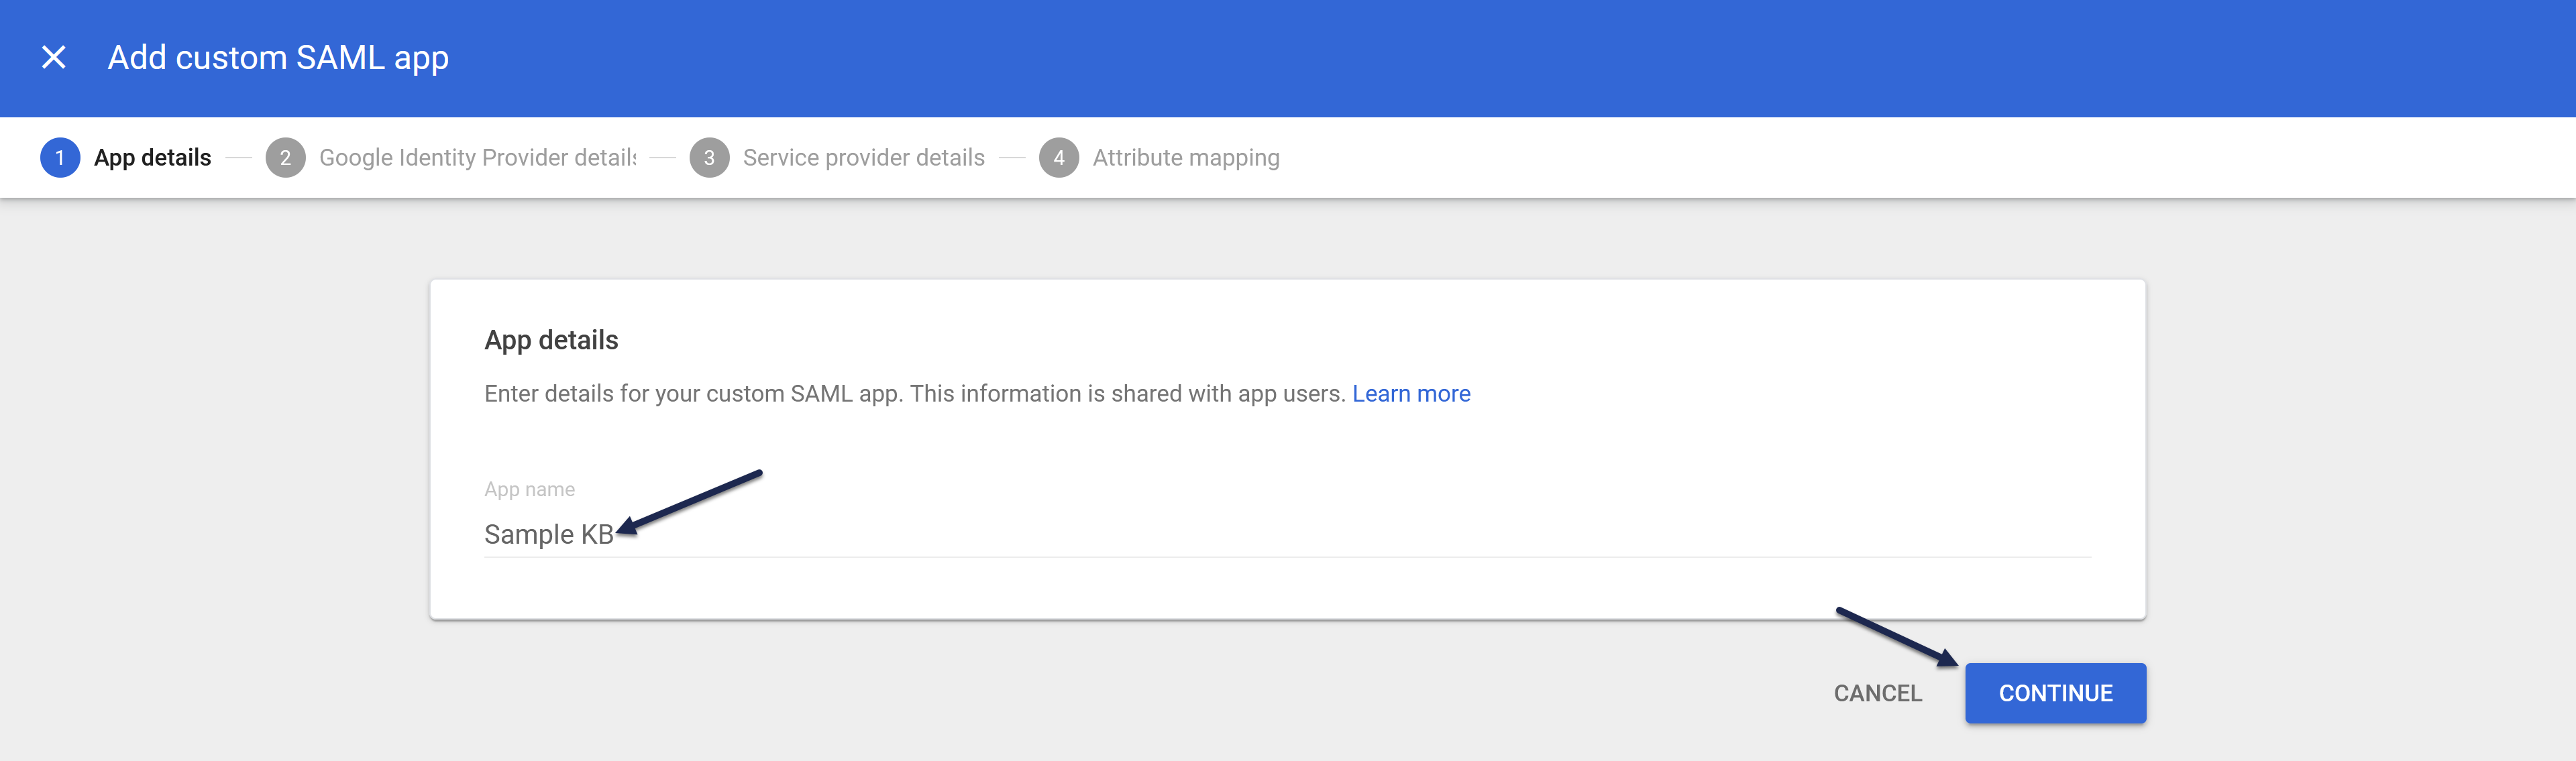
- Then select Continue.
Step 2: Add Google IdP details to KnowledgeOwl and enable SAML SSO
After you complete Step 1 above, Google directs you to the Google Identity Provider detail page. Google offers two options for getting the IdP info KnowledgeOwl will need; we'll use Option 2: Copy the SSO URL, entity ID, and certificate.
For each of these steps, you'll be adding data from Google into KnowledgeOwl, in step 2 of the SAML setup, Connect your identity provider:
- Copy the Google Apps SSO URL and paste it into the KnowledgeOwl IdP login URL.
- Copy the Google Apps Entity ID and paste it into the KnowledgeOwl IdP entity ID.
- Download the Certificate from Google.
- Upload it to KnowledgeOwl by dragging it into the drop zone under IdP certificate, or selecting browse to choose it. The certificate is saved as soon as you upload it.
 SAML step 2, Connect your identity provider
- In KnowledgeOwl, expand step 5, Turn on SAML.
- Select Available.
- Select Save changes in KnowledgeOwl and select Continue in Google.

Step 3: Add your KnowledgeOwl service provider details into Google
This is for the step(s) related to Service Provider Details in the Google instructions.
This references fields in KnowledgeOwl in step 1 of the SAML setup, Give these details to your identity provider:
- Copy the KnowledgeOwl SP login (ACS) URL and paste it into the Google ACS URL field.
- Copy the KnowledgeOwl SP entity ID and paste it into the Google Entity ID field.
- Select EMAIL in the Name ID Format, ensure Name ID is set to Basic Information > Primary email, and select Continue in Google.
Step 4: Attribute mapping and enable Google app
In order for KnowledgeOwl to get information about your readers to properly log them in, you need to map attributes from Google to KnowledgeOwl. There are two required fields and several optional:
- In Google, on the Attribute mapping page, select Add another mapping to map additional attributes.
- Choose Basic Information > Primary Email as the Google Directory attribute and enter
ssoidas the App attribute.Don't forget your SSO ID!
If you don't set up SSO ID, the SAML row on Security and access > Access & SSO displays a warning that it's missing. Refer to Missing SSO ID mapping warning for more info. - Choose Basic Information > Primary Email as the Google Directory attribute and enter
usernameas the App attribute.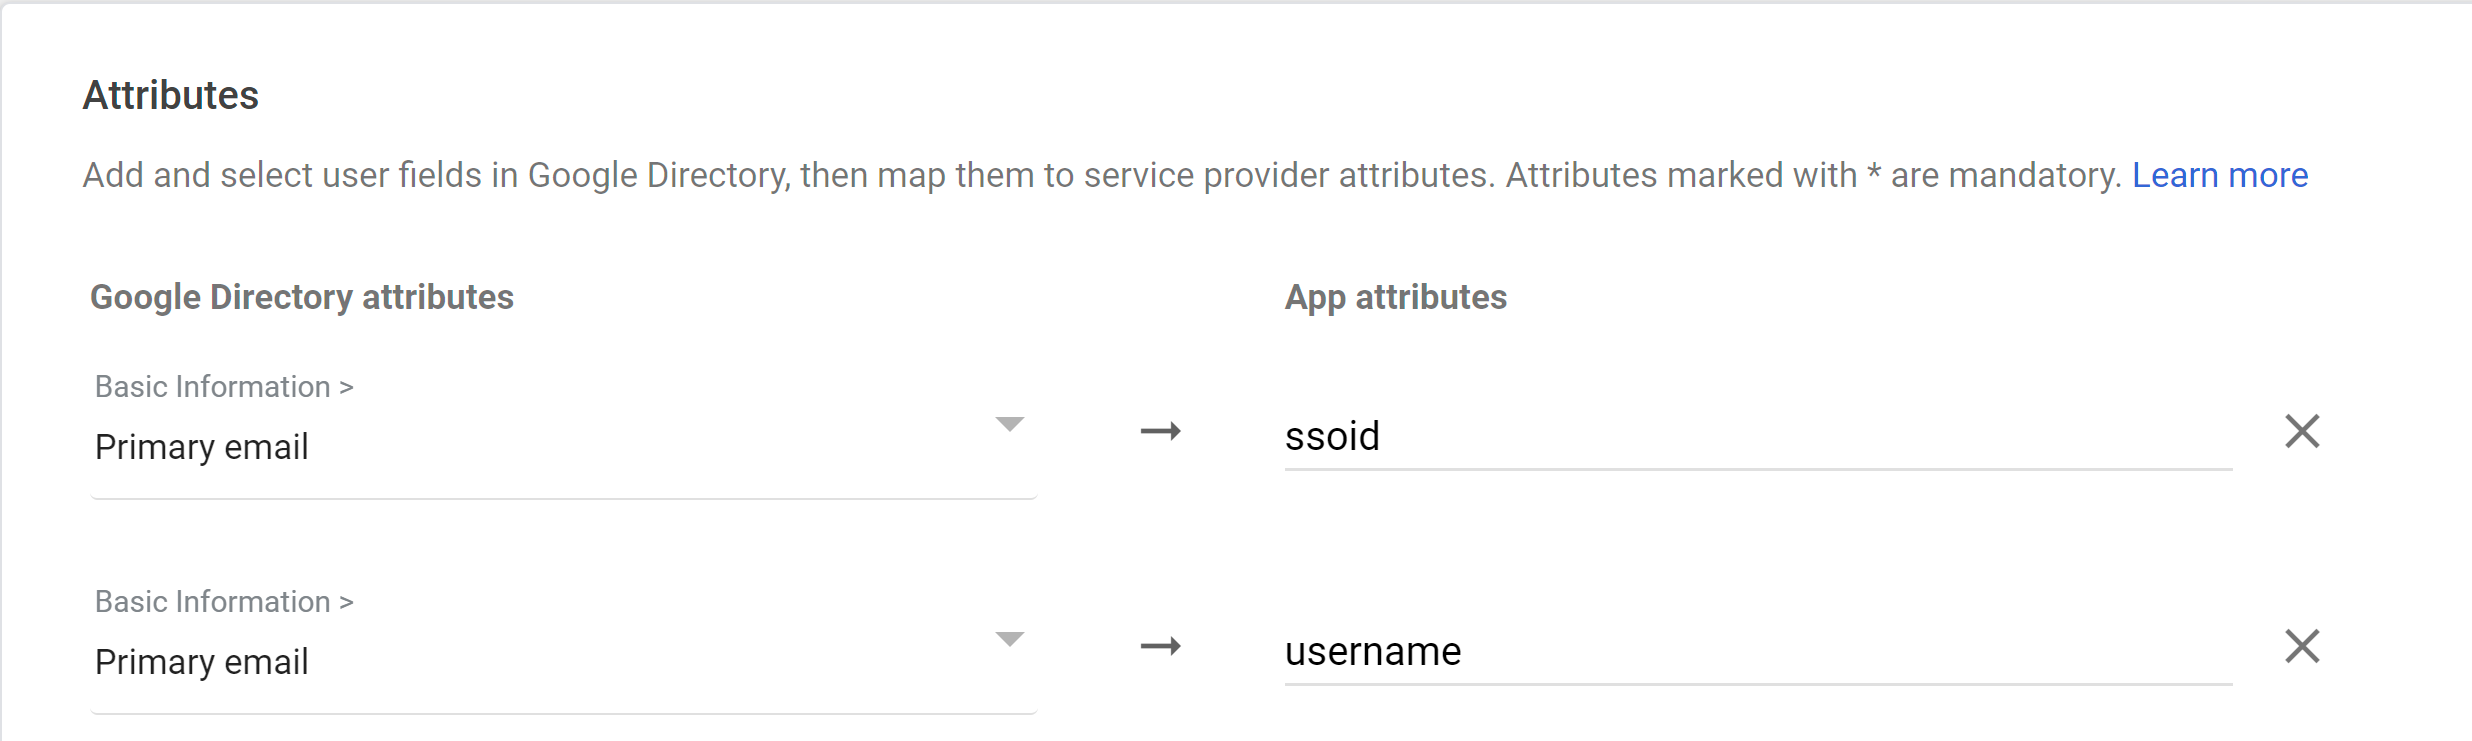
- Repeat for any of the optional attributes you'd like to use:
- First Name
Choose Basic Information > First Name as the Google Directory attribute and enterfirst_nameas the App attribute.
- Last Name
Choose Basic Information > Last Name as the Google Directory attribute and enterlast_nameas the App attribute.
- Picture / Icon
For the Google Directory attribute, choose the category and attribute containing the URL to the user icon (this is usually Custom > Icon but depends on your configuration). Entericonas the App attribute.
- Groups
For the Google Directory attribute, choose the category and attribute containing the group or groups (this is usually Custom > Groups but depends on your configuration). Enterreader_rolesas the App attribute.
- In order for this mapping to work, KnowledgeOwl must have Reader Groups with names that exactly match the group names as they appear in Google.
- To assign a reader to multiple reader groups, put a comma-separate list of groups in the attribute with no spaces after the comma.
- Custom Fields 1-5
If you're using Custom Fields for your readers, use the Google Directory attribute that makes sense, and entercustom_1,custom_2,custom_3,custom_4, orcustom_5for each of the custom fields in the App attributes, respectively.
- First Name
- Select Finish.
- In the KnowledgeOwl SAML setup, expand step 3, Map reader attributes.
- Enter the same values here that you entered in your Google app. Enter ssoid for SSO ID, username for Username / email, first_name for First name, and last_name for Last name. To map Reader icon, Reader groups, or custom fields, select Add field, then enter icon, reader_roles, or custom_1, custom_2, etc., for the respective fields.
- Don't use the Google Workspace fill-in under Identity provider for this setup. It fills in different names (like
emailandfirstName) than the ones above.
- Don't use the Google Workspace fill-in under Identity provider for this setup. It fills in different names (like
- Select Save changes.
Step 5: Enable Google app
With all your mappings set up, it's time to enable your Google app. In Google:
- In Apps > Web apps, select your SAML app.
- Select User access.
- Most likely, you'll want to turn the app ON for everyone; review Google's documentation on enabling it for specific organizational units.
- In an Incognito window or tab, test logging in using the
in KnowledgeOwl and your Google credentials
- If you've set everything up successfully, login will work. If login doesn't work properly, refer to the Troubleshooting section below.
Step 6: Optional KnowledgeOwl settings
With your SAML SSO login working, you can now review three additional options:
- To make it so that SAML SSO is the main access method for your knowledge base, select Required for all readers in SAML step 5, Turn on SAML, and select Save changes. Anyone who isn't logged in is sent straight to SAML. This overrides the Who can read this knowledge base? selection in Security and access > Access & SSO. Other login methods set to Available still work through their login links. Refer to SSO options for different knowledge base setups for more information.
- If you'd like to use the SAML SSO as your primary reader authentication mechanism without requiring it, go to Security and access > Access & SSO. In the Login methods card, set Send readers who aren't logged in to to SAML login and select Save changes. (This option isn't shown when Who can read this knowledge base? is set to Logged-in readers only.) Refer to SSO options for different knowledge base setups for more information.
- If you'd like to use SAML SSO for your authors, refer to Set up SAML SSO for authors.
Troubleshooting Google issues
| Issue | Possible Resolution |
|---|---|
| Error app_not_configured_for_user when trying to log in | This can mean you have the wrong Entity ID in your SAML app for SSO. It should exactly match the SP entity ID in SAML step 1, Give these details to your identity provider. |
| Redirected to the KnowledgeOwl login screen after authentication | This can mean you have the wrong ACS URL in your G Suite SAML app for SSO. It should look like the URL below, with the highlighted section replace with your KnowledgeOwl subdomain: https://gsuite.knowledgeowl.com/help/saml-login. View and customize your subdomain under KB settings > Domain. |
| Redirected to the Google login screen after authentication | This can mean you have an incomplete ACS URL. It might be missing "/help/saml-login". It should look like the link below, with the highlighted portion replaced with your KO subdomain:
https://gsuite.knowledgeowl.com/help/saml-login |
Review Google's SAML app error messages documentation for help with additional errors.