Manage articles

Manage Articles overview

Manage Articles is designed to give you a view of all your articles across all categories and publishing statuses.

You can sort and filter it, and you can export any view in Manage Articles to CSV.

From here, you can open individual articles for editing, delete articles individually or in bulk, and edit articles in bulk.

Let's take a quick look to get oriented. To access your Manage Articles dashboard, go to Knowledge Base > Manage (or, if you're already in the Knowledge Base section, click the Manage option on the left).

A sample Manage Articles view

Here are the main elements and controls:

  1. The filter dropdown at the top allows you to select a filter of articles to display. You can use the dropdown here to select standard filters or any of the custom filters you've created.
  2. Use the Create New Filter button to create a new filter to be added to the filter selector.
  3. You can search the current article list using the search box in the upper right. This will further refine the displayed article list.
  4. Once you select one or more articles using the checkboxes, you can bulk edit the selected articles.
  5. Once you select one or more articles using the checkboxes, you can bulk archive the selected articles.
  6. Once you select one or more articles using the checkboxes, you can bulk delete the selected articles.
  7. You can Export Articles to CSV. This will export all pages of the current article list to a CSV.
  8. The article list will display all articles that meet the selected filter's criteria. You can click on any article here to open it in edit mode in a new tab. You can hover over the category icon to see the category an article is located within.

  9. Clicking any of the underlined column headings will sort the article list by that column:
    • Article Name (sort this from A to Z or Z to A)
    • Last Modified (sorted by date - newest to oldest or oldest to newest)
    • Date Created (sorted by date - newest to oldest or oldest to newest)
  10. By default, Manage Articles will display 20 articles at a time. You can toggle this to 50 or 100.

Using standard Manage filters

Manage Articles includes eight standard filters, which are generally based on Publishing Status:

  • All Non-Deleted: displays all articles without a Deleted status
  • Published: displays all articles with a Published status
  • Draft: displays all articles with a Draft status
  • Rejected Draft: displays all articles with a Rejected Draft status
  • Ready to Publish: displays all articles with a Ready to Publish status
  • Needs Review: displays all articles with a Needs Review status
  • Archived: displays all articles with an Archived status
  • Deleted: displays all articles with a Deleted status in your knowledge base
  • Out of Date: displays all Published or Needs Review articles that haven't been modified in the last six months

To apply one of these filters:

  1. Go to Knowledge Base > Manage.
  2. Click the filter selector and click the filter you'd like applied.

The Standard filters appear first in the filter dropdown list

Creating a custom Manage filter

In addition to the Standard Manage filters, you can also create your own custom Manage filters. To do so:

  1. Go to Knowledge Base > Manage.
  2. Click the Create New Filter button next to the filter selector.
  3. This will open a pop-up where you can select the filter parameters you'd like to use:
    1. The Name you enter is the label that will appear in the filter selector dropdown.
    2. Use the Last Modified filter to display articles last edited or modified within a particular time range.
    3. Use the Created filter to display articles created within a particular time range.
    4. Display articles from a specific category only using the Category filter. This will include all articles directly within the category or within any subcategories of that category.
    5. Display articles that don't have any tags by checking the Exclude all tagged articles box. This is a great way to identify articles that don't have any tags! Once you check this box, the Included Tags and Excluded tags filters disappear.
    6. Display articles that have specific tags using the Included Tags filter. These work great if you've used concepts, subject areas, etc., as article tags.
    7. Display articles that do not have specific tags by adding those tags to the Excluded Tags filter. These work great if you want to find all articles that don't have a "version 1.1" tag, for example.
    8. If you are using article versions, you can check the Versions ready for review checkbox to show only articles that have versions with a ready for review status.
    9. If you are using Required Reading, check the Required reading checkbox to show only articles that are marked as required.
    10. By default, the filter will include articles authored by anyone. You can limit it to articles authored by a specific person or people using the Authors checkboxes.
    11. By default, the filter will include articles restricted to specific author teams or no author teams. You can limit it to articles restricted to specific author teams using the Teams checkboxes.
    12. By default, the filter will include all articles regardless of Publishing Status. You can limit it to specific publishing status(es) using the Status checkboxes.
    13. By default, the filter will include all articles available to all readers and any reader group. You can limit it to articles viewable to only specific reader groups using the Visibility checkboxes.
      1. Public Only will show only articles that have no reader group restrictions whatsoever.
  4. Once you have made your selections, click the Create Filter button in the lower right to create the filter and view its results.

Here is a sample custom filter called Settings > Style which will produce a list of all Published, Needs Review, and Ready to Publish articles that have been assigned the "int: ref-settings-basic" tag and do not have the "int: needs-updated-screenshots" tag:

Editing a custom Manage filter

To view the details of an existing custom filter or edit it:

  1. Go to Knowledge Base > Manage.
  2. Select the filter from the filter dropdown.
  3. Click the Edit Filter button that appears to the right of the filter dropdown.
  4. Make the changes in the filter's details and then click the Update Filter button.

Included Tags vs. Excluded Tags

When you're creating or editing a Manage filter, there are two options for tag filters:

  • Included Tags
  • Excluded Tags

The Included Tags filter makes sure that the filter returns only articles that have (or include) the selected tags. For example, if I add the Included Tag for "subscriptions", I'll get a list of all articles with the subscriptions tag.

The Excluded Tags filter will remove (or exclude) articles that have the selected tags. For example, if I add the Excluded Tag of "settings", I will get all articles that do not have the settings tag.

For both filters, multiple tags are treated as "or" filters:

  • 2 or more tags in Included Tags will give you all articles that have any one of the tags. For example, if I add Included Tags for "subscriptions" and "settings", I'll get all articles that have either (or both) of those tags.
  • 2 or more tags in Excluded Tags will exclude articles that have any one of the tags. For example, if I add Excluded Tags for "needs-updated-screenshots" and "needs content review", I will get all articles that don't have either of those tags.

These two filters are incredibly powerful if you use them together.

For example, let's say that we've made updates to our Basic Settings page. We have a tag in our content for that page ("int: ref-settings-basic"), so I can start off my filter by adding that tag as an Included Tag, to get a list of all articles that reference this page:

Sample filter with single Included TagThis filter basically says: pull all articles with the "int: ref-settings-basic" tag with a status of Needs Review, Published, or Ready to Publish.

It returns 23 articles.

A lot of our content on Basic Settings talks about setting up a private domain, which we use a separate tag for ("int: ref-private-domain"). If we haven't made updates to that functionality, I'd like to filter out all content that references the private domain setup. I can add that tag as an Excluded Tag:

Sample filter with Included Tag and Excluded Tag

This filter now says: pull all articles with the "int: ref-settings-basic" tag, that don't have the "int: ref-private-domain" tag, with a status of Needs Review, Published, or Ready to Publish.

This narrows my list of articles down to 18, which means my content audit can go a lot faster.

I could further refine this to exclude additional tags.

Recommended uses

The Included Tags and Excluded Tags filters become more powerful the more consistently you use tags. They can be a valuable auditing tool if you're using tags for things like:

  • Product version/release information - If you add tags for each version or release, you can pull documentation specific to some versions and not others
  • Policy/procedure version information - If you add tags for specific policies and procedures (or revisions of those policies and procedures), you can pull documentation specific to certain versions of policies or procedures
  • Reviewer/Subject Matter Export (SME) information - If you add tags for designated reviewers or SMEs, you can pull documentation relevant to a specific reviewer or SME

Deleting a custom Manage filter

Deleting a filter will not delete any of the articles in the filter. If you'd like to delete articles, use the checkboxes next to the articles and the Delete option near the top.

To delete a custom Manage filter:

  1. Go to Knowledge Base > Manage.
  2. Select the filter you'd like to delete from the dropdown.

  3. Click on the Edit Filter button.

  4. In the filter details screen, check the box next to Delete Filter.
  5. Then click the Update Filter button.

Your filter will be deleted.


Export the Manage Articles list to CSV

Once you've generated your article list, you can export that list to CSV. There are a few advantages to using the CSV export:

  • CSV exports can act like Excel-styled reports on the number of articles you have, who authored them, and so on.
  • The CSV export includes far more columns and information than the Manage Articles display shows. These can be useful for detailed audits of permissions, publishing status, and so on.
  • CSV exports include the full available article list, so if you have a lot of articles in your filter, you don't have to deal with paging through them.
  • They can provide great master lists to share for audits, updates, reporting, etc.

The CSV export will include all articles that match the current filter, so be sure you have the filter you'd like selected before you begin:

  1. Click the Export Articles to CSV link.
  2. This will slide open a panel with checkboxes for you to select which columns you want to include in your export. Anything with a check will be included.
  3. Once you've made your column selections, click the Export Articles button.
  4. Very large exports may take a couple minutes to generate; most will generate in under two minutes. You'll know when an export has generated because the "Generating Export" message will change to a Download Export link. Click this link to download your CSV:
  5. Click Close in the lower right to collapse the export options.

Tips & tricks

We've seen customers use the Manage Articles CSV export in a variety of ways, but here are some of our favorite tricks:

  • Reviewing knowledge base layout: To review which articles are located in all of your categories, include the Category and Breadcrumbs columns. Category will show you the article's direct parent category; Breadcrumbs will show you the article's full table of contents hierarchy.
  • Auditing reader group restrictions: If you'd like to export a list of articles to review which articles are viewable by certain groups, or which are restricted vs. public, include the Restrict to Groups and the Inherited Group Restrictions columns. Restrict to Groups will show you reader group restrictions that have been assigned to the individual article; Inherited Group Restrictions will show you reader group restrictions that the article has inherited from the category or categories it's in.
  • Viewing articles by clicking a link in the CSV: If you'd like someone who views the CSV to be able to open articles directly from the spreadsheet, consider using the App Edit Link and View Article Link columns. App Edit Link includes the app.knowledgeowl.com link that will open the article in edit mode; View Article Link provides the URL of the article as it appears to your knowledge base readers.
  • Reviewing shared/synchronized content: If you have articles that link and synchronize their content with other articles, consider using the Shared Content Article and Linked to Article columns. Shared Content Article will show links to individual articles in the same knowledge base; Linked to Article will show links to articles in other knowledge bases.
  • Redirects: There are two ways articles can involve redirects: an article can be set up as a URL redirect article (which will take someone to another website entirely, usually used for resources outside of KnowledgeOwl), and redirecting an old article permalink to a new one (useful when you've deleted old articles or renamed them and you want to be sure existing links don't break). You can audit for each of these types of redirects; the Redirect URL field will capture URLs entered for URL redirect articles, and the Old Links field will capture any old links added for the article.

Bulk editing articles in Manage

The Manage Articles > Bulk Edit options

In Manage Articles, You can Bulk Edit articles in a few ways:

  1. Change the Publishing Status for all selected articles (e.g. set these articles to Published status)
  2. Change the Author for all selected articles (e.g. set these articles to have yourself as the author)
  3. Update Article Callouts to add New or Updated callouts to articles. Useful for triggering subscription notification emails and adding New/Updated callouts in your table of contents. This section has four options:
    • Keep Current Status: the article callout field won't be touched during the bulk edit
    • No Status: Overwrites any existing status to set the selected articles to No Status.
    • New Article Status: will assign the New article callout to selected articles. If selected, the status expiration date field will display and will use your knowledge base's default callout expiration, which you can manually override, just as in Article Editor.
      Sample display when the New callout is selected. Note the Status Expiration date field is now shown.
    • Updated Article Status: will assign the Updated article callout to selected articles. If selected, the status expiration date field will display and will use your knowledge base's default callout expiration, which you can manually override, just as in Article Editor.
  4. Change the explicitly-assigned reader group restrictions for all selected articles (e.g. restrict these articles to your "Administrator" reader group; or set these articles to have no reader group restrictions using None)
    1. Keep Current Restrictions will guarantee that no other groups are added to the content, even if boxes below that have been checked.
    2. None will remove any explicitly assigned reader group restrictions from the articles. To remove inherited reader group restrictions, edit the category that's adding the restriction.
    3. Checking boxes next to any of the reader groups in the list will overwrite any reader group restrictions added to the article and replace them with the group(s) who's boxes you've checked.
  5. Set all selected articles to Exclude from search results. (There is no way to bulk edit/undo this to include them, so use with caution!)
  6. Set all selected articles to Hide from table of contents. (There is no way to bulk edit/undo this to show in the table of contents, so use with caution!)
  7. Set all selected articles to Hide from landing page (home or category landing page). (There is no way to bulk edit/undo this to show in the table of contents, so use with caution!)
  8. Set all selected articles to Hide from article lists.  (There is no way to bulk edit/undo this to show in the table of contents, so use with caution!)
  9. Set all the selected articles to be required. This option only displays if Required Reading is enabled. Once selected, a Start Date field will appear so you can set the Start Date of the articles' required status (which is required for it to properly display to readers as required!)
  10. For selected articles with versions marked "Ready for review", activate the next ready for review version.
  11. Add tags to all selected articles (e.g. add "needs-update" tag to these articles) -- Note: this will only add tags to the articles; it will not remove or overwrite any existing tags they might already have

All Bulk Edits to articles will update the Last Modified date for the articles selected.

Our default Editor and Writer roles have permission to bulk edit articles. If you're using a custom author role, that role must have the Article Permission to Edit articles in bulk to bulk edit articles.

To make these kinds of bulk edits:

  1. Go to Knowledge Base > Manage.
  2. Use the checkboxes to select the articles you'd like to edit. To make your selection, you can:
    • Select individual checkboxes to select only specific articles:
      Bulk edit selected articles
    • Select all articles on the page using the checkbox in the header:
      Bulk edit all articles on the current page
    • Select all articles in the current filter view (all pages) by checking the box in the header and clicking the "Select all xxx articles that match the current filter" link. This will select all articles in the view you've selected, regardless of pagination:
      Bulk edit all articles in the current filter When all in filter is selected, you'll see a different message across the top:
  3. With your articles selected, click the Bulk Edit link above the article list.
    Select the articles you'd like to edit and click the Bulk Edit link
  4. Select the changes you'd like to make in the Bulk Edit Articles pop-up.
  5. Click the Update Articles button in the lower right to make the edits.
    Select the bulk edits you'd like to make and click the Update Articles button

    In the screenshot above, I'm setting all the selected articles to a "Needs Review" status and adding the "int: needs-updated-screenshots" tag. The "No Status" in Update Article Callouts will ensure that none of these articles have a New or Updated callout, even if one did previously exist. No other changes will be made.

See How do bulk edits/deletes work? for more information on what you can expect to see during a bulk edit. See Bulk activating "ready for review" versions for more information on using the "Activate next version marked ready for review" option.

Bulk activating "ready for review" versions

As part of the bulk editing options, you can also choose to "Activate next version marked ready for review." If you have a lot of versions that need to go "live" at the same time, as part of a release or policy update, this can be a great way to activate them all at the same time.

We recommend also setting the Updated Article Callout when you activate a new version, but that step is totally optional!

Check the box to Activate next version marked ready for review

To access this screen:

  1. Go to Knowledge Base > Manage.
  2. Check the boxes next to the articles you'd like to bulk activate.
  3. Click the Bulk Edit link to open the pop-up in the screenshot above.
  4. Check the box next to "Activate next version marked ready for review."
  5. Optional: If you use Article callouts, this is a great time to add the Updated article callout, too, as shown in the screenshot above!
  6. Click the Update Articles button to complete the activation.

If you're unfamiliar with bulk editing, see Bulk editing articles in Manage for more details on steps 1-3.

"Activate next version marked ready for review" will check the selected articles. If any of them are articles with multiple versions, and one of those versions is marked as "Ready for review", it will automatically set that version to be active. If the articles have no versions currently ready for review, they'll simply be re-saved.

So, for example, if we bulk edit this article to activate the next version:

Sample versions with one ready to review: version 5.00 will be activated

After the bulk edit completes, version 5.00 will be the current active version.

For the publishing status, that activated version will:

  • If Keep Current Status is used, the version will inherit whatever publishing status the article already has overall.
  • If you've selected a specific publishing status in the bulk edit screen, the newly-activated version will receive that publishing status.

If I have multiple versions marked ready for review, which version gets activated?

If an article has multiple revisions in a ready for review state, such as in this example:

Article with two versions marked ready to review before bulk activation. Version 5.00 will be activated.

The most recent/newest version marked ready for review will be activated and the Ready to Review flag will be removed from the other versions.

So in this example, once we bulk edit to activate versions, version 5.00 will be the current active version and 4.01 will no longer be marked ready to review:

Same article after bulk activation

For this reason, we don't recommend marking multiple versions as ready for review at the same time if you're using bulk activation. If multiple ready versions makes sense for your workflow, we recommend manual activation of versions.

Bulk edit articles to make them required reading

If you have multiple articles you'd like to mark as required, you can either choose to edit them individually or you can use the Bulk Edit feature in Knowledge Base > Manage to mark them all required at once.

All editor

To bulk edit multiple articles to mark them as required:

  1. Go to Knowledge Base > Manage.
  2. If necessary, use a Standard or Custom filter and/or search to display the articles you want to mark as required.
  3. Check the boxes next to the articles you'd like to mark as required.
  4. Click the Bulk Edit link.

  5. In the Bulk Edit Articles pop-up, in the Add Options section, check the box next to Add to required reading.
  6. Once you check the box, a Start Date field will appear. Use the date picker to select the date you'd like to use as the Start Date for the required reading. (When all else fails, use today's date!)

  7. Make any other bulk edit selections you'd like.
  8. Once you've done making your selections, select the Update Articles button to begin the bulk edit.

Once your bulk edit is complete, all articles you selected will be marked as Required and have the Start Date set to whatever date you selected.

You cannot set articles in topic display categories or URL redirect articles to be required. Bulk Edits on these articles won't go through.

For more information on all the options in the Bulk Edit pop-up, see Bulk editing articles in Manage.

Archiving articles in bulk in Manage

Our default Editor and Writer roles have permission to archive articles. If you're using a custom author role, that role must have the Article Permission to Archive articles to bulk archive articles.

You can archive multiple articles at once using Manage Articles. To do so:

  1. Go to Knowledge Base > Manage.
  2. Use a filter or search to display the articles you'd like to archive.
  3. Check the box next to each article you'd like to archive. (Or use the checkbox in the header to select all displayed articles/all articles in filter.)
  4. Click the Archive link just above the article list.
    Select the articles you'd like to archive and then click the Archive link
  5. A confirmation message will appear, identifying how many articles you've selected to archive. Select OK to archive the articles you selected.
    Select OK to confirm the archive

Once the articles are archived, if you need to view or edit them, selected Archived from the filter dropdown at the top to view a full list of archived articles:

Use the Deleted filter to view deleted articles

Deleting articles in bulk in Manage

Our default Editor and Writer roles have permission to delete articles. If you're using a custom author role, that role must have the Article Permission to Delete articles to bulk delete articles.

Deleting an article will:

  • Remove it completely from your live knowledge base (the table of contents, category landing pages, search results, article lists)
  • Show a 404 page when someone navigates to the article's URL, unless you've set up an old link to redirect to a different page.
  • Delete all view data for the article. This data will not be recovered if you recover the article and will disappear from the Popular Articles Report.
  • Remove it from the Articles hierarchy (though you can still find it in the Knowledge Base > Manage > Deleted filter)

You can delete multiple articles at once using Manage Articles. To do so:

  1. Go to Knowledge Base > Manage.
  2. Use a filter or search to display the articles you'd like to delete.
  3. Check the box next to each article you'd like to delete. (Or use the checkbox in the header to select all displayed articles/all articles in filter.)
  4. Click the Delete link just above the article list.
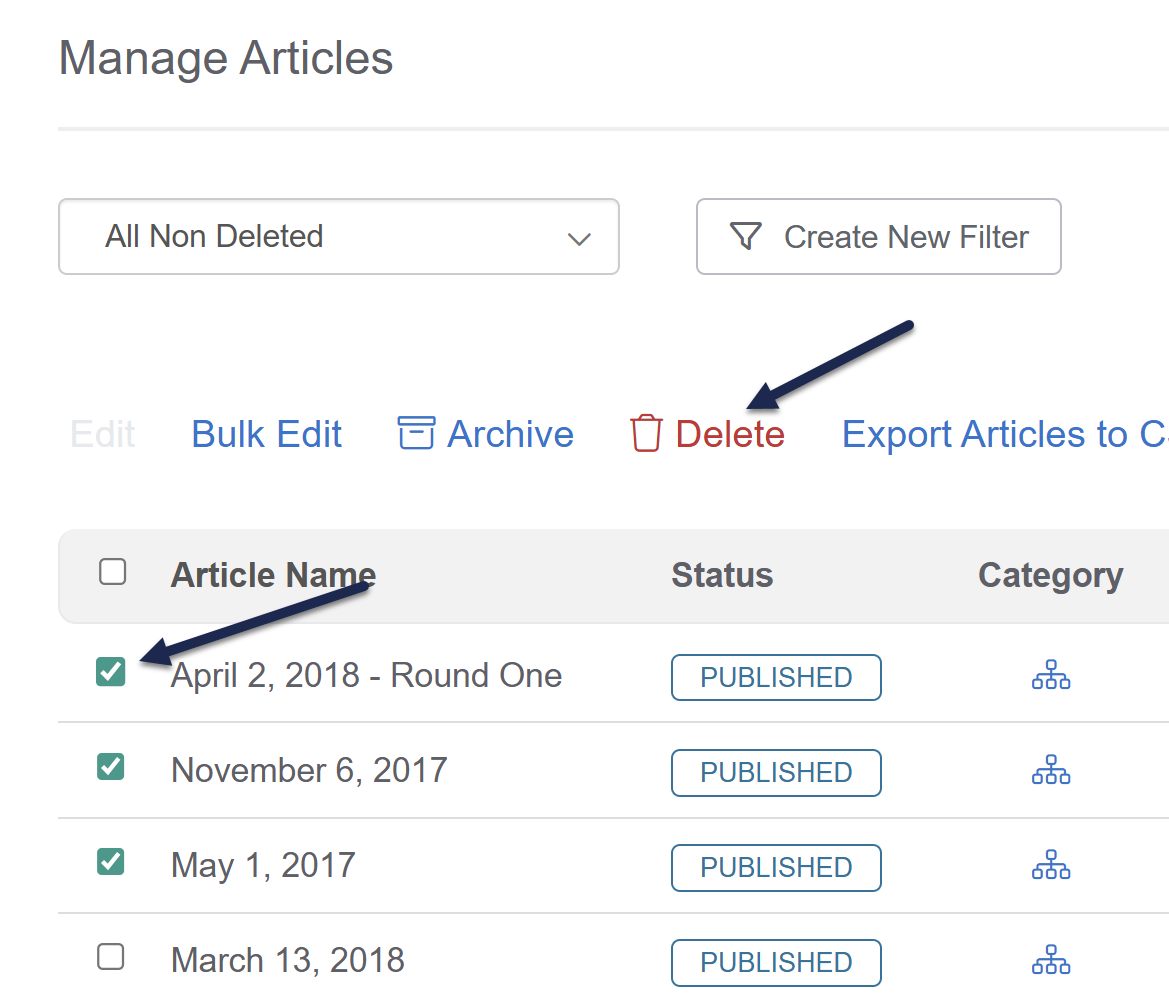
    Select the articles you'd like to delete and then click the Delete link
  5. A confirmation message will appear, identifying how many articles you've selected to delete. Select OK to delete the articles you selected.
    Select OK to confirm the delete

Once the articles are deleted, if you need to view or edit them, selected Deleted from the filter dropdown at the top to view a full list of deleted articles:

Use the Deleted filter to view deleted articles

How do bulk edits, archives, and deletes work?

In Manage Articles, the number of articles being edited, archived, or deleted and the type of bulk edit influence how long a bulk edit takes: 

  • Bulk edits to add tags complete fairly quickly, regardless of how many articles are selected.
  • Selecting articles and clicking the Delete link completes fairly quickly, regardless of how many articles are selected.
  • All other bulk edit types take longer, and will take longer the more articles you've selected.

Bulk edits, archives, and deletes for 9 or fewer articles will load almost instantly, regardless of the type of edit.

For bulk edits, archives, and deletes for 10 or more articles, you'll see a progress bar shown across the top of the screen, letting you know how many articles remain:

Sample initial bulk edit progress bar

The remaining articles countdown will update in chunks of 50 (so in this example starting with 540 articles, it will say 540, 500, 450, etc.), so that you can get a sense for how many articles remain:

The progress bar will countdown in chunks of 50Once the action is complete, the progress bar disappears and a confirmation message is displayed:

A confirmation message displays once the bulk edits are complete

You can only run one bulk edit at a time. With the progress bar present, if you try to select other things, you'll get a warning letting you know a bulk update is in progress:

Sample warning that a bulk update is in-progress

Once the update is complete, you can run another.