
You can publish a new article in one of three ways:
- Edit the article directly to change the Publishing status to Published.
- Bulk edit several articles in Manage to publish them all at once. Refer to Bulk edit articles in Manage for more detailed instructions.
- Schedule the article to be published at a future day/time. This page provides instructions on how to schedule publication.
All undeleted articles have the Schedule option just below the Publishing Status dropdown (old article editor) or visible when you hover over the Status field (new article editor). Any article that is unpublished (doesn't have a publishing status of "Published" or "Needs Review") gives you the option to Schedule > To be published for a future day and time.
Articles that are scheduled for publication will display information about their schedule in the article editor and in the Scheduled Publish Date column of the Manage CSV export. Refer to Generate your CSV export for more information on working with the Manage CSV export.
How publication schedules work
When the day and hour arrives, we run a scheduled job in the background to process your scheduled articles. Typically you'll see the scheduled article publish around :10 or :15 after the hour you selected.
What you can expect to see:
- The Status changes to Published.
- The Published Date is set to the date you scheduled the publication.
- The Last Modified date will update when the schedule has run.
- If you added a New or Updated callout, it will display when the article is published. (As long as the callout's expiration date isn't in the past!)
- If you use webhooks, the
article.statuschangeandarticle.publishwill log the change. - If you use Subscriptions and included a New or Updated callout, this article will be included in your next scheduled subscription notification email. (As long as the callout's expiration date hasn't passed!)
How to schedule an article for publication
The information below varies based on whether you're using our 2026 new editor or old editor.
To figure out which instructions to follow:
- Open any article for editing.
- If the lefthand navigation is collapsed and there's a link near the top of the page to Switch to old editor, follow the New editor documentation.
- If the lefthand navigation is expanded and the top of the editor and the righthand column have a heavier grey background, follow the Old editor documentation.
Here are side-by-side examples of the new editor and the old editor:
 Sample New editor
 Sample Old editor
Try out the new editor
We'd love your feedback on the new editor. To switch to the new editor, open any article for editing and select the Switch to new editor link at the top of the editor.
To schedule an article for publication in the new article editor:
- Open the article you'd like to schedule in the editor.
- Hover over the Status field. A Schedule button appears.
- Select Schedule > To be published:
The Schedule to Publish calendar picker opens.
 Select Schedule > To be published
 - Use the calendar picker to select the day you want to schedule publication on. This must be at least one day in the future, but you can schedule as far out as you'd like. Refer to How to use the schedule calendar picker for more detailed instructions.
-
Use the clock face to select the time you'd like to schedule publication for. Refer to How to use the schedule time picker for more detailed instructions.
- Publication generally occurs 10-15 minutes after the selected hour in the displayed time zone.
- The time zone displayed and used depends on the Timezone set for your knowledge base in KB settings > Basic.
- Once you've finished making your selections, select Save to finalize the schedule.

Once your article is scheduled, the Status section updates to include a Scheduled to be published section:
 Sample Scheduled to be published details
If you need to cancel or edit the schedule in any way, hover over the schedule statement and select the Remove link. Refer to Edit or remove an article's scheduled publication or archival for more information.
To schedule an article for publication in the old article editor:
- Open the article you'd like to schedule in the editor.
- In the upper right, just below the Publishing Status dropdown, select Schedule.
- In the dropdown that appears, select To be published. (You won't see this option if the article is already Published or in a Needs Review status.)
A calendar picker opens where you can complete your scheduling details.
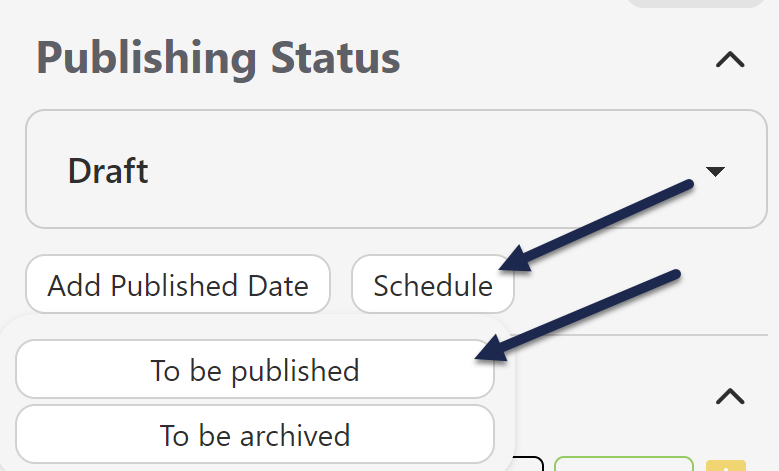 Select Schedule > To be published.
 - Use the calendar picker to select the day you want to schedule publication on. This must be at least one day in the future, but you can schedule as far out as you'd like. Refer to How to use the schedule calendar picker for more detailed instructions.
-
Use the clock face to select the time you'd like to schedule publication for. Refer to How to use the schedule time picker for more detailed instructions.
- Publication generally occurs 10-15 minutes after the selected hour in the displayed time zone.
- The time zone displayed and used depends on the Timezone set for your knowledge base in KB settings > Basic.
- Once you've finished making your selections, select Schedule to finalize the schedule.

Once your schedule is added, the editor displays an alert across the top with the details of the schedule:
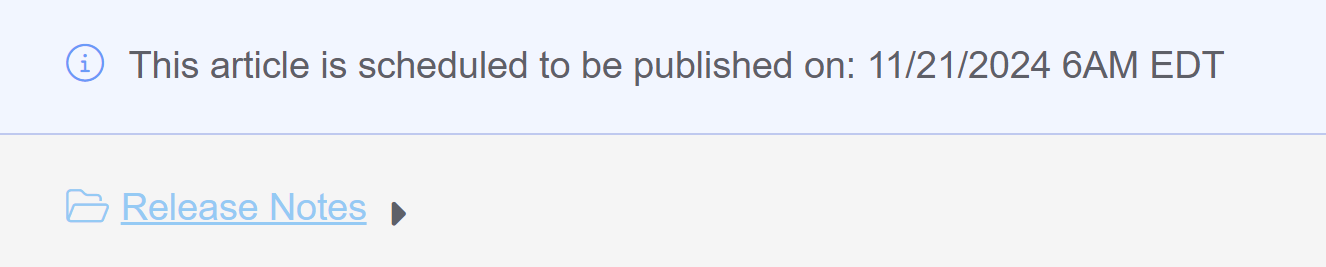 Sample publication statement at the top of the editor
The righthand column also shows the scheduled publication date. If you need to cancel or edit the schedule in any way, remove it by selecting the trashcan icon there. Refer to Edit or remove an article's scheduled publication or archival for more information.
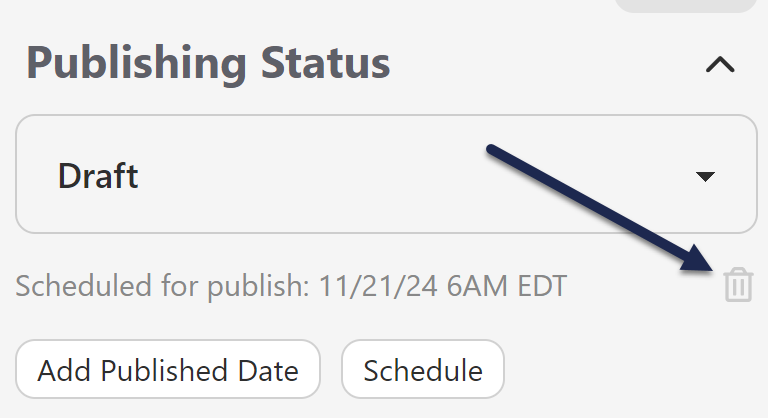 Select the trash can icon next to the Scheduled for publish date to cancel the publication.
How to use the schedule calendar picker
The calendar picker defaults to 12pm on an unselected day in the current month. Select a day in the calendar month to schedule publication for that day.
To switch to a different month, select the <month year> label at the top and then select the month you'd like:
How to use the schedule time picker
The calendar picker defaults to 12:00pm. Select a number on the clock face to select a different hour.
To switch between AM or PM, select the lowercase am or pm in the upper right corner of the picker:
 Select pm in the upper right to toggle to am.