
Use New and Updated callouts to draw your readers' attention to content that is brand-new or recently updated. These callouts add a visual badge with the word "New" or "Updated" in it next to the article title anywhere it's listed or summarized.
New and Updated callouts are displayed:
- To the right of the article title in the table of contents
- Summary counts of New/Updated callouts are also displayed next to the category that contains them to help highlight the callouts even if the table of contents doesn't currently show the article
- To the left of the article title in Article Lists
- To the right of the article title in search results
- To the right of the article title in default category landing pages
New and Updated callouts are automatically removed from articles when their expiration date passes.
Here's a sample of what the callouts look like in either position:
New My article title
My article title Updated
Use callouts with purpose
Refer to When to use New and Updated callouts for some guidance on when to use these callouts!
Add New or Updated callout
The information below varies based on whether you're using our 2026 new editor or old editor.
To figure out which instructions to follow:
- Open any article for editing.
- If the lefthand navigation is collapsed and there's a link near the top of the page to Switch to old editor, follow the New editor documentation.
- If the lefthand navigation is expanded and the top of the editor and the righthand column have a heavier grey background, follow the Old editor documentation.
Here are side-by-side examples of the new editor and the old editor:
 Sample New editor
 Sample Old editor
Try out the new editor
We'd love your feedback on the new editor. To switch to the new editor, open any article for editing and select the Switch to new editor link at the top of the editor.
Add New or Updated callout in new editor
To add a New or Updated callout to an article in the new editor:
- Open your article for editing.
- In the top section of the righthand column, select anywhere in the No callout text next to Callout:
 Select No callout next to Callout
- The callout modal opens.
- Select the type of callout you wish to add (New or Updated).
- An Expiration date displays automatically based on your knowledge base's settings. Once the expiration date passes, the callout is automatically removed from the article. Refer to Change default expiration dates for New/Updated callouts for instructions to change this default expiration date.
- To manually override this date, select anywhere in the date field and use the date picker that appears.
- Be sure to Save your article. The callout is immediately visible to your readers.

Add New or Updated callout in old editor
To add a New or Updated callout to an article in the old editor:
- Open your article for editing.
- Select the callout you want from the Article Callouts menu:
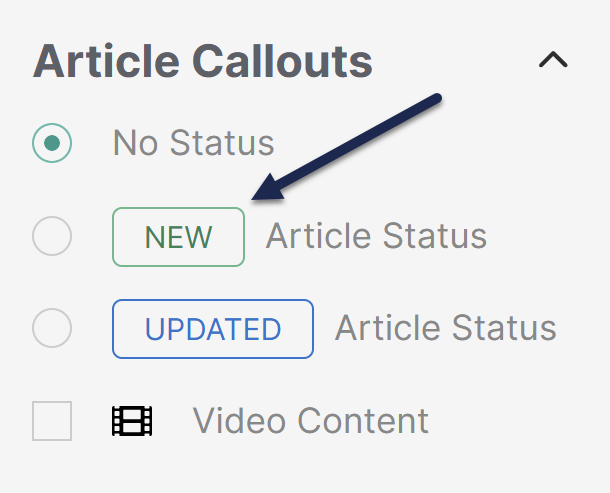 Sample Article Callouts section
- A Status Expiration date displays automatically added based on your knowledge base's settings. Once the status expires, the callout is automatically removed from the article. Refer to Change default expiration dates for New/Updated callouts for instructions to change this default expiration date.
- To manually override this date, select anywhere in the date field and use the date picker that appears.
- Be sure to Save your article. The callout is immediately visible to your readers.

Change default expiration dates for New/Updated callouts
By default, all New and Updated callouts will expire in one week.
To change the default used across your knowledge base:
- Go to KB settings > Article editor.
- Change the Default article callout expiration dropdowns to set the number and measure of your choice. (Options include numbers 1-12 and durations of days, weeks, or months.)
- Save your changes.
This will update the default date that gets generated whenever a callout is added; authors can manually edit/override that date.
When to use New and Updated callouts
While you can use these callouts at any time, here are some general best practices for using them:
- Add a New callout when you first publish an article to draw attention to it.
- Add an Updated callout when you make important changes to an existing article.
- Add New or Updated callouts to trigger Subscription notification emails to your readers. Refer to our Subscription feature overview to learn more about working with subscriptions.