
This tutorial will walk you through setting up an SSO SAML 2.0 Okta app integration with KnowledgeOwl. This feature is available on select plans.
Refer to Okta's instructions
If you have questions on setting up your Okta app, refer to Okta's Application Integration Wizard SAML field reference documentation, as it's more comprehensive than the steps below.
Step 1: Create your Okta SAML 2.0 app
To begin, create a SAML 2.0 app in Okta:
- Sign in to the Okta Admin Console.
- Go to Applications > Applications.
- Select Create App Integration. The Create a new app integration modal opens.
- Select SAML 2.0 as the Sign-in method. The Create SAML Integration page opens to the General Settings tab.
- Enter an App name, like
KnowledgeOwl SAML.
If for some reason you're using Okta without a custom domain, this app name will display at the top of the knowledge base's login page when a user isn't logged in, so you may want to use the name of your knowledge base in that case! - Add your knowledge base logo, if desired. You're welcome to save and use this version of Linus:

If you're using Okta without a custom domain, this logo is also displayed on the Okta login page for your knowledge base. Here's where the logo and name show up on the login page without a custom domain: Sample Okta login without a custom domain. App logo and name display at the top with the "Connecting to [logo] Sign in with your account to access [App name]" text
- Select Next. The app's Configure SAML tab loads and you can move on to Step 2.


Step 2: Add the KnowledgeOwl SP info to your Okta app
Now that your Okta app exists, add the KnowledgeOwl Service Provider (SP) information into it. Keep your Okta app open to the Configure SAML tab. Then:
- In KnowledgeOwl, go to Security and access > Single sign-on. The SAML settings tab loads.
- From the Service provider metadata section, copy the SP login URL.
- Paste this into your Okta app as the Single sign-on URL. Leave the box to Use this for Recipient URL and Destination URL checked.
- In KnowledgeOwl, copy the SP entity ID.
- Paste this into your Okta app as the Audience URI (SP Entity ID).
- Make sure these settings are set this way:
- Default RelayState should be blank.
- Name ID format should be Unspecified.
- Update application username on should be Create and update.
- Set the Application username to Email.
Your completed screen should look something like this: Sample Okta app SAML Settings
 - Select Next. The Feedback tab opens. No actions are required on this page, though if you feel thorough, copy the URL for this page and add it to the Did you find SAML docs for this app? textbox.
- Select Finish. The page updates to display the General tab of your application details.
- If you named your app after your knowledge base and didn't mention KnowledgeOwl, Edit the App Settings to add Application notes for admins to note that this app is
For KnowledgeOwl SAML for [knowledge base name]. Future Okta admins will thank you.

You can now continue with Step 3: Add your Okta IdP details into KnowledgeOwl.
If you have questions on setting any of the Okta app fields, refer to Okta's Application Integration Wizard SAML field reference documentation.
Step 3: Add your Okta IdP details into KnowledgeOwl
Now that the KnowledgeOwl info is in Okta, we need to add the Okta details into KnowledgeOwl.
For this step, in KnowledgeOwl in Security and access > Single sign-on > SAML settings, go to the Identity provider metadata section:
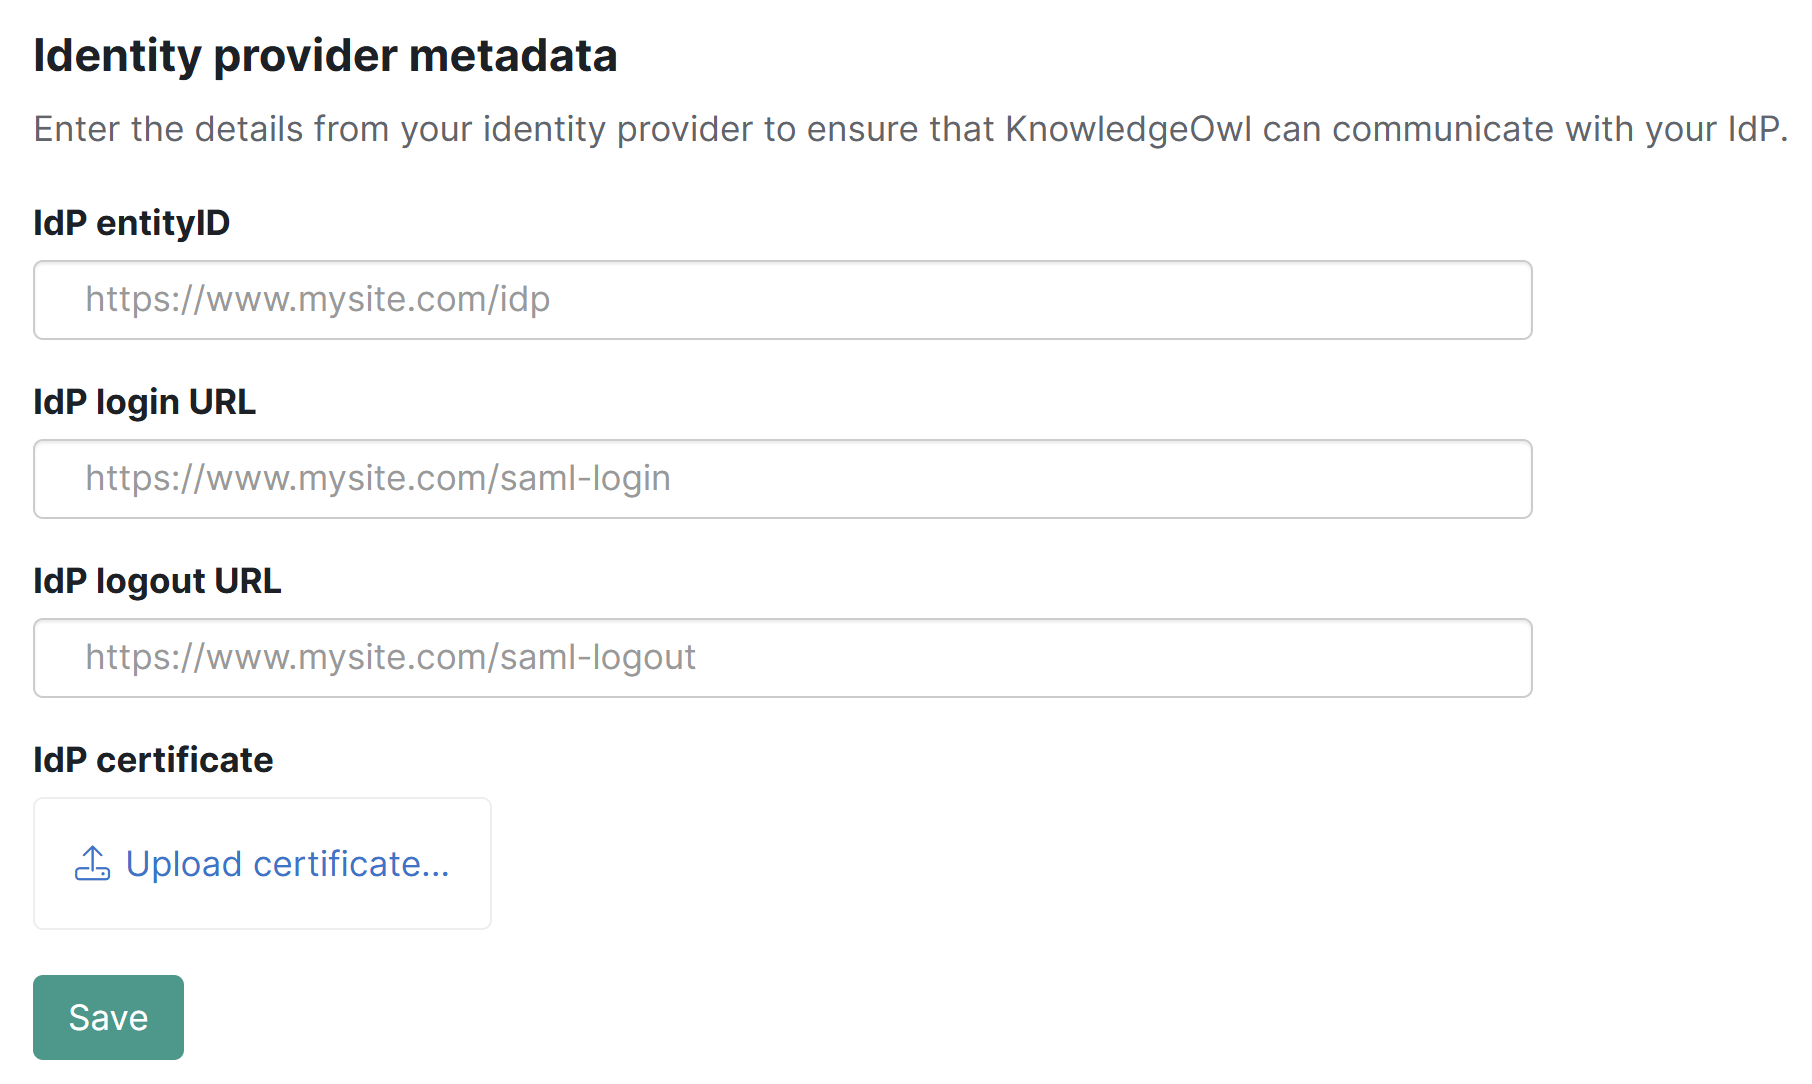 Sample initial Identity provider metadata section
From your Okta application details:
- Open the Sign On tab.
- In the SAML 2.0 card, select More details.
- Copy the Sign on URL.
- In KnowledgeOwl, in Security and access > Single sign-on > SAML settings > Identity provider metadata, paste the Sign on URL you copied into the IdP login URL.
- Copy the Okta Sign out URL and paste it into KnowledgeOwl as the IdP logout URL.
- Copy the Okta Issuer and paste it into KnowledgeOwl as the IdP entityID.
 Sample More details section in Okta Sign On tab
 - In Okta, Download the Signing Certificate.
- Find the certificate in your downloads and use your preferred method to change the file extension from .cert to .crt. (in many cases, if you show the file extension in the name, renaming it from .cert to .crt works).
- In KnowledgeOwl, still in the Identity provider metadata section, select the Upload certificate option in the IdP certificate subsection, located just under the IdP URL fields:
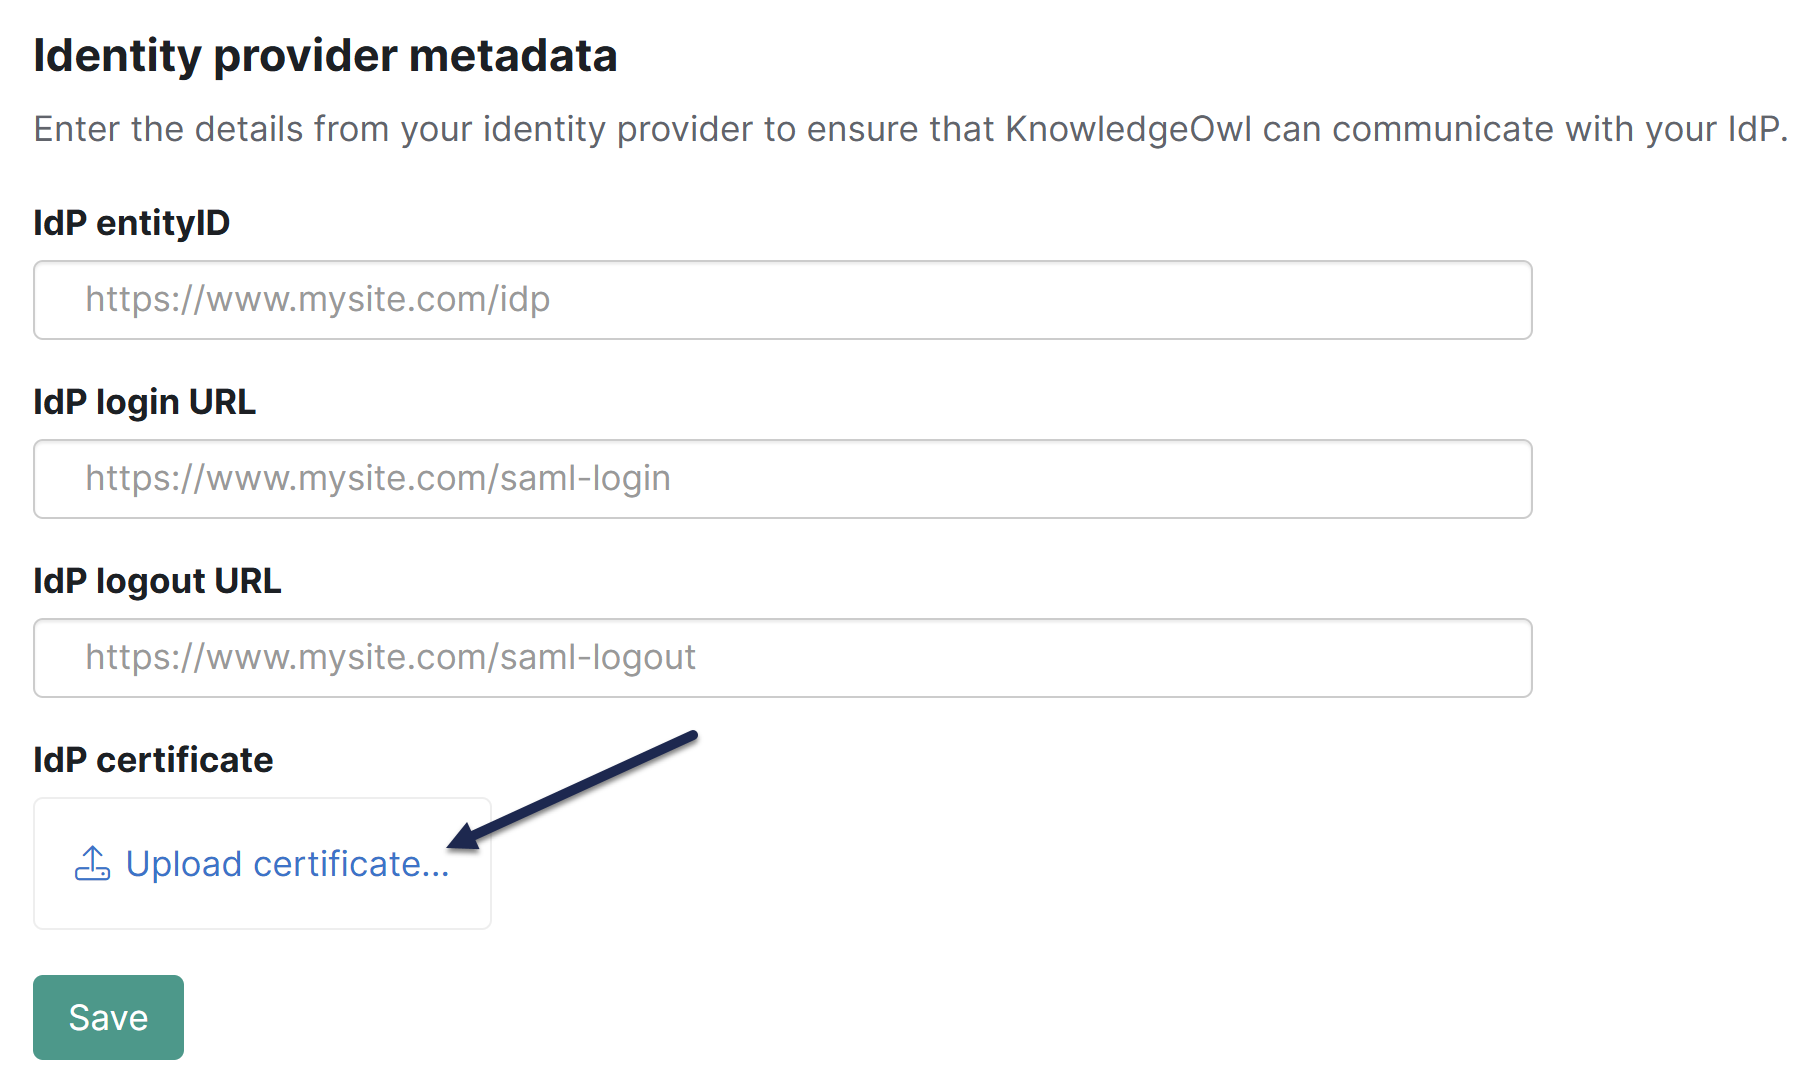 Select Upload certificate... under IdP certificate
 - A file browsing window opens where you can select the .crt file to upload. Once you upload, a modal confirms if the certificate was updated successfully.
- Once you select OK to close that modal, the IdP certificate section displays the certificate's details. For example:
 Sample Okta Identity provider metadata configuration, including certificate
 - Be sure to Save your changes in KnowledgeOwl.


Now you're set to tackle Step 4: Select Okta attributes to pass to KnowledgeOwl.
Step 4: Select Okta attributes to pass to KnowledgeOwl
Select which attributes you want to pass from Okta over to KnowledgeOwl:
- In Okta, go to your application detail's Sign On tab.
- In the Attribute statements section, select Add expression. The Add expression modal opens.
- Enter a Name for your expression, like
email. - Enter an expression for your attribute, like
user.profile.email. - Be sure to Save your changes.
Refer to your Okta Admin Console Directory > Profile Editor > User to view a list of all user attributes and how to reference them.
For a standard Okta setup, we recommend passing along these attributes or their equivalent as a minimum:
| Name | Expression |
|---|---|
| |
| firstName | |
| lastName | |
You may want to pass along additional attributes if you're using reader signup custom fields or groups. For example, many authors will pass a profile field like user.profile.department into the Reader groups field. (You'll need to make sure you have your departments already created in KnowledgeOwl as reader groups for this assignment to work.) Refer to Reader Groups for more information; refer to Add custom fields to the reader signup form for more information on using custom fields.
Next, we'll map those attributes in KnowledgeOwl.
Step 5: Map Okta SAML attributes to fields in KnowledgeOwl
Now that you've made these user profile attributes available to your Okta KnowledgeOwl SAML app, map these attributes to the correct fields in KnowledgeOwl:
- In KnowledgeOwl, go to Security and access > Single sign-on.
- Open the SAML attribute map tab.
- Map the fields in your Okta attribute list to the corresponding fields in KnowledgeOwl using the exact same names you used in Okta. For example, if you used the default setup above, enter
emailfor both SSO ID and Username / email,firstNamefor First name, andlastNamefor Last name.SSO ID and email address are required
To successfully log a reader in through SAML SSO, you must map a unique ID (SSO ID) and an email address. The reader's email address can be used as both the SSO ID and their email address.- If you cannot directly map an IdP attribute to a KnowledgeOwl reader attribute, use Custom attribute map rules to do some mappings or logic for you.
- Be sure to Save your changes.
Now we're ready to enable SAML SSO in KnowledgeOwl and test the setup!
Step 6: Enable SAML SSO in KnowledgeOwl
Congratulations, the moment has arrived: we can now enable SAML SSO:
- Go to Security and access > Single sign-on.
- Be sure you're in the SAML settings tab.
- In the SAML settings section, select Enable SAML SSO reader logins.
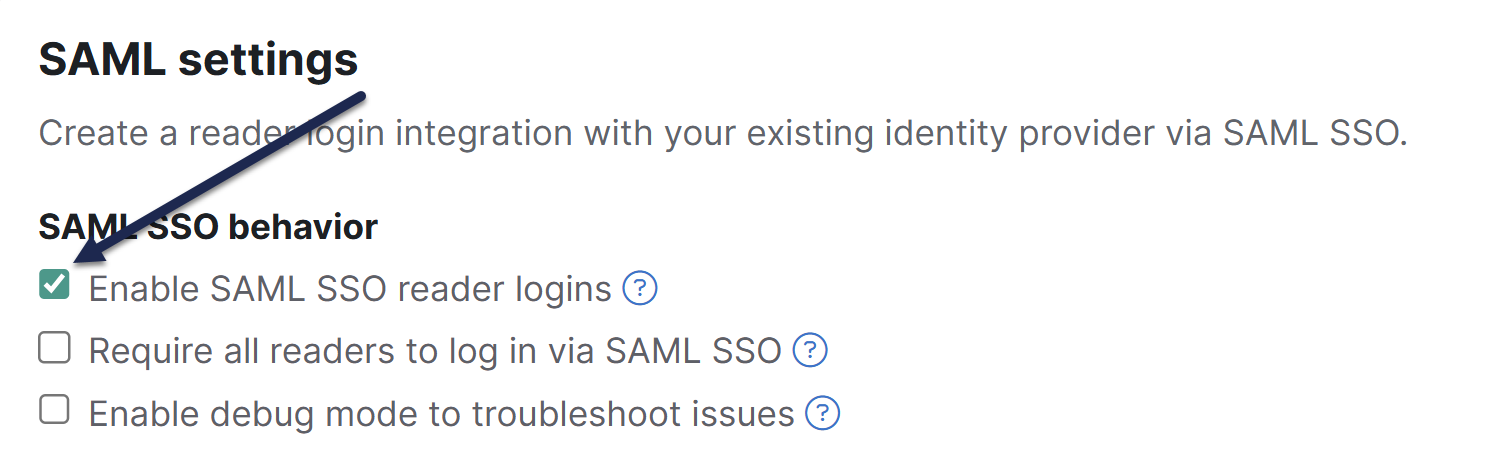 Select Enable SAML SSO reader logins
 - Be sure to Save your changes.
- You can now test the SAML SSO setup. In your Okta app, assign individual users or groups of users to your Okta app in its Assignments tab. Refer to Okta Support's How to Assign Users to Applications for more detailed instructions.
- Then open a new incognito or private browser window and open the SP Login URL. Log in using one of the user accounts you assigned to the app. Make sure you can access what you expect.
- In KnowledgeOwl, go to Account > Readers and be sure that the reader account you logged in to now exists and that all the attributes came through properly.

If you run into any issues, refer to the Troubleshooting section below.
Step 7: Optional settings
With your SAML SSO login working, you can now review a few additional options:
- To make it so that SAML SSO is the only access method for your knowledge base:
- Go to Security and access > Single sign-on > SAML settings tab.
- Select Require all readers to log in via SAML SSO.
- Save.
This overrides the Content authentication selection in Security and access > Security settings. - Refer to SSO options for different knowledge base setups for more information.
- To use the SAML SSO as your only or primary reader authentication mechanism:
- Go to Security and access > Security settings.
- In the Unauthenticated access behavior subsection, select Redirect them to your SAML login URL.
- Save.
This sets your SAML login URL as the URL all unauthenticated readers will be directed to. - Refer to SSO options for different knowledge base setups for more information
- To make logging out from the knowledge base log your reader out of Okta entirely:
- Go to Security and access > Single sign-on.
- In the SAML settings tab, in the SAML settings section, under Advanced options, check the box to Issue a remote logout request using the IdP logout URL when a reader logs out.
- Save.
When a reader selects Logout in your knowledge base, they'll be fully logged out of Okta and redirected to your Okta login screen. - Refer to SSO Advanced options for more information on this change and other tweaks you can make to the SAML SSO behavior.
- To manually set authors to use SAML SSO to login to your knowledge base, too, refer to Set up SAML SSO for authors.
Troubleshooting
Here are troubleshooting steps for some of the most common issues you'll run into.
No incoming IdP attribute mapped for SSO ID
A warning displays above the tabs of Security and access > Single sign-on with this text:
SAML SSO is enabled but there is no incoming IdP attribute mapped for SSO ID. Go to the SAML attribute map tab to map attributes. Without mapping the SSO ID, readers will not get created or updated when logging in to your knowledge base.
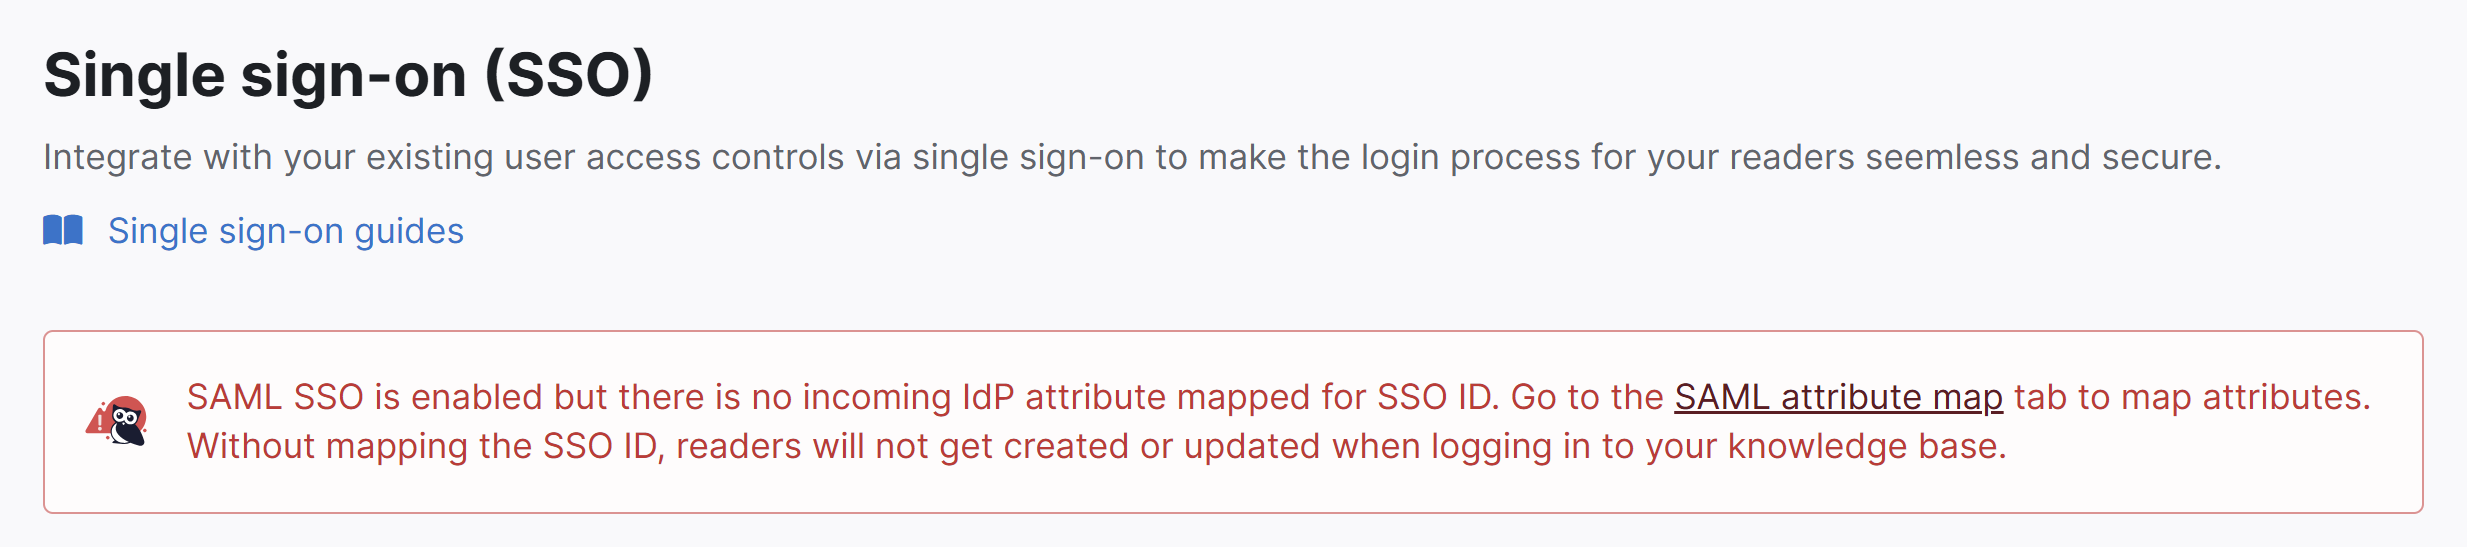 Sample warning when no incoming IdP attributes have been mapped.
If you see this warning, it means that you didn't add an attribute mapping for the SSO ID in the SAML attribute map tab.
To fix it, add a valid attribute name to that field and save.
SP Login URL page doesn't load
If you try to open the SP Login URL and the page doesn't load, make sure that the IdP Login URL is correct, that it uses HTTPS, and that you can resolve the page by going to the IdP login URL directly.
All other issues
For all other issues, including if you can successfully log into your IdP but you get redirected to your knowledge base No Access page:
- Go to Security and access > Single sign-on.
- In the SAML settings tab, in the SAML settings section, select Enable debug mode to troubleshoot issues.
- Save those settings.
- Now open the SP Login URL again.
- If you receive an error on the resulting debug page after logging in:
- You may have an issue with the IdP certificate you uploaded, or
- Your IdP may require one of the Advanced Options in the SAML settings tab.
- If you don't receive an error on the debug page after logging in:
- Make sure that the IdP attribute names listed on the debug page match the values listed on the SAML attribute map tab.
- Make sure that the SAML attribute map tab has values entered for the SSO ID and Username / Email fields. SAML SSO won't work without these entries.
- If you receive an error on the resulting debug page after logging in:
- Once you're done troubleshooting, be sure to uncheck the Enable debug mode to troubleshoot issues and Save the SAML settings.
- If you're still having trouble after trying all of the above steps, contact our support team and we will try to help figure out what the issue is.