
To turn on subscriptions, you'll need to:
- Make sure you have at least one SMTP service configured in Account > SMTP. You must use your own or a third party SMTP server to send subscription emails.
- Configure the email schedule and subject for notification emails.
- Update KB settings > Subscriptions to use the desired SMTP and send a test email to be sure everything's working properly.
- Edit your subscription settings to enable subscriptions.
- Optional: If some or all of your knowledge base content is publicly available without logging in, you may want to Set up public subscriptions so not-logged-in readers can subscribe to updates. By default, subscriptions are only enabled for logged-in readers.
- Depending on your spam protection settings, you may need to make adjustments in Security and access > Spam protection before you can check this box. The page will warn you if there's anything else you need to do.
Look before you leap
You must complete steps 1-4 for subscriptions to work properly. You'll need the SMTP details for your email server before you begin this process.
To turn on subscriptions, set up a global notification schedule and email subject line.
When subscription emails are sent
Regardless of the email schedule you select, subscription notification emails are only sent if there is New or Updated content to notify subscribers about. Refer to Trigger/retrigger subscriptions for more information.
To set your global notification schedule and email subject line:
- Go to KB settings > Subscriptions. These settings are all in the Subscription Settings section at the top of the page.
- For the Email Schedule, choose to send emails on either a daily basis or weekly basis.
- To send subscription notifications every day, select Daily from the dropdown.
- To send subscription notifications once a week, select the day of the week you'd like to send the emails from the dropdown.
- Use the second Email Schedule dropdown to select the time of day you'd like the emails to send. All times used in this schedule are U.S. Eastern timezone.
Scheduled job timing
Emails generally send between :10 and :15 after the hour that you've selected. - Modify the Email Subject however you'd like. The default email subject for notification emails is:
The{{kbName}} Update for {{prettyDate}}kbNamemergecode displays your knowledge base name as it appears in KB settings > Basic. TheprettyDatemerge code displays the date as "Month day" (e.g. February 19th). - Be sure to Save once you've made these changes!
The KnowledgeOwl subscription notification system uses your own or a third-party SMTP email server to send email notifications. Before you enable subscriptions in your knowledge base, you'll need to configure the SMTP settings so that KnowledgeOwl can talk to your SMTP server.
SMTP service required
Before you can set up SMTP for your Subscriptions, a knowledge base admin must set up an account-wide SMTP service to use. Refer to SMTP for more information!
Once you have at least one SMTP service configured in your account:
- Go to KB settings > Subscriptions.
- In the SMTP Settings section, select the SMTP configuration you'd like to use from the Custom SMTP dropdown. The dropdown displays the Friendly Names set up for the SMTP services in your account.
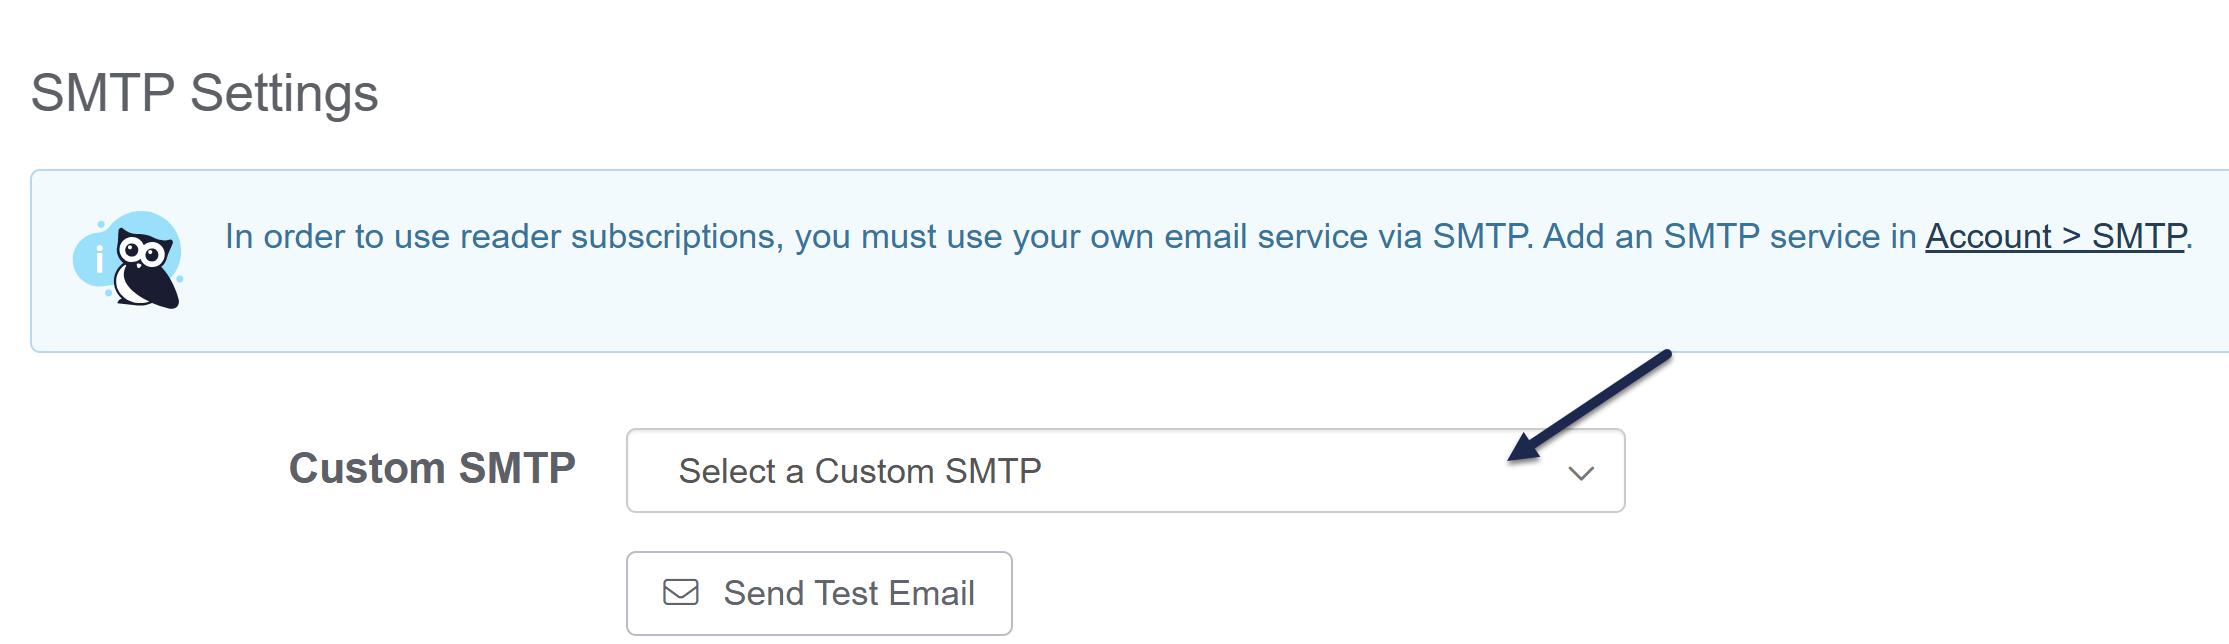 Select the Custom SMTP service to use from the Custom SMTP dropdown.
 - Select the Send Test Email button to send a test Subscription email. This helps to confirm that the SMTP has been properly configured. (And it helps you see a sample of what the emails look like!)
- Once you select Send Test Email, the Send Test Email Using SMTP modal opens.
- Enter the Test recipient email address you'd like to send the test email to. For Azure OAuth2 SMTP services, you'll need to send the test to another Azure email.
- Select Send Email.
- If you receive a message that the email failed, this likely means there's something wrong with your SMTP configuration overall. You may need an IT admin to help troubleshoot your SMTP configuration. Refer to SMTP for more detailed instructions on working with different SMTP services. Error messages should be one of two types:
- Basic validation: We'll alert you if the email addresses you've entered don't follow standard email address conventions or if required fields have been left blank.
- SMTP provider validation: If the error comes from the call to your SMTP provider, we'll return the error message they provide.
- If everything is properly configured, an "Email sent successfully!" confirmation message displays.
- Verify you received the test email and that it displays as expected using the details below.
- Save your changes to come back and finish the setup later, or finish enabling subscriptions now!

Test subscription email contents
The email subject, Send From Name, and Send From Address are all pulled from your SMTP settings. These will be used for your actual subscription notification emails, so be sure they show up as you expect. If they don't, here's how you can make changes:
- Subject line: Update the Email Subject in KB settings > Subscriptions. Refer to Set the subscription notification schedule and email subject for more information.
- Send From Name: Update your SMTP service's Send From Name.
- Send From Address: Update your SMTP service's Send From Address.
The email body is a set sample we created, which should look something like this:
Recent Activity <test example>
New in Configuring subscriptions
- Enable subscriptions
- Configure reCAPTCHA for public subscriptions
Updated in Configuring subscriptions
- Configure SMTP for subscriptions
- Add Subscribe option to a custom content category
New in Using subscriptions
- How subscriptions work
Updated in Using subscriptions
- Subscribing to a category
By default, subscriptions will only be turned on for logged-in readers only.
If you have a knowledge base that is partially or fully available to the public (e.g. doesn't require people to log in to read content), you might want to enable subscriptions for readers who aren't logged in. We call these Public Subscriptions.
The setup steps differ based on which type of spam protection you're using. Refer to the more detailed instructions for each spam protection type below
Setup for knowledge bases with honeypot spam protection
If you're using honeypot spam protection, to enable public subscriptions:
- Go to KB settings > Subscriptions.
- In the Public Subscriptions section, check the box to Enable subscriptions for readers on public knowledge base.
- Be sure to Save your changes.
Setup for knowledge bases with reCAPTCHA spam protection
If you're using reCAPTCHA spam protection with a KnowledgeOwl subdomain (such as support.knowledgeowl.com), skip to step 2 below.
If you're using reCAPTCHA spam protection with a private domain for your knowledge base (such as help.our-amazing-company.com), you'll need to add a reCAPTCHA for your public subscriptions. We require this to prevent bot traffic:
- Be sure you have a V2 reCAPTCHA key and secret added to Security and access > Spam protection. Refer to Add reCAPTCHA for more details.
- Go to KB settings > Subscriptions.
- In the Public Subscriptions section, check the box to Enable subscriptions for readers on public knowledge bases (no login).
- Be sure to Save your changes.
The Subscribe button will now be visible to anyone viewing your knowledge base, whether they've logged in or not.
Once you've edited your Email Schedule and Subject to your liking, set up and tested your SMTP, and (optionally) Set up public subscriptions, you're ready to turn on Subscriptions.
To do so:
- Go to KB settings > Subscriptions.
- In the Subscription Settings section, check the Enable / Disable box to Enable reader subscriptions.
- Be sure to Save your changes.
At this point, subscriptions are live! Use the New/Updated callouts to trigger subscriptions to send.
Complete all steps first
Don't enable reader subscriptions until you've set up and tested your SMTP. Without a valid SMTP configuration, we can't send any emails.
Subscribe buttons are automatically added to most category landing pages, but they won't appear on topic display or custom content categories without a little encouragement.
If you'd like to add a Subscribe button to a custom content category or topic display category and have it float next to the category header (as is the default for standard categories), it's a two-step process:
- Create a snippet that will generate the Subscribe button.
- Add that snippet to the categories where you want the Subscribe button to appear.
To do so:
- Go to Snippets.
- Select + Create New Snippet.
- Enter a Snippet Name, like "Custom Content Subscribe Button". The Merge Code Name will be automatically generated from that Snippet Name, though you can adjust it if you'd like.
- Enter a SnippetDescription, like "This snippet adds the Subscribe button to custom content categories and topic display categories it's added to. It positions the button in the category header. For custom content categories, insert the snippet anywhere into the body of the category; for topic display categories, paste the snippet merge code into the category description."
- Select the Snippet Content dropdown and choose Code Editor:
- Copy the script below and paste it into the Code Editor:
<p>[template("cat-subscribe")]</p> <script> $(function() { $(".ko-cat-sub-cntr").insertBefore($(".hg-article-header h1")); }); </script> - In Visibility, check the box to Hide from PDFs.
- Select Create.
With your snippet created, you can now add it to the categories you wish:
- For custom content categories, use the Insert Snippet editor control to add the snippet anywhere in the custom content category body.
- For topic display categories, copy the snippet merge code and paste it directly into the category's description.
This Subscribe button will inherit the styling for Subscription buttons across your site. You can also Style the Subscribe button differently.
Alternatives
If you'd rather display the Subscribe button in the body of the category content, instead of floating next to the header, copy the merge code below and add it wherever you'd like the button to display:
[template("cat-subscribe")]This adds a float-right Subscription button wherever you've placed the template code.
There are two CSS classes that impact the Subscribe button:
.hg-minimalist-theme .btn.btn-default.ko-cat-sub: This styles the Subscribe button itself. If you'd like to change the button background color, text color, border, box-shadow, or paging between the text and button edges, here's where you do it..hg-minimalist-theme .ko-cat-sub-cntr: This container is what gives the Subscribe button its float: right positioning and the margin-right. If you'd like to change button positioning on the page, add custom CSS for this class.
In our initial default theme, these are added in Custom CSS under the /******************************************************** Default Category Styles *********************/ section, around row 225-250:
/* adjust position of subscribe button */
.hg-minimalist-theme .ko-cat-sub-cntr {
  margin-top: 12px;
  margin-right: 0;
}
/* apply hover effects to subscribe button */
.hg-minimalist-theme .btn.btn-default.ko-cat-sub {
  border: 1px solid var(--border-hover-color);
  transition: all .1s ease-in-out;
  backface-visibility: hidden;
}
.hg-minimalist-theme .btn.btn-default.ko-cat-sub:hover {
  box-shadow: 1px 2px 2px var(--box-shadow-color);
  transform: scale(1.01) translateZ(0);
}
To adjust the style for the button:
- Go to Customize > Style (HTML & CSS).
- In the Customize HTML, CSS, and JS section, select Custom CSS.
- Locate the existing Custom CSS for the button, shown in row 7 in the sample above.
- Copy the parts of the default button styling you'd like to adjust from the code sample below and paste it into your Custom CSS:
.hg-minimalist-theme .btn.btn-default.ko-cat-sub { background: #fff; /* Button color */ color: #333; /* Button label text color */ border: 1.5px solid #555; /* Button border--#555 sets the color */ box-shadow: none; padding: 8px 18px; } - Edit as necessary to get the look and feel you want. For example:
- Edit the
backgroundcolor value in row 2 to change the color of the button overall. - Edit the
colorin row 3 to change the color of the "Subscribe" text. - Edit the
borderthickness (1.5px), style (solid), and color in row 4. - Add a
box-shadowin row 5, for example:box-shadow: 1px 2px 2px #aeaeae;. - Change the
paddingbetween the text and the button edges in row 6.
- Edit the
- Save your changes.
For example, here, we've added CSS to style the Subscribe button font color and button border to match the color we use across our theme but we've kept the transition and backface-visibility effects:
.hg-minimalist-theme .btn.btn-default.ko-cat-sub { color: #1d284f; /* Change button font color to KO theme*/ border: 1.5px solid #1d284f; /* Change border color to KO theme*/transition: all .1s ease-in-out; backface-visibility: hidden;}
Once readers select the Subscribe button in a category, we'll display a modal where they need to entire the email address they want to use for the subscription. This is by design, since some of our customers have readers who share accounts (such as one reader account per client, consulting firm, partner, etc.) or use public subscriptions.
But if you require reader login and always have individual reader accounts, you can bypass the screen where they enter an email address entirely, and take them straight to the Manage Subscriptions page.
This approach has a few advantages:
- It's more foolproof. There's no risk that they'll enter a typo or an improperly-formatted email address.
- It's faster. It removes the extra step to enter an address and select another button before they're subscribed.
- It prevents the use of personal email addresses. You may have security or compliance reasons why you don't even want links to your knowledge base content to be emailed to non-work email addresses.
Not supported with public subscriptions
You can't use this approach if you use public subscriptions.
To bypass the reader email address entry modal:
- Go to Customize > Style (HTML & CSS).
- In the Customize HTML, CSS, and JS section, select Custom HTML
- Select Body from the Select HTML section to edit dropdown.
- Copy the code below and paste it into the bottom of the Custom HTML editor:
<script> $('.documentation-article .ko-cat-sub').click(function(){ $('#subscription-modal form').submit(); }); </script> - Now select Custom CSS in the Customize HTML, CSS, and JS section.
- Copy the CSS below and paste it anywhere into the Custom CSS section:
/* Hide the Subscription modal by default */ #subscription-modal { display: none !important; } - Save your changes.