
- KnowledgeOwl account on the Pro or above plan - sign up or log in
- Zapier account - sign up or log in. Note that you can test Zaps, including premium functionality, on the free tier, but you need a paid plan to use Webhooks by Zapier in a live Zap.
- Recommended: a test knowledge base, or test section, so you can try out your Zaps without affecting live documentation or real data.
- For the tutorial: a Google account.
The basic steps to use Zapier with KnowledgeOwl’s API are:
- Log in to Zapier and create a new Zap, using Webhooks by Zapier in the action step to call the API.
- Log in to KnowledgeOwl and create a new API key for your knowledge base: How to generate an API key.
- Refer to KnowledgeOwl’s API documentation to get the URL endpoint and information about the required data.
- In Zapier, enter the URL endpoint, select JSON as the payload type, map the data from your data source (this could be an email, for example) to the data structure required by the API, and enter the API key and a dummy password as authentication.
This section provides a step by step tutorial of a possible use case for the Zapier and KnowledgeOwl API integration. In this example, you will catch every new email sent to a Gmail inbox, and use them to create a new article.
- Send an email to the Gmail address that you want to use for article creation. For this tutorial, you can use any Gmail address, but if you plan to use this workflow live, you should create a dedicated Gmail account. This example will create an article from every email received in the inbox.
- Log in to Zapier. You can create a Zap in the Dashboard, but it is clearer to see the options in the Zap editor. Select Zaps > Create Zap to open the editor.
- In Name your zap, give your Zap a meaningful name, such as “KnowledgeOwl tutorial”.
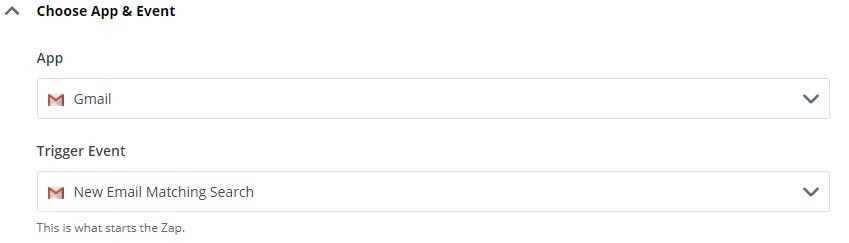
- In Choose App & Event, search for and select "Gmail". Zaper displays a list of events you can listen for.
- Select New Email Matching Search.
- Select CONTINUE.
- Zapier prompts you to sign in to Gmail with your Google account. Sign in, and give Zapier the permissions it asks for.
- Select CONTINUE.
- You can now customize which emails Zapier uses to create articles. In Search String, enter "in:inbox". This ensures Zapier ignores any emails sent from the account.

- Select CONTINUE.
- Select Test trigger.
- Zapier loads the newest email. If this is not the test email you sent, browse for and select the correct email.
- Select CONTINUE.
- In the Choose App & Event section, search for and select "Webhooks by Zapier".
- In Action Event, select POST.
- Select CONTINUE. Zapier displays the API call configuration form.
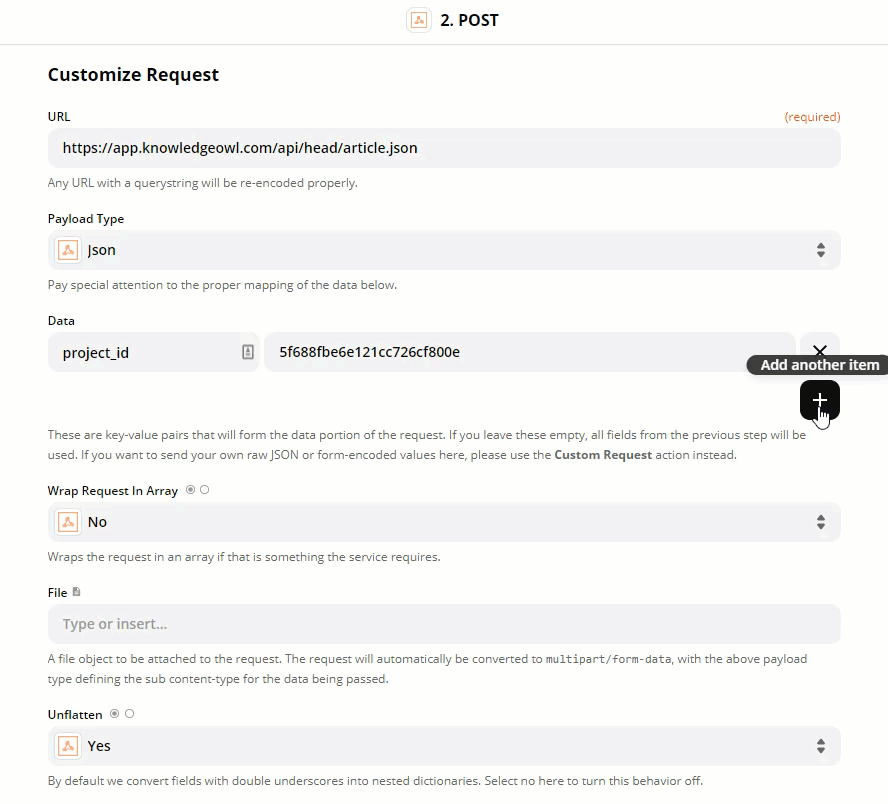
- In URL, enter "https://app.knowledgeowl.com/api/head/article.json". This is the article creation API endpoint.
- In Payload Type, select JSON.
- In Data, set up the data you want to send from Gmail to KnowledgeOwl. This data must be in the form of key-value pairs. The key is the name used by the KnowledgeOwl API, and the values are either entered directly in Zapier or come from the email. Refer to Articles Endpoint: Create and Article for information on all the available fields. For this tutorial, enter the following:
- project_id: enter your knowledge base ID. You can get this from the URL of your knowledge base editor. Log in to KnowledgeOwl, and select the knowledge base you want to use. KnowledgeOwl opens the Articles page. Look at the URL. It ends in a long string of numbers and letters. This is the ID.
- status: enter "draft".
- url_hash: browse the data available from the email, and select ID. This ensures a unique URL.
- name: browse the data from the email, and select Subject.
- current_version: browse the data from the email, and select Body Plain.
 Sample gif showing the above steps.
- In Basic Auth, enter your API key and a dummy password, in this format:
key | password - Select CONTINUE.
- Select TEST & CONTINUE. When Zapier displays a success message, go to your knowledge base. There should be a new draft article at the top level of your content.


The tutorial described how to get data from an email and use it to create an article. You can use the KnowledgeOwl API and Webhooks by Zapier for lots of other things. Here are a few ideas.
Log comments
Linus wants to log all comments on articles for further analysis and sharing. He sets up a Zap that uses the KnowledgeOwl API to get a list of all comments using the List Comments endpoint, then outputs them to a spreadsheet using Zapier's Google Sheets integration.
Autogenerate a newsletter
Linus wants to automatically update his readers about new content. He sets up a Zap that uses the List Articles endpoint of the KnowledgeOwl API to get a list of his most recently created articles, then send them as a newsletter with the MailChimp integration.