Bulk edit articles in Manage

The Manage Articles > Bulk Edit options

In Manage Articles, you can Bulk Edit articles in a few ways:

  1. Change the Publishing Status for all selected articles (e.g. set these articles to Published status)
  2. Change the Author for all selected articles (e.g. set these articles to have yourself as the author)
  3. Update Article Callouts to add New or Updated callouts to articles. Useful for triggering subscription notification emails and adding New/Updated callouts in your table of contents. This section has four options:
    • Keep Current Status: the article callout field won't be touched during the bulk edit
    • No Status: Overwrites any existing status to set the selected articles to No Status.
    • New Article Status: will assign the New article callout to selected articles. If selected, the status expiration date field will display and will use your knowledge base's default callout expiration, which you can manually override, just as in Article Editor.
      Sample display when the New callout is selected. Note the Status Expiration date field is now shown.
    • Updated Article Status: will assign the Updated article callout to selected articles. If selected, the status expiration date field will display and will use your knowledge base's default callout expiration, which you can manually override, just as in Article Editor.
  4. Change the explicitly-assigned reader group restrictions for all selected articles (e.g. restrict these articles to your "Administrator" reader group; or set these articles to have no reader group restrictions using None)
    1. Keep Current Restrictions will guarantee that no other groups are added to the content, even if boxes below that have been checked.
    2. None will remove any explicitly assigned reader group restrictions from the articles. To remove inherited reader group restrictions, edit the category that's adding the restriction.
    3. Checking boxes next to any of the reader groups in the list will overwrite any reader group restrictions added to the article and replace them with the group(s) who's boxes you've checked.
  5. Set all selected articles to Exclude from search results. (There is no way to bulk edit/undo this to include them, so use with caution!)
  6. Set all selected articles to Hide from table of contents. (There is no way to bulk edit/undo this to show in the table of contents, so use with caution!)
  7. Set all selected articles to Hide from landing page (home or category landing page). (There is no way to bulk edit/undo this to show in the table of contents, so use with caution!)
  8. Set all selected articles to Hide from article lists.  (There is no way to bulk edit/undo this to show in the table of contents, so use with caution!)
  9. Set all the selected articles to be required. This option only displays if Required Reading is enabled. Once selected, a Start Date field will appear so you can set the Start Date of the articles' required status (which is required for it to properly display to readers as required!)
  10. For selected articles with versions marked "Ready for review," activate the next ready for review version.
  11. Add tags to all selected articles (e.g. add "needs-update" tag to these articles) -- Note: this will only add tags to the articles; it will not remove or overwrite any existing tags they might already have

All Bulk Edits to articles will update the Last Modified date for the articles selected.

Our default Editor and Writer roles have permission to bulk edit articles. If you're using a custom author role, that role must have the Article Permission to Edit articles in bulk to bulk edit articles.

To make these kinds of bulk edits:

  1. In the top section of the lefthand navigation, select Manage.
  2. Use the checkboxes to select the articles you'd like to edit. To make your selection, you can:
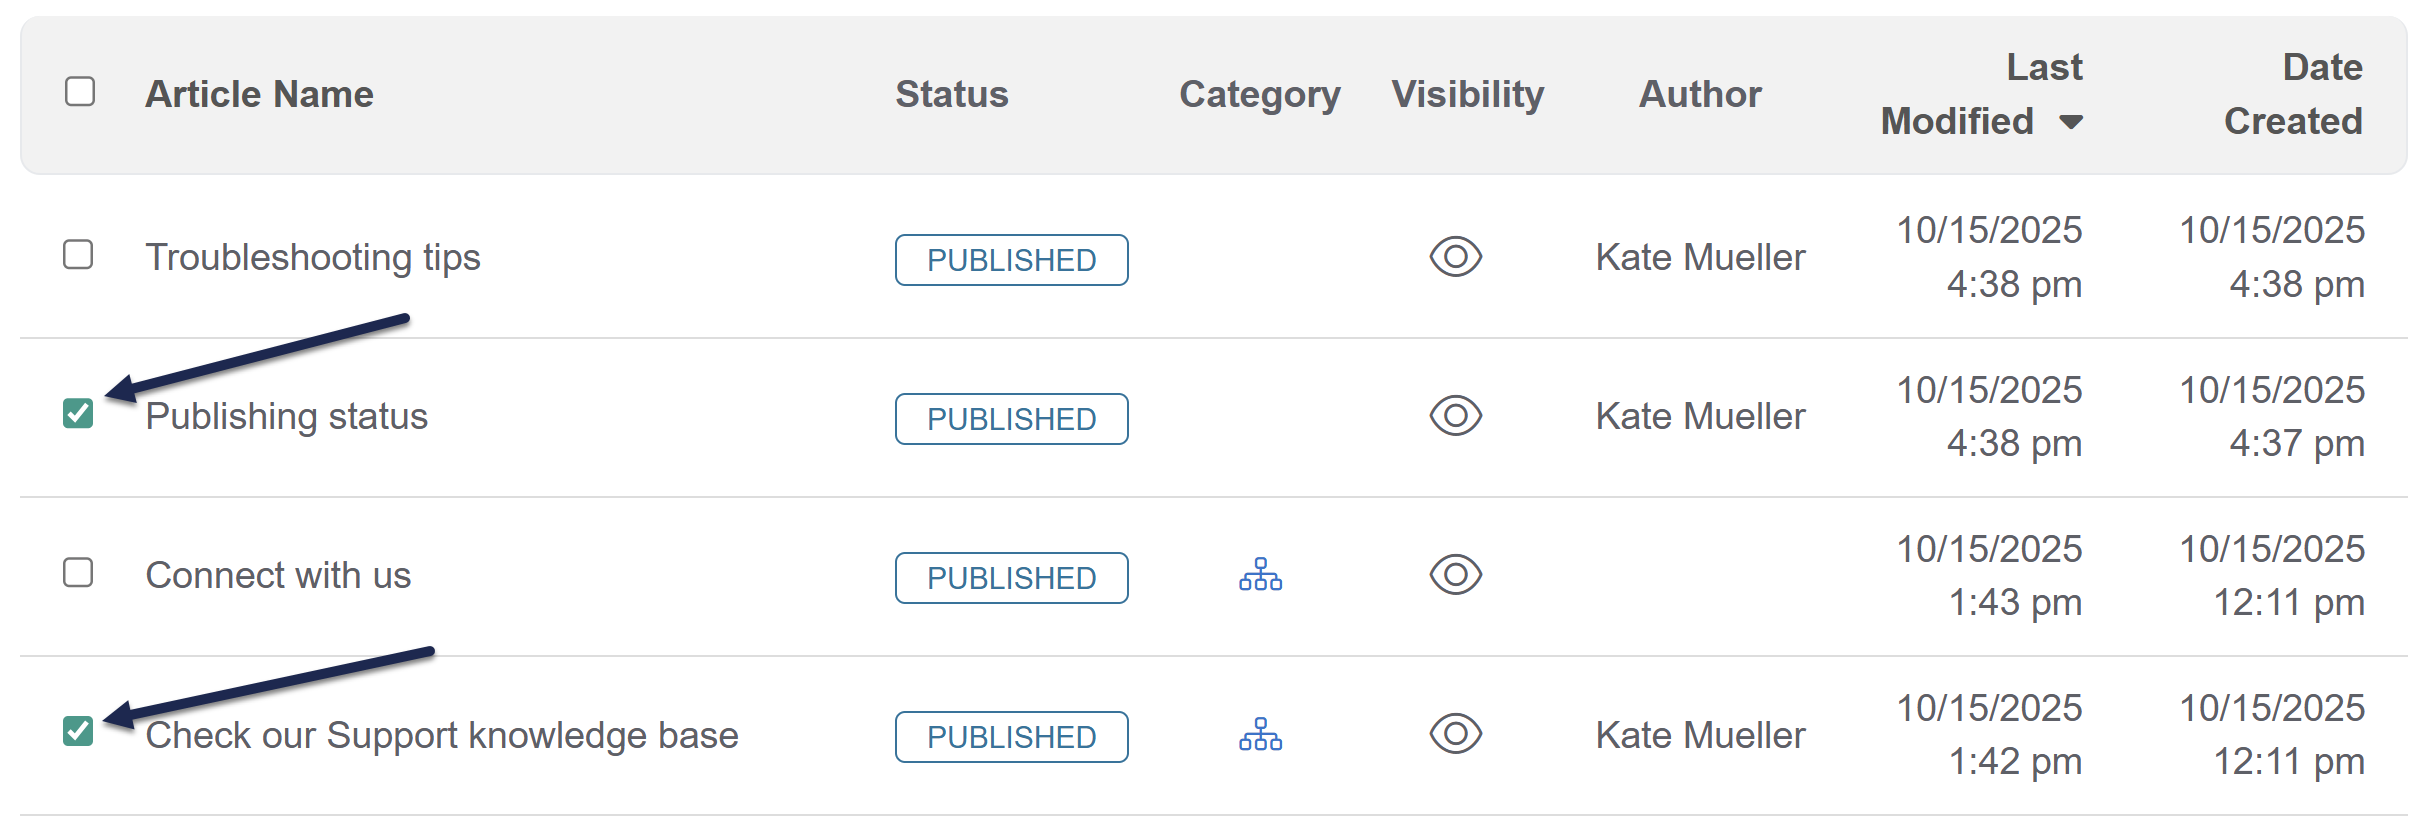
    • Select individual checkboxes to select only specific articles:
      Bulk edit selected articles
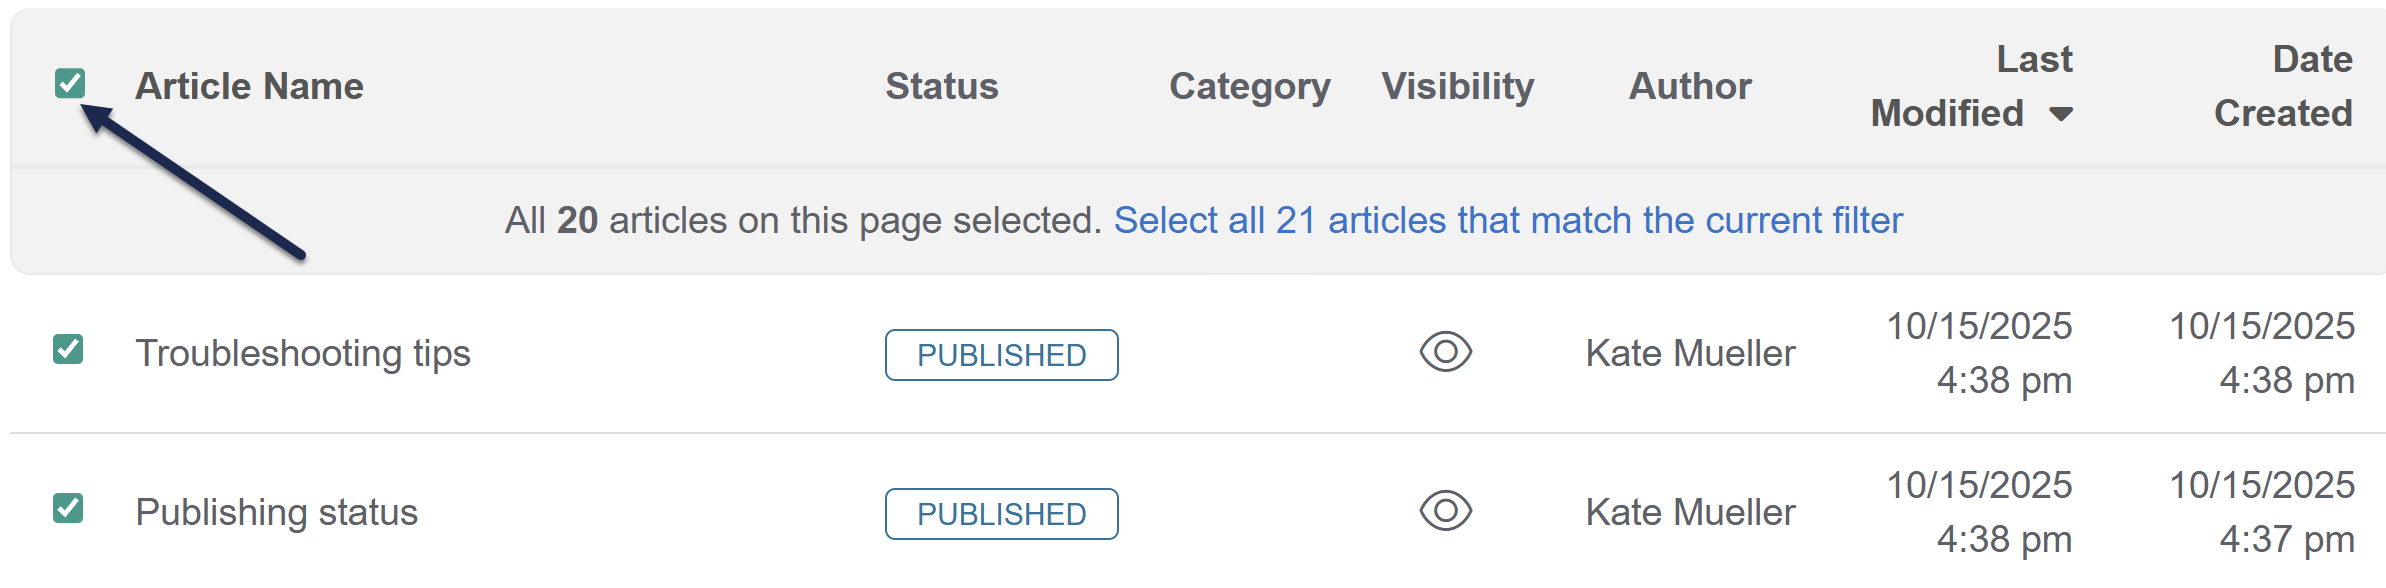
    • Select all articles on the page using the checkbox in the header:
      Bulk edit all articles on the current page
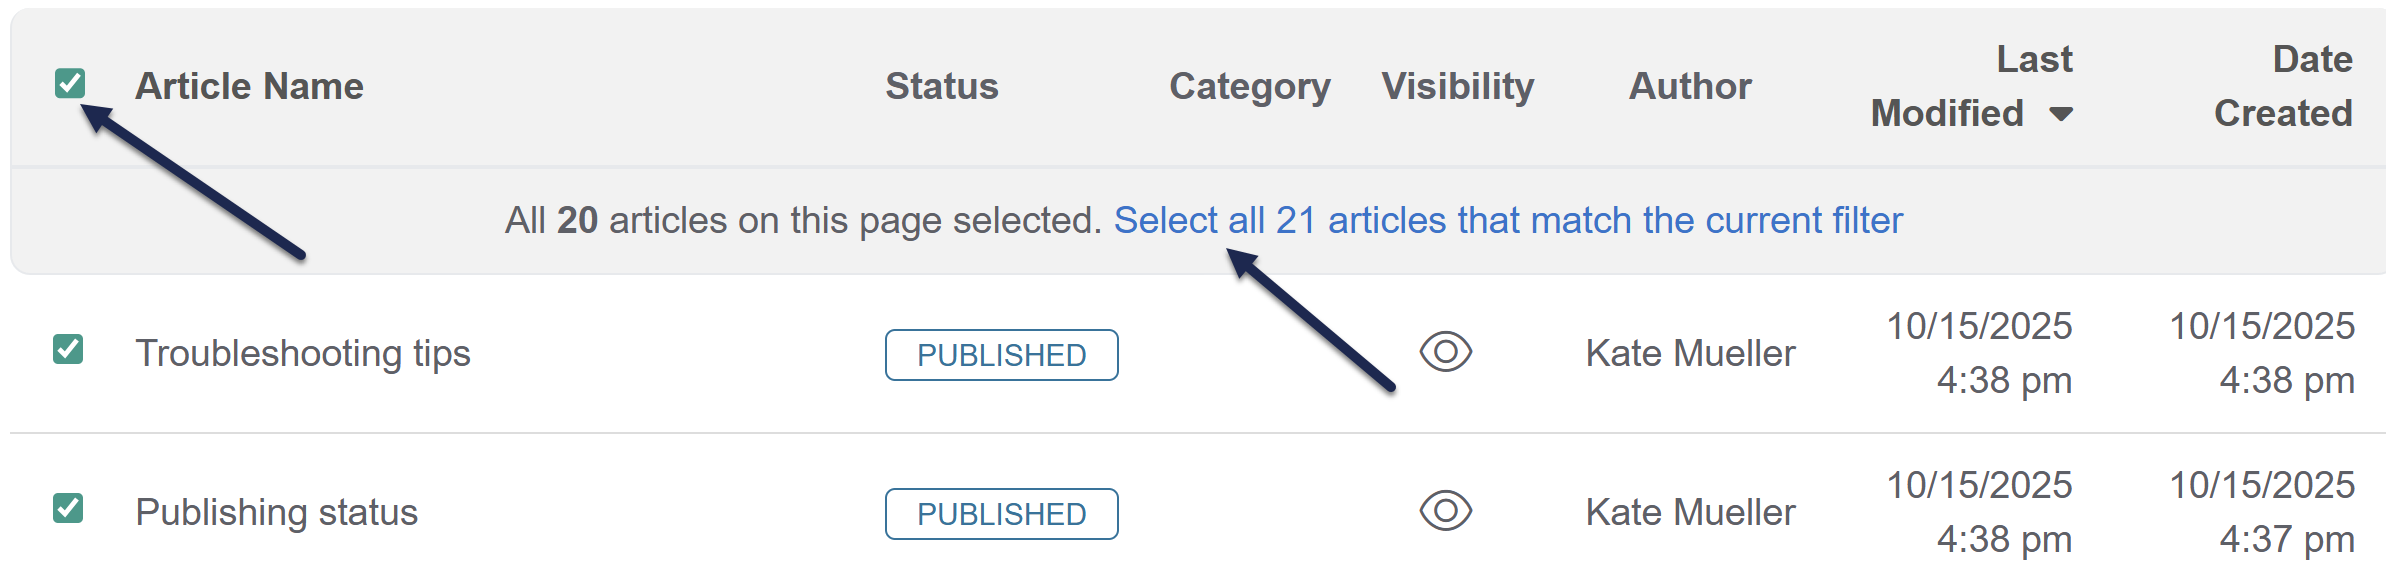
    • Select all articles in the current filter view (all pages) by checking the box in the header and clicking the "Select all xxx articles that match the current filter" link. This will select all articles in the view you've selected, regardless of pagination:
      Bulk edit all articles in the current filter When all in filter is selected, you'll see a different message across the top, saying "All xxx articles that match the current filter selected." You can undo this by selecting the Clear selection link that appears.
  3. With your articles selected, select the Bulk Edit link above the article list.
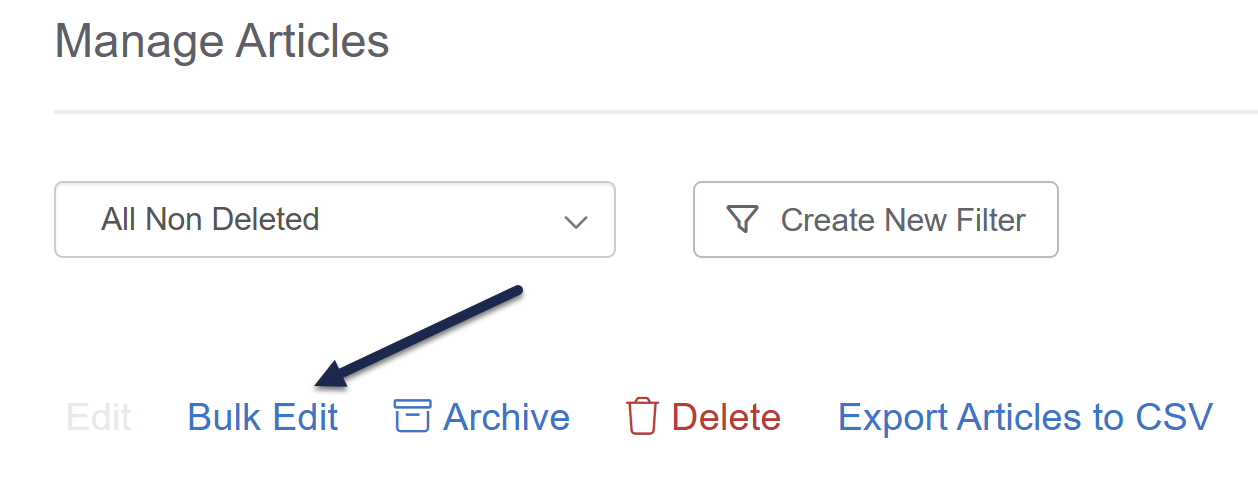
    Select the articles you'd like to edit and click the Bulk Edit link
  4. Select the changes you'd like to make in the Bulk Edit Articles pop-up.
  5. Once you've finished selecting the bulk edits you'd like to apply, select the Update Articles button in the lower right to make the edits.
    Select the bulk edits you'd like to make and click the Update Articles button

    In the screenshot above, I'm setting all the selected articles to a "Needs Review" status and adding the "int: needs-updated-screenshots" tag. The "No Status" in Update Article Callouts will ensure that none of these articles have a New or Updated callout, even if one did previously exist. No other changes will be made.

See How do bulk edits/deletes work? for more information on what you can expect to see during a bulk edit. See Bulk activating "ready for review" versions for more information on using the "Activate next version marked ready for review" option.