A tag is a word or short phrase that describes the article. An article may have as many tags as you like. They can be a great way to add organization and navigation to your knowledge base.
The easiest way to think about tags is to consider them like filters for your content. These filters can be used:
- By your readers using a tag search (which begins with ":" followed by the tag name)
- As custom filters in Manage: if you're using tags for these kinds of internal filters only, you can mark tags as "hidden" so they won't show up to readers

For readers, tags will display:
- In search results, in a Tags section between the Last Updated and the article blurb:

- In the search autocomplete after they've begun a search phrase with a colon (":"):
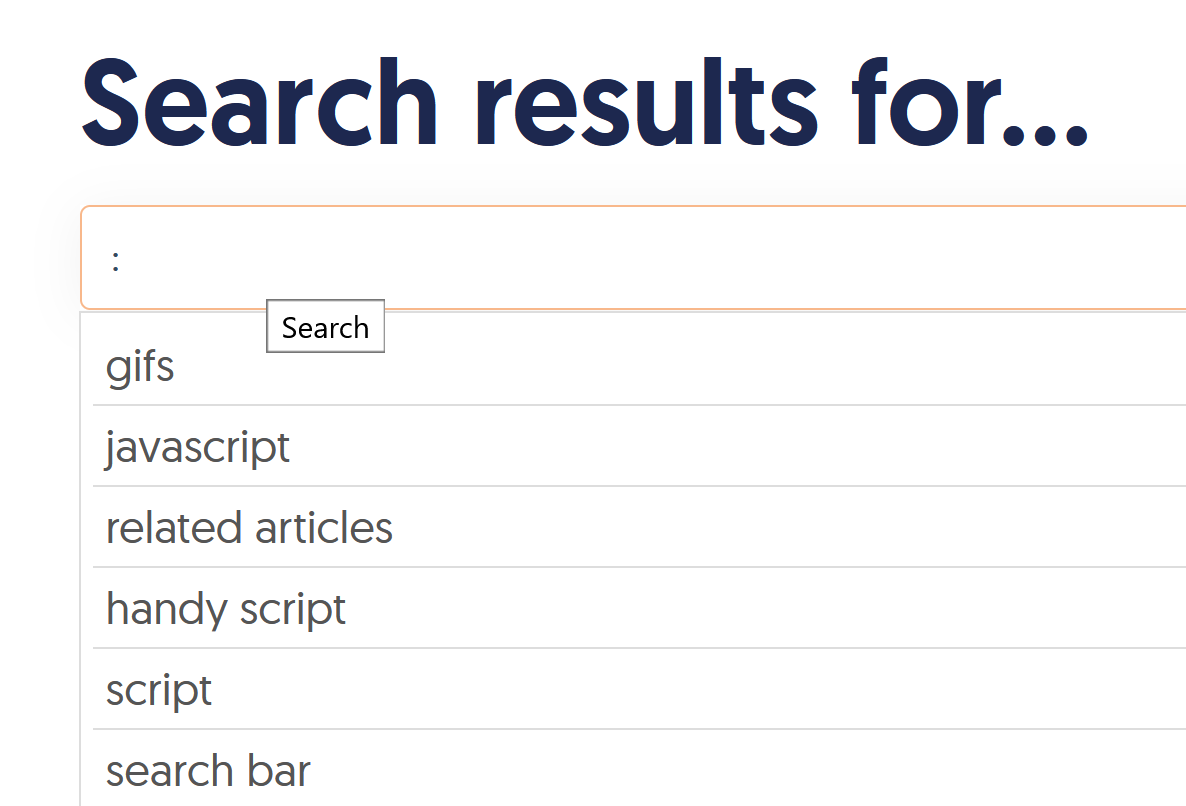
- If you've added the article-tags template to Customize > Style (HTML & CSS) > Custom HTML > Article, tags display in the article wherever you've added that template. (These are not included by default in the article layout, though.)
You can create tags in three ways:
- In the top-level Tags page, use the Create option.
- In any article or category editor view, type into the Tags box and hit Enter.
- In any article or category editor view, paste a comma-separated list of tags into the box and hit Enter or tab. (example: alpha,bravo,charlie pasted in will create three tags: alpha, bravo, and charlie)
Authors with the default Editor or Writer role can create tags. If you're using a custom role, you'll need to have the Tags custom author role permission to Add new tags.
Before you begin
Tags are quite versatile, but they don't support all characters.
Tags can contain these characters:
- Upper and lowercase a-z
- Numbers
- Spaces
- These punctuation characters:
- Dashes (-)
- Underscores (_)
- Pound sign/hashtags (#)
- Equals sign (=)
- At symbol (@)
- Exclamation point (!)
- Period (.)
- Comma (,)
- Quotation marks (")
- Apostrophes (')
- Colons (:)
- Forward slashes (/)
Tags can't contain these characters because they cause errors with tag search:
- Question marks (?)
- Plus signs (+)
- Asterisks or stars (*)
- Ampersands (&)
- Carets (^)
- Backward slashes (\)
- Dollar signs ($)
Create tags in Tags page
Creating tags in the Tags page can be great if you:
- Need to create a lot of tags at once
- Want to be able to see tags that already exist while you create new tags
- Want to be able to create the tag and mark it as internal/hidden from readers
To do so:
- In the left navigation, select Tags.
- Select Create:
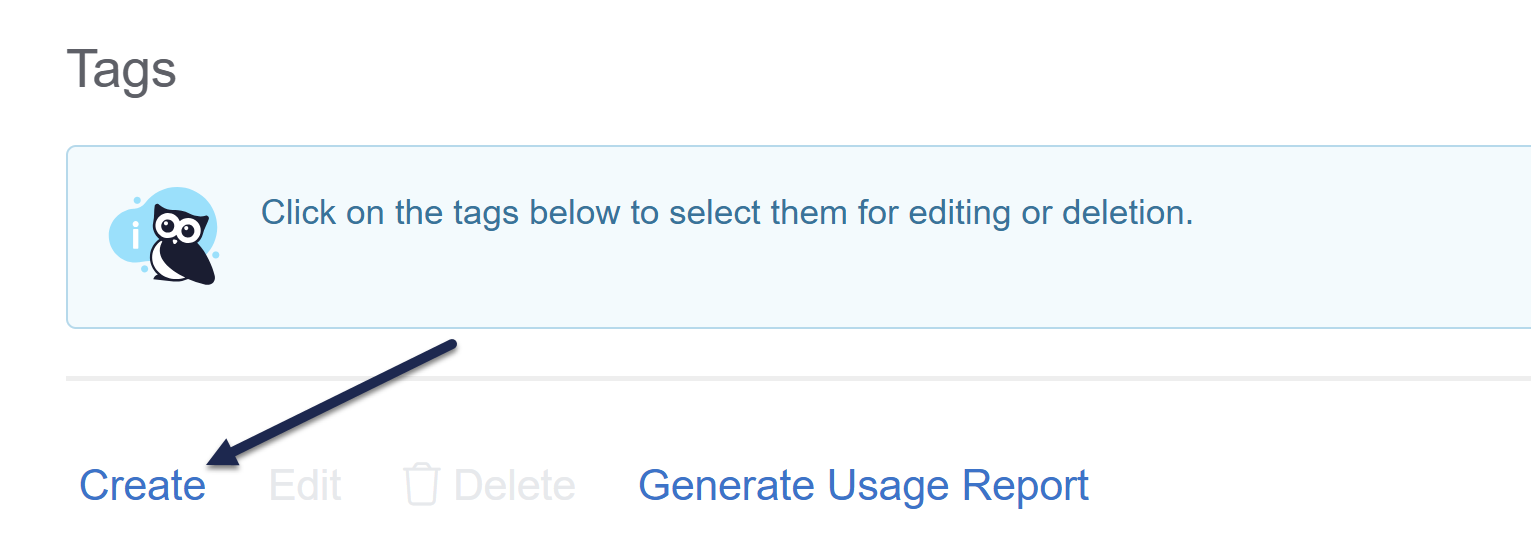 Select Create to begin.
The Create Tag modal opens. - Enter the Tag name you'd like displayed for the tag.
- If you'd like to use this tag only within app.knowledgeowl.com, check the Visibility box to Hide tag from readers. If you don't hide from readers, the tag will be visible in search and, potentially, in your article itself, depending on your configuration. Refer to What are tags? for more information.
- Select Create Tag. The tag is added to your knowledge base and is available for use.
Create tags in the editor individually
You can also create tags on the fly while you're editing an article, topic display category, or custom content category.
To do so:
- In the article editor and in select category editors (topic display and custom content), select the Tags text box below the editor.
- To add one tag at a time, enter the name of your new tag.
- Hit Enter, tab, or comma, or select anywhere outside of the box:
- The tag(s) are created in the Tags page and added to this article.
- Be sure to Save your article once you're done.
Create tags in the editor in bulk
You can add a list of tags separated by commas while you're editing an article, topic display category, or custom content category. This can be a great way to create or add tags in bulk.
To do so:
- In the article editor and in select category editors (topic display and custom content), select the Tags text box below the editor.
- Type or paste in the list with each tag separated by a comma. For example:
alpha,bravo,charlie,delta: - Hit Enter or tab or select anywhere outside of the box.
- The tags are created in the Tags page and added to this article.
- Be sure to Save your article once you're done.
Once a tag has been created, you can edit it to update the name or change whether it's shown or hidden to readers.
Authors with the default Editor or Writer role can create article versions. If you're using a custom role, you'll need to have the Tags custom author role permission to Edit existing tags.
To edit a tag:
- Select Tags in the left navigation. The Tags page opens.
- Select the tag you'd like to edit. (If you have a lot of tags, you may need to search to find the tag you want.)
- Once you've selected a tag, the Edit link activates. Select it.
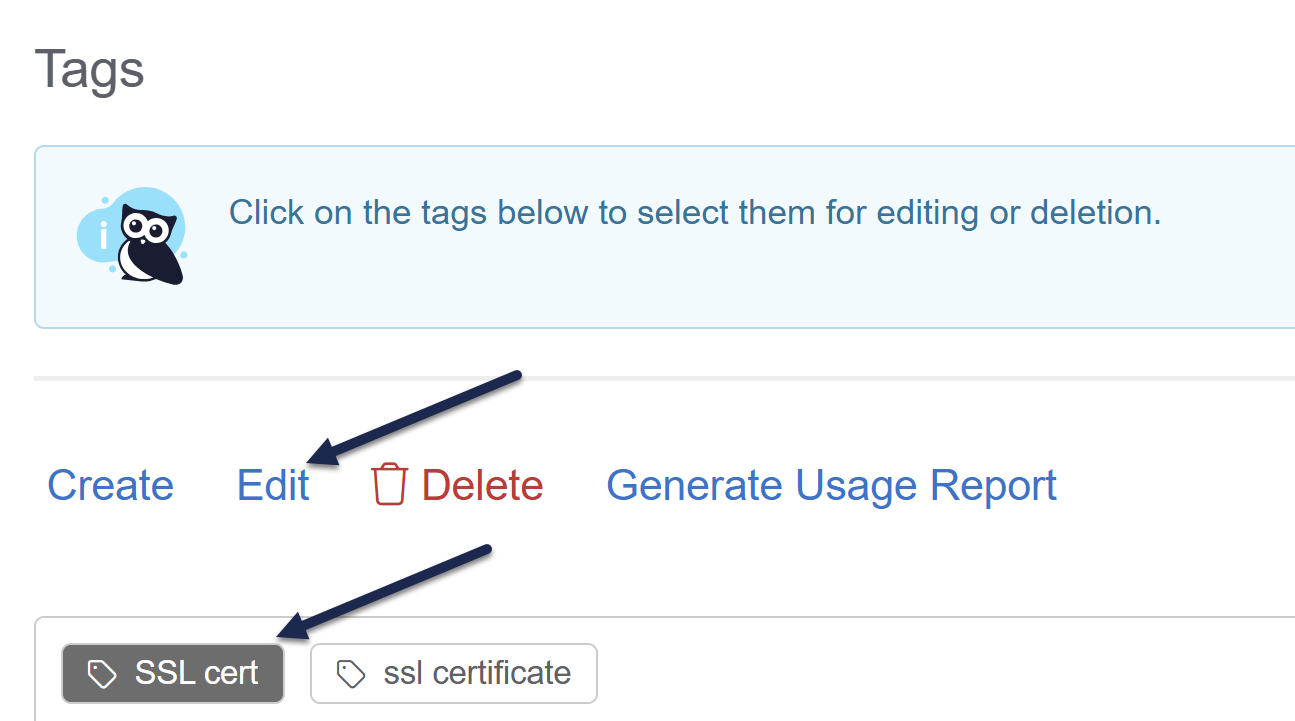 Once you select a tag, the Edit link activates.
The Edit Tag modal opens. - Make any changes you'd like in the Edit Tag modal, then select Edit Tag to save your changes. Refer to Merge tags for information on using the Merge into different tag option.
- All articles with this tag will now display the updated name.
You can delete tags from the Tags page. Deleting a tag removes it from all articles or categories where it's been used.
Authors with the default Editor or Writer role can delete tags. If you're using a custom role, you'll need to have the Tags custom author role permission to Delete tags.
To delete a tag:
- Select Tags from the left navigation. The Tags page opens.
- Select the tag or tags you'd like to delete. (If you have a lot of tags, you may need to search to find the tags you want.)
- Once you've selected one or more tags, the Delete link activates. Select it.
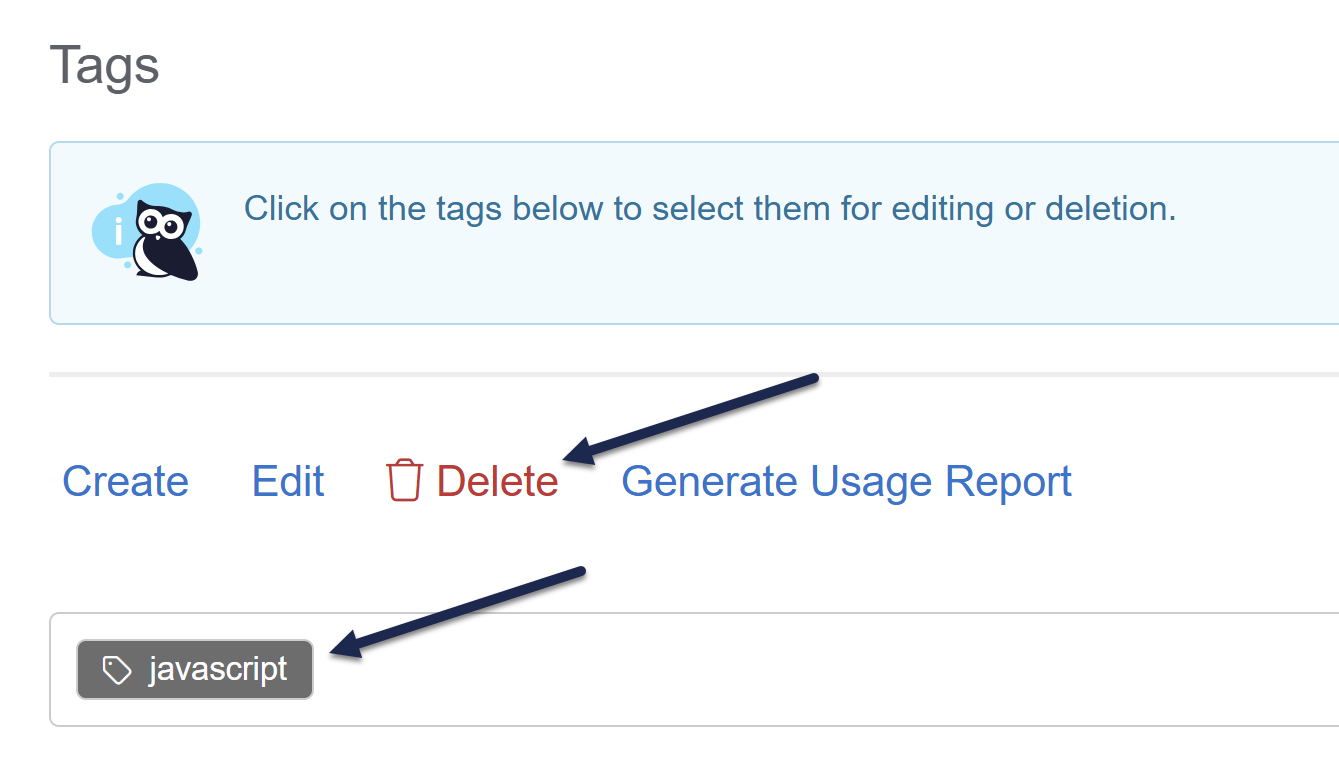 Select the tag(s) you'd like to delete and click the Delete link
The Delete tags modal opens. - Review the tags listed for deletion and make sure they're the tags you want to delete.
Point of no return
Once you delete a tag, all its assignments to articles and categories are also deleted. Those relationships cannot be recovered. Be sure you're deleting the correct tag(s)! - When you've confirmed these are the tags you want to delete, select Delete. The tag is deleted and all its assignments to articles and categories are removed.
Once a tag exists, you can add existing tags to articles.
Authors with the default Editor or Writer role can add existing tags to articles. If you're using a custom role, you'll need to have the Tag custom author role permission to Add existing tags to articles. Custom role authors with this permission and the Add new tags permissions can also create new tags; custom role authors with only the Add existing tags to articles permission can only start typing and select from existing tags.
To add an existing tag to an article:
- In the article editor and in select category editors (topic display and custom content), select the Tags text box below the editor.
- Start typing the name of the tag. As you type, a list of autosuggested matching tags appears. You can use the arrow keys and Enter or select with your mouse to select the tag you'd like to add:
- Once you've finished adding tags, be sure to Save the article or category you're working in.
Add multiple tags at once
You can also add existing tags in bulk by pasting in a comma-separated list. For example, pasting in alpha,bravo,charlie,delta will add the tags alpha, bravo, charlie, and delta. If you enter a tag that's already added to the article, the duplicate is detected and removed. Refer to Create a tag for more details.
Have you added a tag that's no longer relevant for an article or category? You can remove it while editing that content. This leaves the tag in your Tags page and only removes it from the content you're viewing.
Authors with the default Editor or Writer role can remove tags from articles and categories. If you're using a custom role, you'll need to have the Tags custom author role permission to Remove tags from articles.
To remove a tag from an article:
- In the article editor and in select category editors (topic display and custom content), go to the Tags text box.
- Select the "x" on the card of the tag you'd like to remove.
 Select the "X" next on the tag card you'd like to remove.
 - Be sure to Save the article or category.
Delete a tag completely
Removing a tag from an article only removes it from the article. That tag still exists in your Tags page and can be used elsewhere. If you'd like to delete a tag from your knowledge base completely, head to the Tags page to delete it. Refer to Delete a tag for more information.
Tags are displayed in search to give the reader additional context as to what the article is about and what it relates to. A reader can click on a tag to navigate to a list of all articles with that tag.
 Sample search results with tags displayed
Selecting a tag performs a special operation in the search to return a list of all articles with the same tag. You can do the same thing by putting a colon in front of the tag name in the search bar, like this:

Refer to Tag searches for more information on how tag search works.
Don't want a tag to show up in search results?
Set it to be hidden from readers! Refer to Hide tags from Search Results for more information.
Listing articles by tag
If you like, you could get really fancy and create a link that lists all articles with a certain tag. This can be useful for directing your readers to a specific list of resources.
The fastest way to do this is to perform a tag search for the tag, copy the URL of the search results, and use that.
But you can also construct the link yourself using this format:
/{rootpath}/search?phrase=:{tag}Replace {rootpath} with the rootpath of your knowledge base: help, home, or docs.
Replace {tag} with your tag name. If your tag has spaces in it, replace the spaces with %20.
For example, this link will search for the "third-party customization" tag referenced in the above screenshots:
https://support.knowledgeowl.com/help/search?phrase=:third-party%20customization
Search results will automatically display all tags assigned to a given article:
 Sample of Tags showing in Search Results
However, if you're using tags for custom filters in the Manage Articles interface, you might not want some of your internal tags to be shown in search results.
You can mark tags like this as hidden from readers. Hiding a tag from readers:
- Keeps it visible in the article editor and category editor.
- Allows it to be used as a filter in Manage Articles custom filters.
- Prevents the tag from appearing in search results in your knowledge base.
- Prevents the tag from appearing in the typeahead suggestions when a reader types ":" to begin a tag search.
To hide an existing tag from readers:
- Select Tags in the left navigation. The Tags library opens.
- Select the tag you'd like to hide from readers.
- Once you select a tag, the Edit link activates. Select it.
 Select the tag you'd like to hide and click Edit
The Edit Tag modal opens. - In the modal, check the Visibility box to Hide tag from readers.
- Select Edit Tag to save your changes.
- Regular tags will have a normal tag icon in the Tags library. Tags hidden from readers will have a padlock icon. Here, readers can see the tag
html(denoted by the regular tag icon), but the tagint: accessibilityis hidden from readers (denoted by padlock icon). Sample tags; the tag on the left with the tag icon is viewable to readers; the tag on the right with the padlock is not
Like your product, company, and policies, tags might change over time. And without clear style guidelines (and even sometimes with them!), different authors might create differently-structured tags. Linus has faced this problem several times in our documentation. For example, some content was tagged with SSL cert and some was tagged with ssl certificate. What's an owl to do?
Merging allows you to replace one tag with the other and delete the now unneeded tag. It's fast and much easier than auditing articles through a Manage filter.
Authors with the default Editor or Writer role can merge two tags together. If you're using a custom role, you'll need to have the Tags custom author role permissions to Edit tags and Delete tags.
To merge tags:
- Select Tags from the left navigation. The Tags page opens.
- Select the tag you'd like to merge into another tag. This will be the tag that gets removed. For example, Linus wants to keep the
ssl certificatetag, so he'll selectSSL certas his starting tag. - Once you've selected a tag, the Edit link activates. Select it.
 Select the tag you'd like to merge and then select Edit
The Edit Tag modal opens. - If you have the proper permissions to merge tags, the Merge into different tag option displays. Select this link.
- The next screen prompts you to enter the New tag you'd like to merge this tag into. This is the tag that all articles and categories with the Current tag will have after the merge is complete. The text box does an autosuggest search as you type. Select the tag you want to replace the current tag with. Refer to What does merging tags do? for more information on how tag merges work.
In Linus's case, he searches for and selectsssl certificateas the New tag: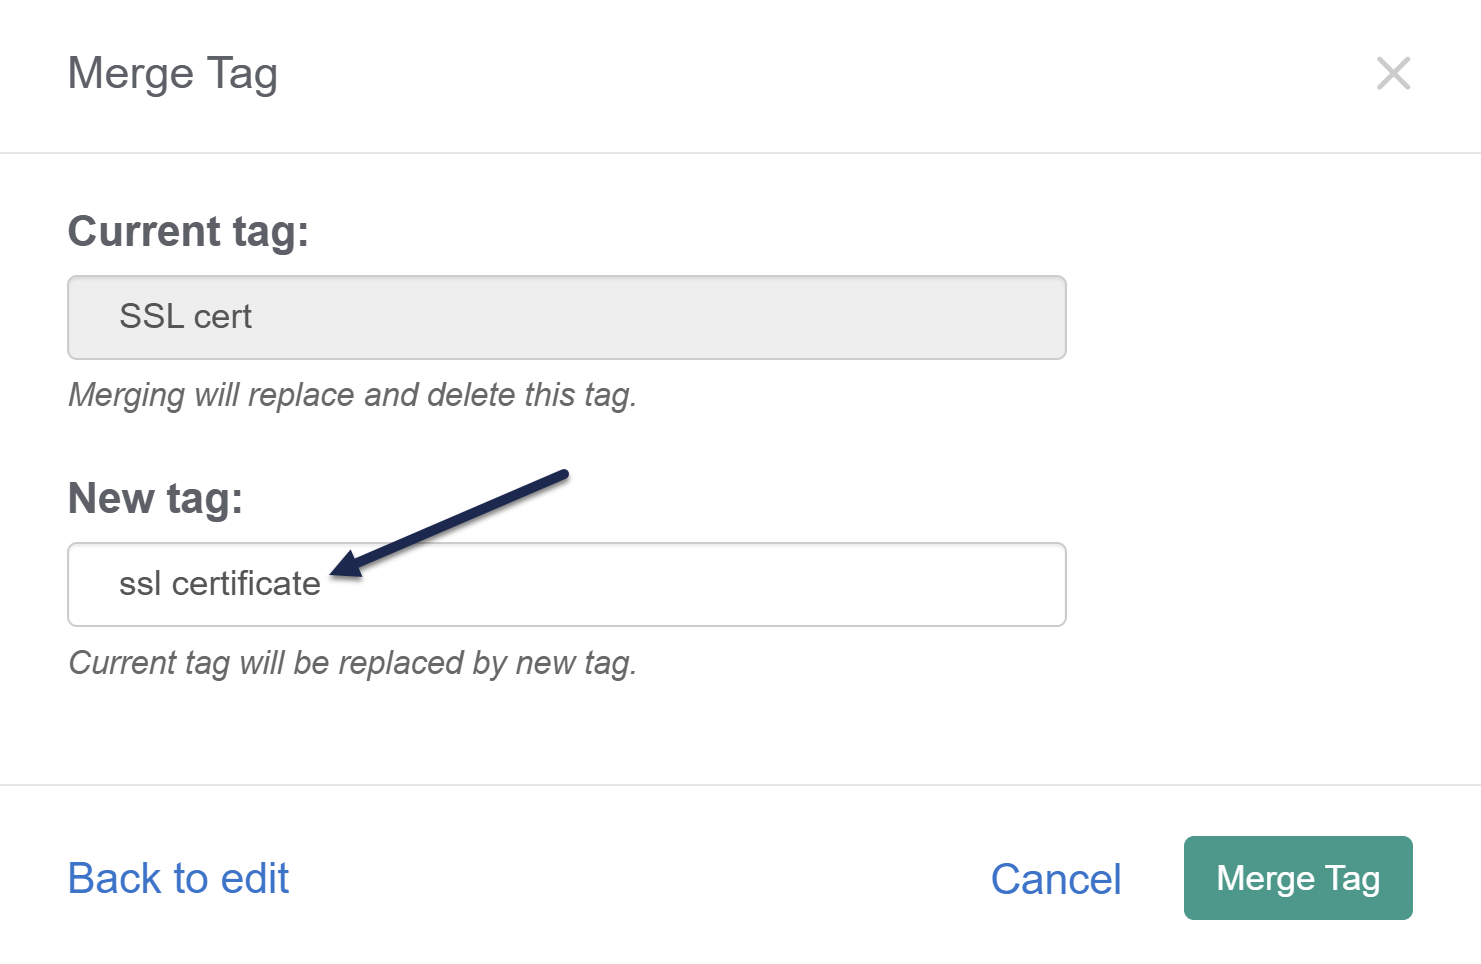 Add the New tag you'd like to merge the current tag into
 - Once you've confirmed the Current tag and New tag are set as you'd like, select Merge Tag.
- A confirmation message appears for you to confirm the merge.
Point of no return
Tag merges cannot be undone. Be sure you've selected the correct tags! - Select OK to complete the merge.
- When the merge is complete, you'll be directed back to the main Tags page. The merged/current tag is removed and the new tag remains.
In each tag merge, there are two tags:
- The Current tag (the tag you began the merge from)
- The New tag (the tag that will remain when the merge is complete)
Merging will:
- Add the New tag to all articles that have the Current tag
- Remove the Current tag from all articles
- Delete the Current tag from the Tags page
Let's assume I'm using this scenario in my merge:
 A sample tag merge scenario
SSL cert is the tag I began the edit and merge with.
When I complete the merge:
- The
SSL certtag won't exist anymore - All articles that had
SSL certas a tag will have thessl certificatetag - Articles that had both tags will no longer have the
SSL cert - Any Manage filters that used
SSL certtag as a filter will have the tag removed. I'll need to manually update them to add thessl certificatetag.
Want to know how many times a tag's been used? Or curious to see if you have similarly-named tags?
In the Tags page, you can generate a Tags Usage Report to get a list of all the tags in your knowledge base along with counts of how many articles and categories each tag is assigned to.
This report comes in CSV format, with three columns:
- Tag Name: The text of the tag as it appears in your knowledge base.
- Article Usage: A count of all the non-deleted articles that use this tag.
- Category Usage: A count of all the topic display and custom content categories that use this tag.
Generate a report
To generate a tags usage report:
- In the left navigation, go to Tags. The Tags page opens.
- Select Generate Usage Report:
 Select Generate Usage Report.
 - A progress spinner displays while the report's generated. Once it finishes, the text changes to prompt you to Download Usage Report. Select this option to download the CSV:
 Select Download Usage Report.
Additional actions will depend on which browser you're using.
Use the report
The tags usage report is great for tag reviews and audits. It can help you identify tags:
- That aren't used anywhere (have 0 Article Usage and 0 Category Usage), which are "safe" to delete: Sort by the Article Usage column and review.
- That are slight variations or duplicates of each other so they can be merged: Sort by the Tag Name column and review.
- With low usage overall that might be candidates for deletion, merging, or editing: Sort by the Article Usage or Category Usage columns and review.
- Identify tags that are misspelled or improperly formatted for editing: Sort by the Tag Name column and review.


