
To edit an existing category:
- Go to Articles.
- Hover over the category you want to edit so the context menu appears.
- Select the Edit option (gear cog icon):
 Select the Edit/gear cog icon.
The category opens in the category editor.
Sometimes, you need a place to leave notes for other authors (or yourself). This might include notes on who the subject matter expert is, or that if you update this category, you should also update another page, or some type of quality control note (such as Article Confidence levels if you use KCS).
This type of note is exactly what we designed the Internal Note field for.
Internal notes:
- Are notes you want front-and-center when you or other content creators are editing a given article or category.
- Are displayed only in app.knowledgeowl.com, not to your readers.
- Accept very simple HTML markup, so you can include hyperlinks and lists.
- Will be displayed at the top of ALL versions of the article.
- Are available in the Manage Articles CSV export.
- If used in a template article, will be copied to new articles created from that template.
- If in an existing article, will be copied when a new article is created from that existing article.
Add an internal note
Authors with the default Editor or Writer role can add internal notes. If you're using a custom role, you'll need to have the Internal notes custom author role permission to Create new internal notes.
Authors who don't have permissions to create, edit, or delete internal notes will still be able to see internal notes created by other authors who do.
To add an internal note to category:
- Open the category for editing.
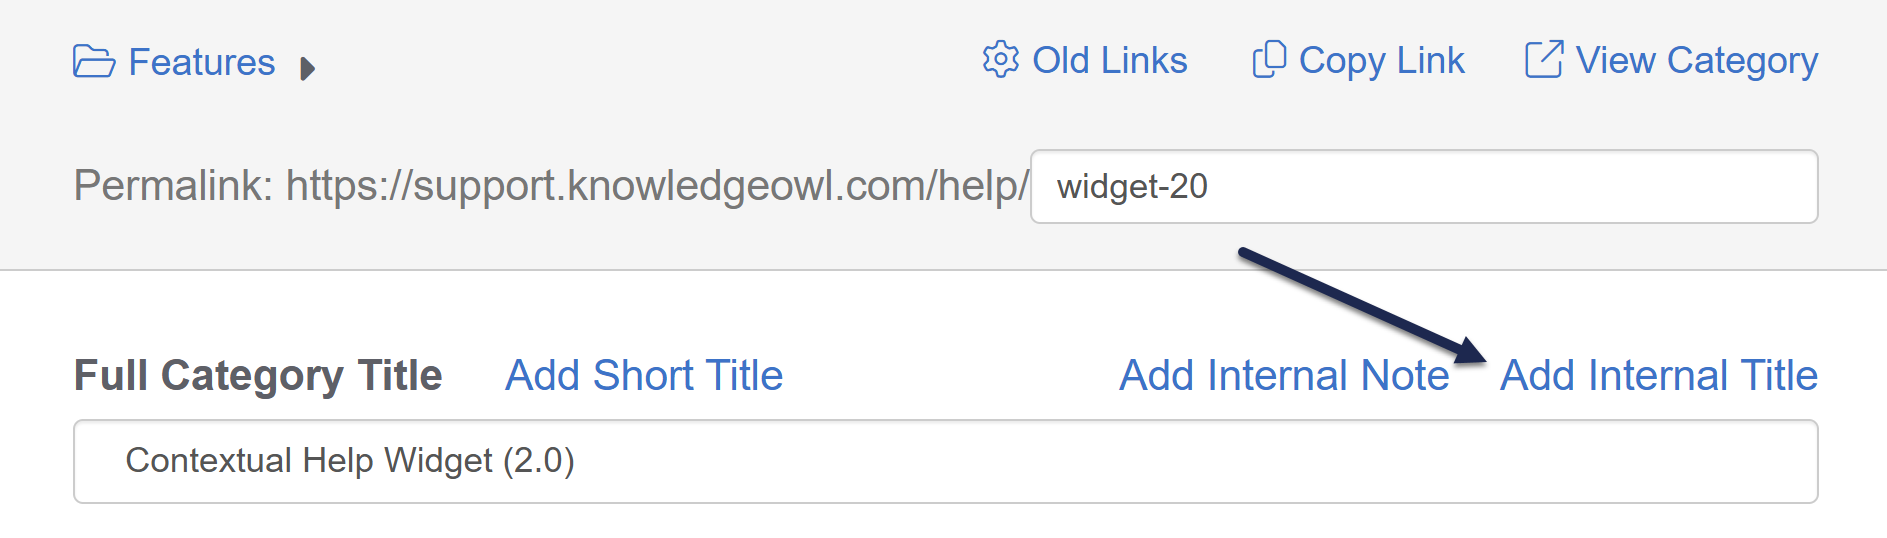
- Select the Add Internal Note link to the right of the title:
 Select Add Internal NoteThe Create Internal Note modal opens.
 - Add the text of your note in the Note HTML. If you're just putting in regular sentences, you don't need to add HTML. If you're using lists, hyperlinks, and so on, add raw HTML.
- It's often easiest to use the article editor to create the note, then toggle to Code View to copy the raw HTML and enter it into the note.
- Refer to What HTML is supported in internal notes? for more information on which HTML you can use.
- Use the Style dropdown to select the style display for your note. We default to Alert Info.
- A simple one-line note in the Alert Warning style might look like this:
 Sample Create Internal Note modal with a one-line note in the Alert Warning style
- A simple one-line note in the Alert Warning style might look like this:
- Select Create Note. The modal closes and the article editor displays with the note near the top, in the style you selected:
 Sample display of an Internal Note in the Alert Warning style
 - You don't need to resave the article itself for the note to be saved.


Edit an internal note
Authors with the default Editor or Writer role can edit internal notes. If you're using a custom role, you'll need to have the Internal Notes Permission to Edit internal notes.
Authors who don't have permissions to create, edit, or delete internal notes will still be able to see internal notes created by other authors who do.
Once an internal note exists, you can edit it to make updates. To do so:
- Open the category for editing.
- Select the Edit Note link that appears just above the note:
 Select the Edit Note linkThe Edit Internal Note modal opens.
 - Edit the HTML or change the style as you'd like.
- Once you're done making changes, select Edit Note to save your changes.The note updates immediately based on the changes you made. You do not need to resave the article or category for the note to save.

Remove an internal note
Authors with the default Editor or Writer role can remove internal notes. If you're using a custom role, you'll need to have the Internal Notes Permission to Remove internal notes.
Authors who don't have permissions to create, edit, or delete internal notes will still be able to see internal notes created by other authors who do.
To delete an internal note from a category completely:
- Open the category for editing.
- Select the Remove Note link that appears just above the note:
 Select Remove Note
 - A confirmation modal opens to ask you to confirm that you want to delete the note. Select OK to delete the note.
- The note is deleted immediately; you don't need to resave the article or category for the deletion to complete.

What HTML is supported in internal notes?
We've kept these notes pretty lean. They will support HTML:
- Paragraph
<p> - Numbered list
<ol> - Bulleted list
<ul> - List items
<li> - Hyperlinks
<a href="www.mylink.com">Link text</a> - Bold text
<b> or <strong> - Italics
<i> - Paragraph breaks
<br> - Headers, e.g.
<h1>
For each category, you can add an internal title. Internal titles are used only within app.knowledgeowl.com - your readers do not see them when viewing the knowledge base.
Internal titles can be useful when you have a lot of categories or subcategories with very similar names, and you want to be sure you're selecting the correct category when you use:
- The Insert Link to Article option in Modern Editor
- The Related Articles section
- The Change Article Category option in the article editor
To add an internal title to a category:
- Open the category settings. Refer to Edit a category for more information.
- Select Add Internal Title.
 Select Add Internal Title
 - The Internal Category Title field displays. Enter the title you want to use internally here.
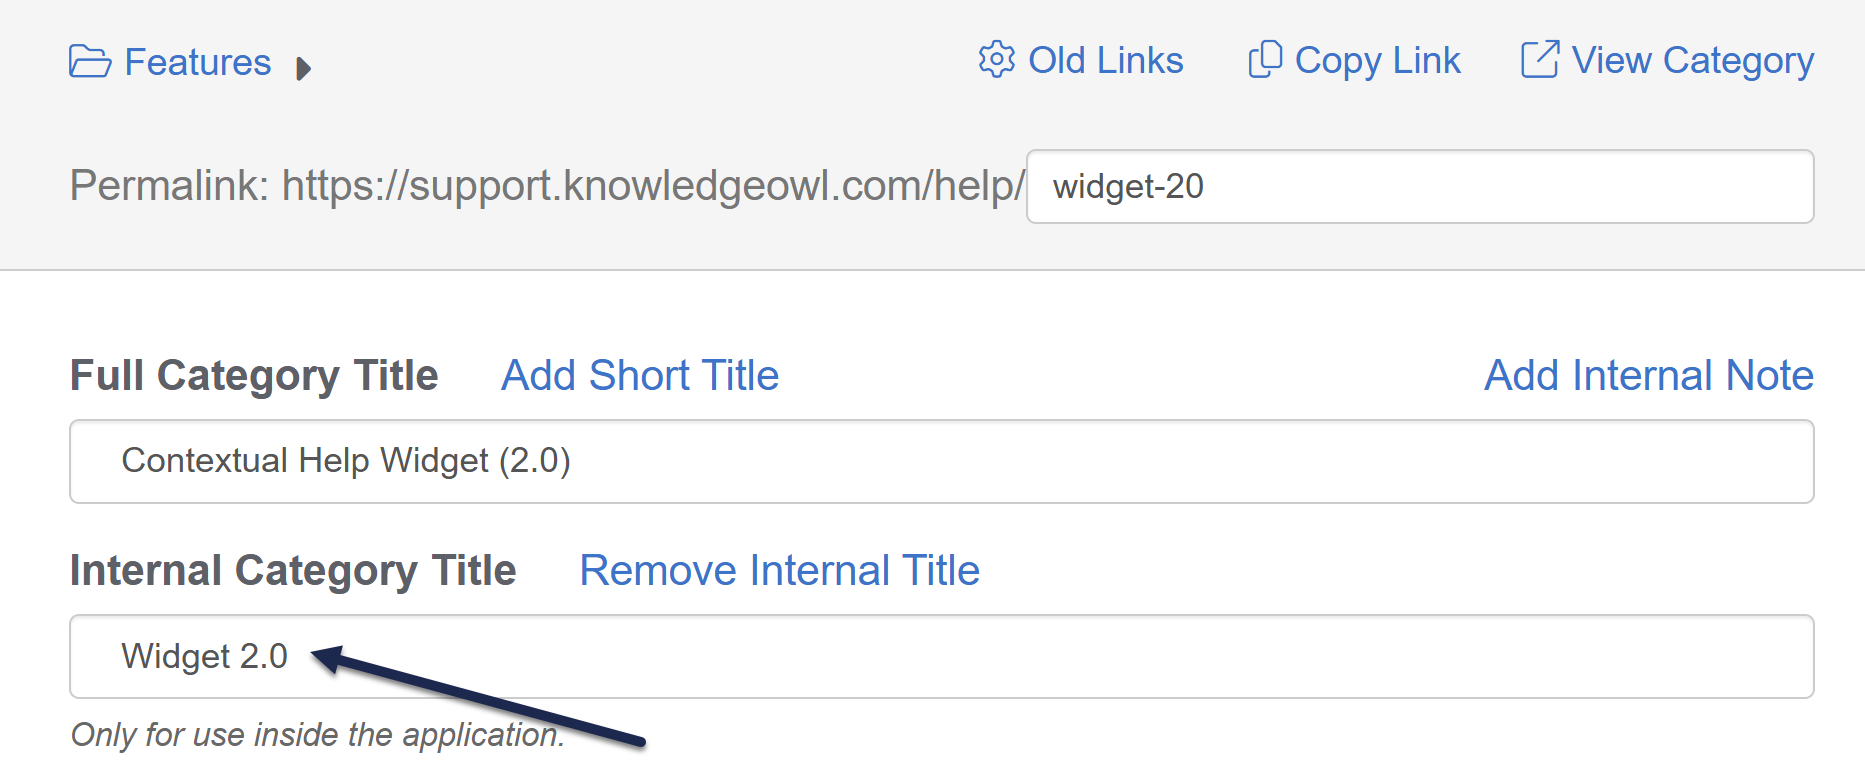 Enter the Internal Category Title.
 - Be sure to Save your changes.


Where will I see internal category titles?
The internal title is displayed instead of the Full Article Title in these places within app.knowledgeowl.com:
- The Articles hierarchy
- In the editor, the Category display beneath the Author field, along with the pop-up search to change categories when that gear icon is clicked
- The Manage Articles CSV export > Basic > Category and Breadcrumbs columns
- The Insert Link to Article pop-up/search in the editor
- The Related Articles search in the editor (only Topic Display and Custom Content categories show up in this list)
- If you have synced categories between different knowledge bases, the internal title will display in the editor messages identifying the synced categories.
Use cases
My knowledge base might contain one category for each of my products, and I might use the same subcategory hierarchy for each product. So this might be my first two products:
- Opportunities for Owls
- Setup instructions
- Troubleshooting & tips
- Customization
- Fight & Flight
- Setup instructions
- Troubleshooting & tips
- Customization
When I want to reference the Fight & Flight Customization subcategory to assign an article to it, or Link to Article to that subcategory, right now if I search Customization, both of these will come up and I won't be able to tell which is for Opportunities for Owls and which is for Fight & Flight. I don't want to change the titles of the categories themselves, because I don't want my customers to see that difference.
I can add an Internal Title to both categories to distinguish them, and that's what will be used for all app.knowledgeowl.com layouts:
- Opportunities for Owls
- Setup instructions - OfO
- Troubleshooting & tips - OfO
- Customization - OfO
- Fight & Flight
- Setup instructions - F&F
- Troubleshooting & tips - F&F
- Customization - F&F
This way, when I link to a category or I edit the category, I can search for Customization - F&F and know I'm always getting the correct category.
Want to jazz up your knowledge base to add some more visuals? Add icons to your categories and display those icons on your homepage or when displaying lists of categories.
You can choose to add an icon in two ways:
- Use our integration with Font Awesome to select a Font Awesome icon, set the color, and style for it.
- Upload your own icon file or use an existing icon in Files.
Add an icon to a category
- Open the category for editing.
- Select the gear cog next to the Category Icon heading.
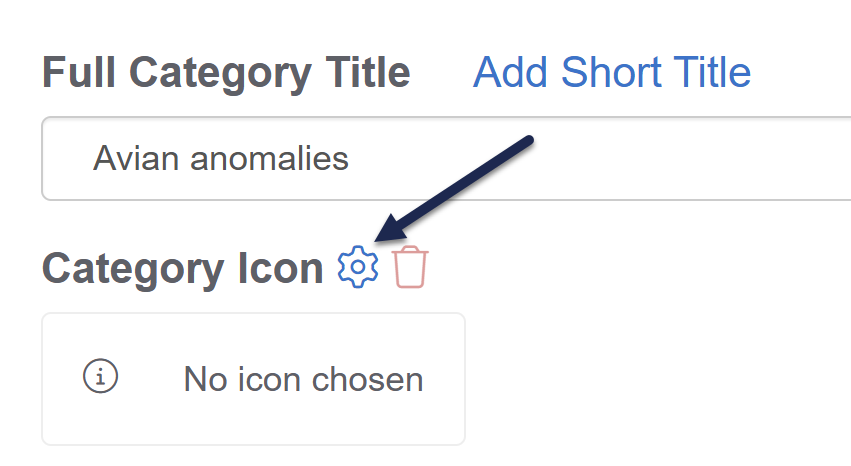
- The category icon edit options display. Choose how you'd like to add an icon:
- Use Pick icon from library to select an existing file from your Files or upload a new file of your choice. Once you select this option, the Add from Library modal opens.
- Search or browse for an existing file or use the Upload New File button in the lower left to add a new one.
- Once you've selected or uploaded the file you'd like to use, select Insert File to add the icon to the category.
- Use Pick Font Awesome icon to select one of over 6000 icons in Font Awesome's icon library. We pay for the license so you can use them as much as you'd like! Once you select this option, the Choose a Font Awesome icon modal opens.
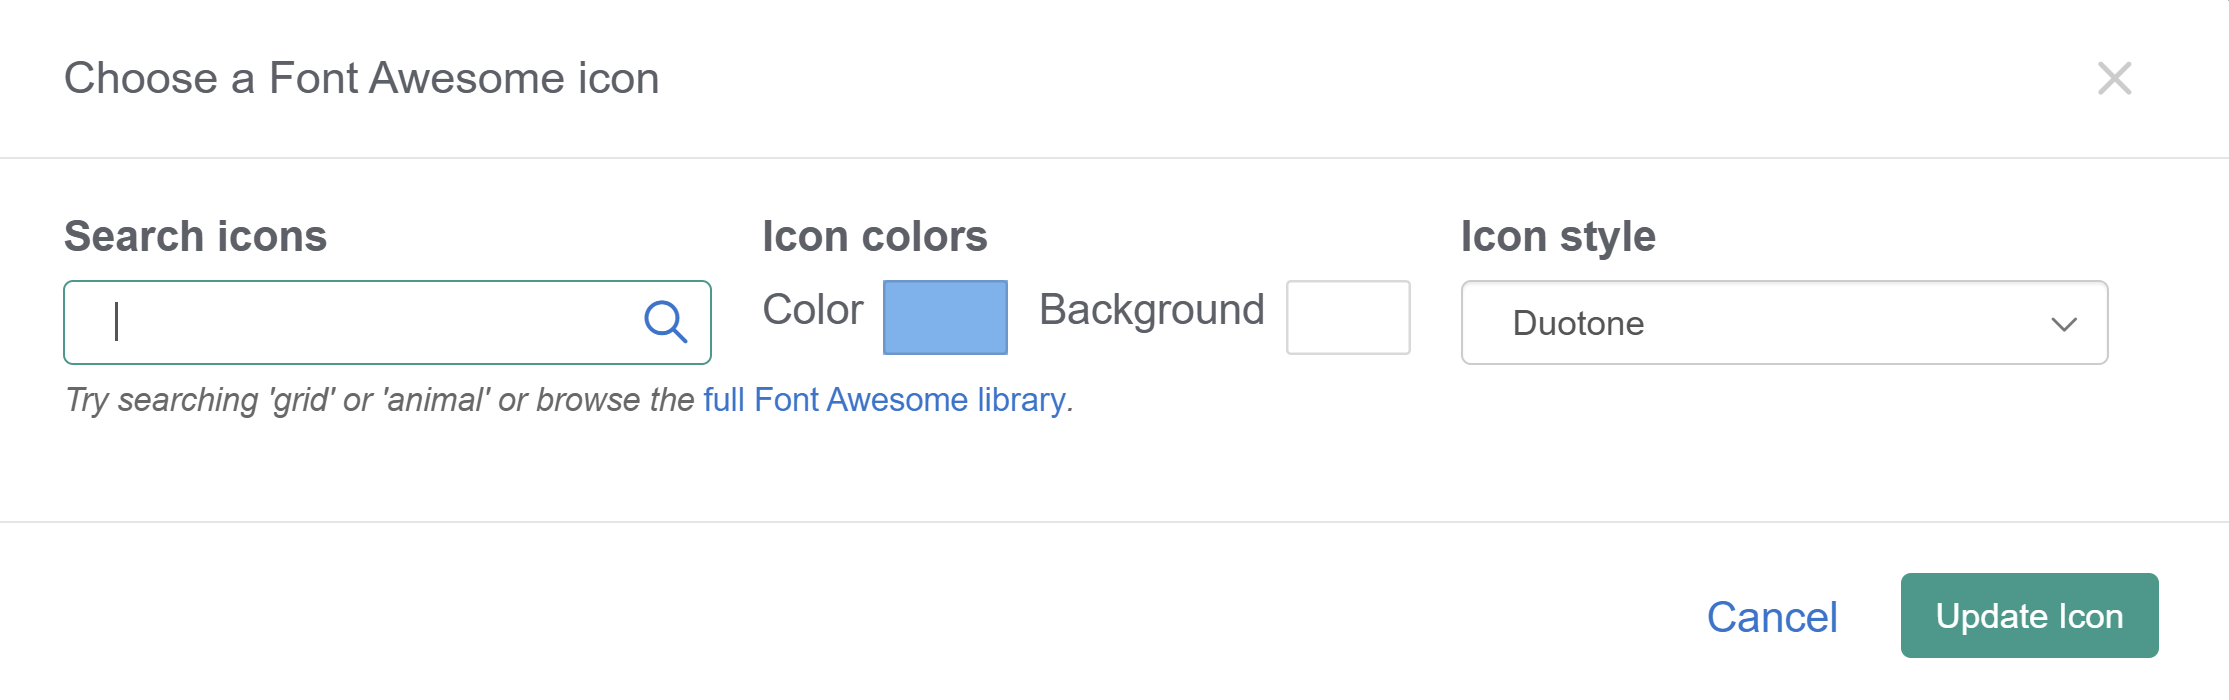 Sample Choose a Font Awesome icon modal
- Enter a phrase or word into the Search icons box, then hit Enter or select the magnifying glass to search. This search will look through Font Awesome's catalog to return icons. If you're not sure what to search, you can also head over to the Font Awesome website to browse icons. Select the icon you'd like to use.
- The Color section will start with whatever color has been set in Customize > Style (HTML & CSS) > Colors > Category Icons. To change the color of the icon, select the Color swatch. Use the color picker to select a new color or enter a hex code.
- The Background section will start with whatever color has been set in Customize > Style (HTML & CSS) > Colors > Category Icons Background. To change the color of the background, select the Background swatch. Use the color picker to select a new color or directly enter a hex code. The background will provide a small square background of color around the icon, like this:
- Select an Icon style from the dropdown. These are Font Awesome's predefined variant style. Refer to Font Awesome icon styles guide for more details and a sample of each icon style.
- Once you've configured the icon as you'd like, select Update Icon to add the icon to the category.
- Use Pick icon from library to select an existing file from your Files or upload a new file of your choice. Once you select this option, the Add from Library modal opens.
- Once you've added your icon, a preview of your selection appears in the editor.
- Be sure to Save the changes to your category once you're done.
Font Awesome icon styles guide
Here's a quick guide to walk you through the different icon styles options for Font Awesome icons.
Duotone (default)
A two-tone style, Duotone will use the color of your choice plus a lighter variation to provide a two-tone icon. This is the default icon style.
Font Awesome suggests this style for an illustrated feel and attention-grabbing, which is why we default to this style for category icons.
For example, here is the House icon in Duotone:
Regular
The Regular icon style uses a white fill and outlines the icon using the color you select.
Font Awesome suggests this style for easy, readable icons that blend in with regular text.
Here's the same House icon in Regular:
Solid
The Solid icon style usually follows the Duotone outline of the icon and fills it solid with the color of your choice.
Font Awesome recommends these for small sizes and bringing contrast to text.
Here's the same House icon in Solid:
Light
The Light icon style uses the same outlined icon version as Regular, but thins the lines moderately.
Here's the same House icon in Light:
Thin
The Thin icon style uses the same outlined icon version as Regular, but thins it significantly.
Here's the same House icon in Thin:
Display category icons on your homepage only
New knowledge bases automatically display category icons on your homepage.
If you're using an older knowledge base without the homepage category icon display, refer to Add category icons to your homepage category panels for full steps on adding category icons to your homepage automatically.
Display category icons in other categories
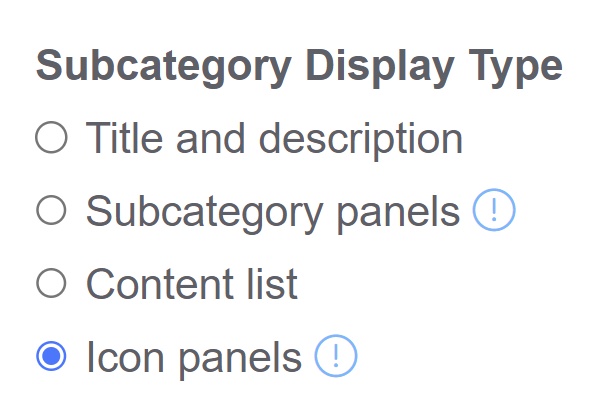
If you have a category which contains subcategories, use the Icon panels Subcategory Display Type to display those icons.
For Default category types, you can choose how to display subcategories (that is, categories within this category) on the category homepage using the Subcategory Display Type setting.
To set or change these settings:
- Open the category for editing. Refer to Edit a category for more information.
- Make your Subcategory Display Type selection.
- Some Subcategory Display Types include additional settings, which will appear below the Subcategory Display Type. Make any necessary additional selections.
- Be sure to Save your changes.
There are four Subcategory Display Type options:
- Title and description
- Subcategory panels
- Content list
- Icon panels
Title and description
This Subcategory Display Type displays category titles and description in a simple grid format with three categories to a row. Example: Company and product info.
We have a modified version with subcategories in our knowledge base (we force one subcategory per row): Example: Security and permissions
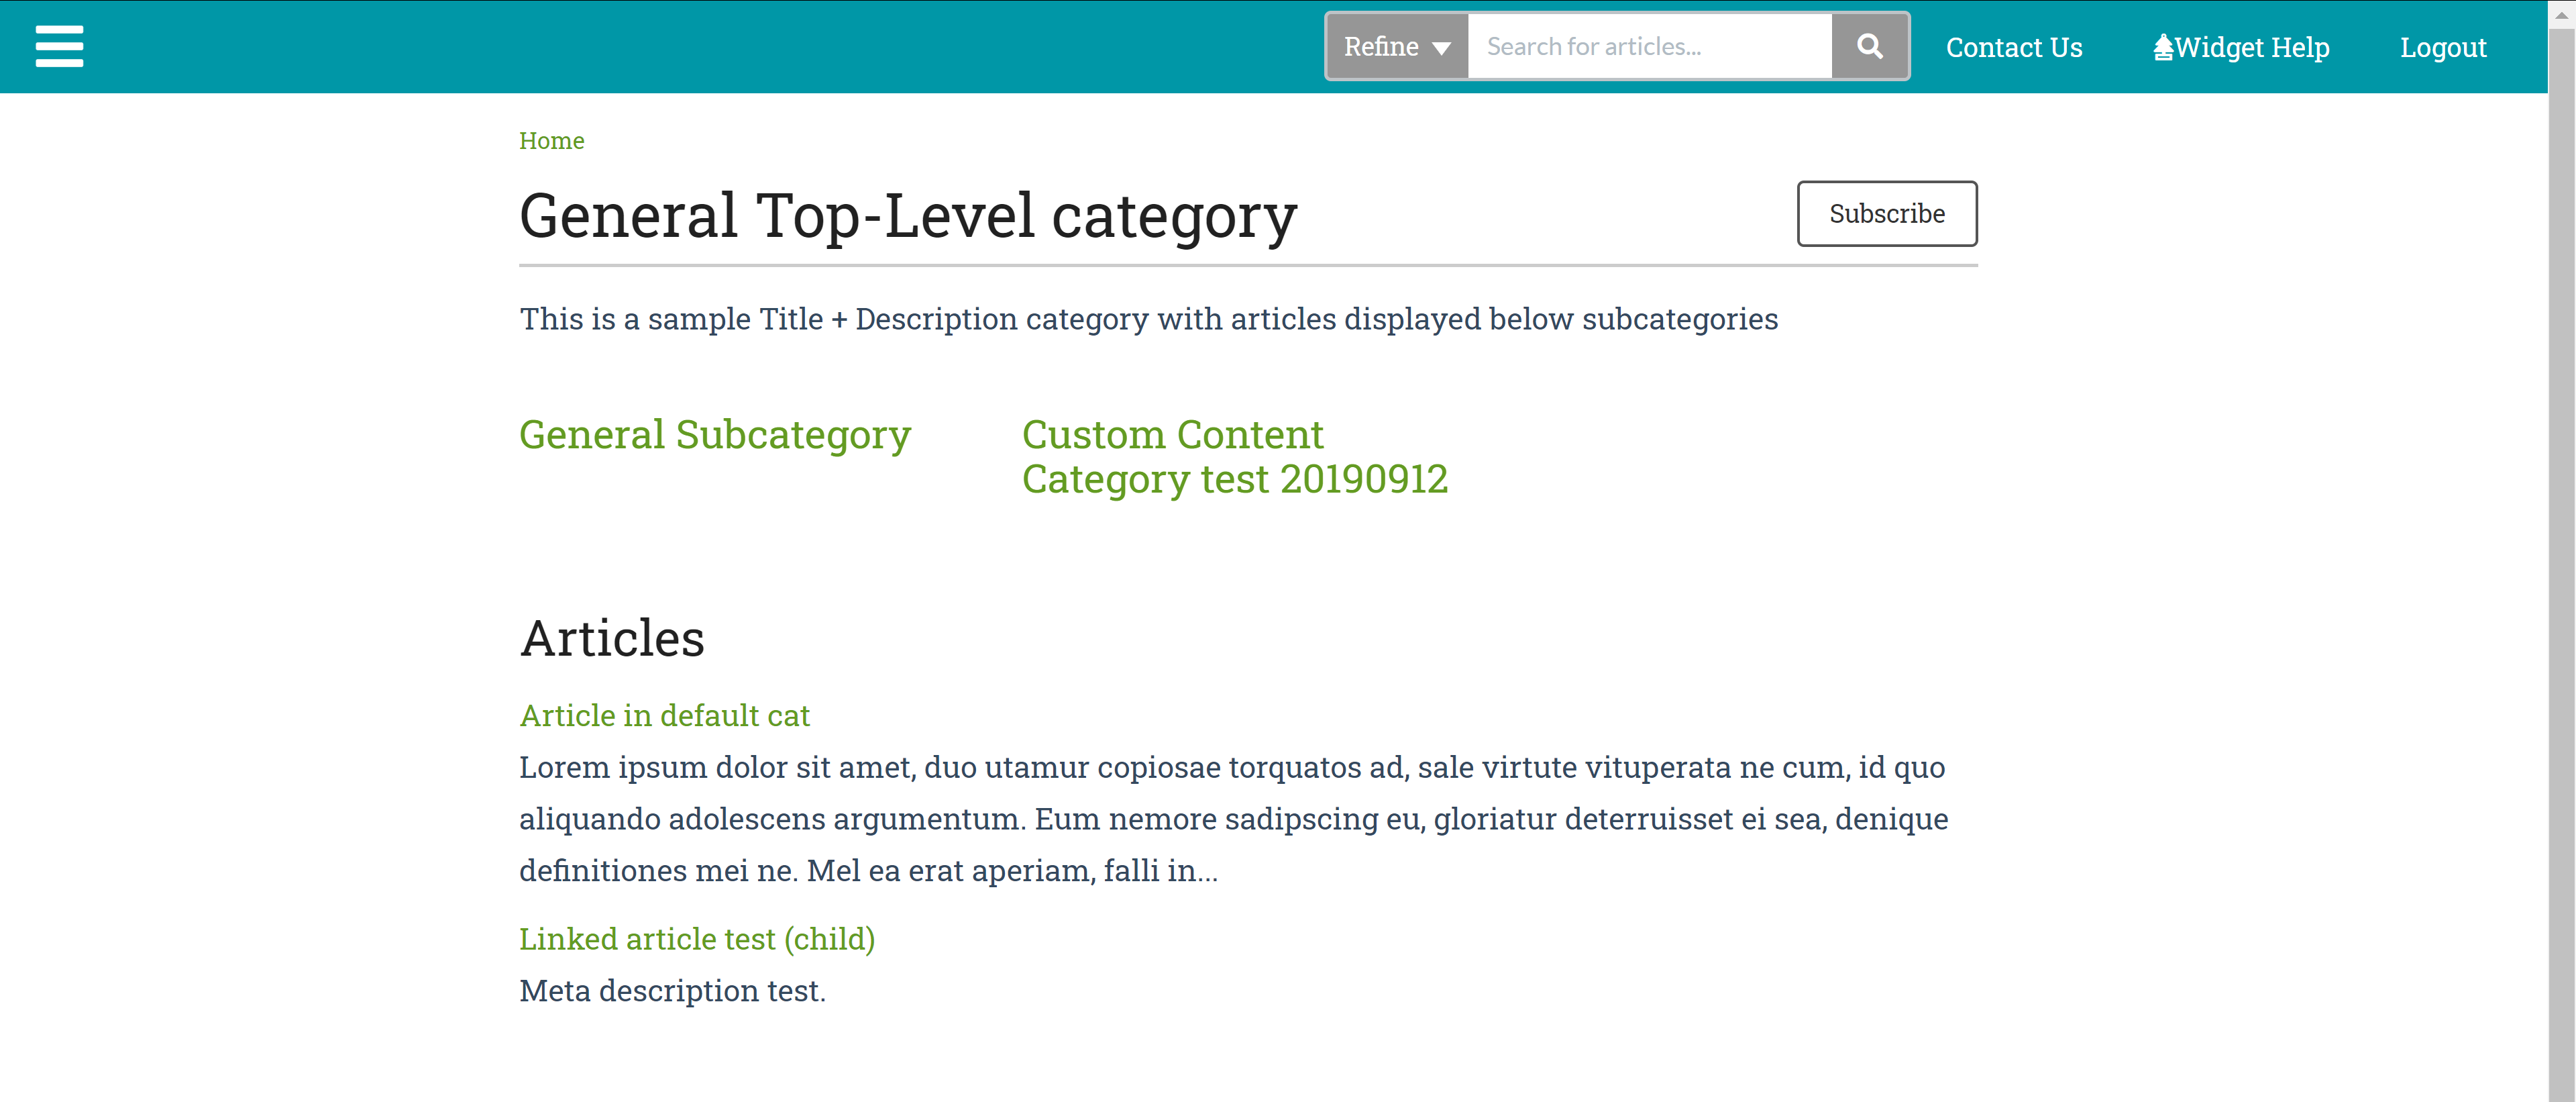 Sample default category, Title and description subcategory display type
Subcategory panels
This Subcategory Display Type displays subcategory titles in panels matching the homepage base category panels with three categories to a row. We have modified versions of this in our knowledge base (we force one category per row).
Article Display limitation
When using subcategory panels, articles only show when using inline display for the Article Display options.
So, for example, here is the same category as above with subcategory panels selected, without the inline display selected:
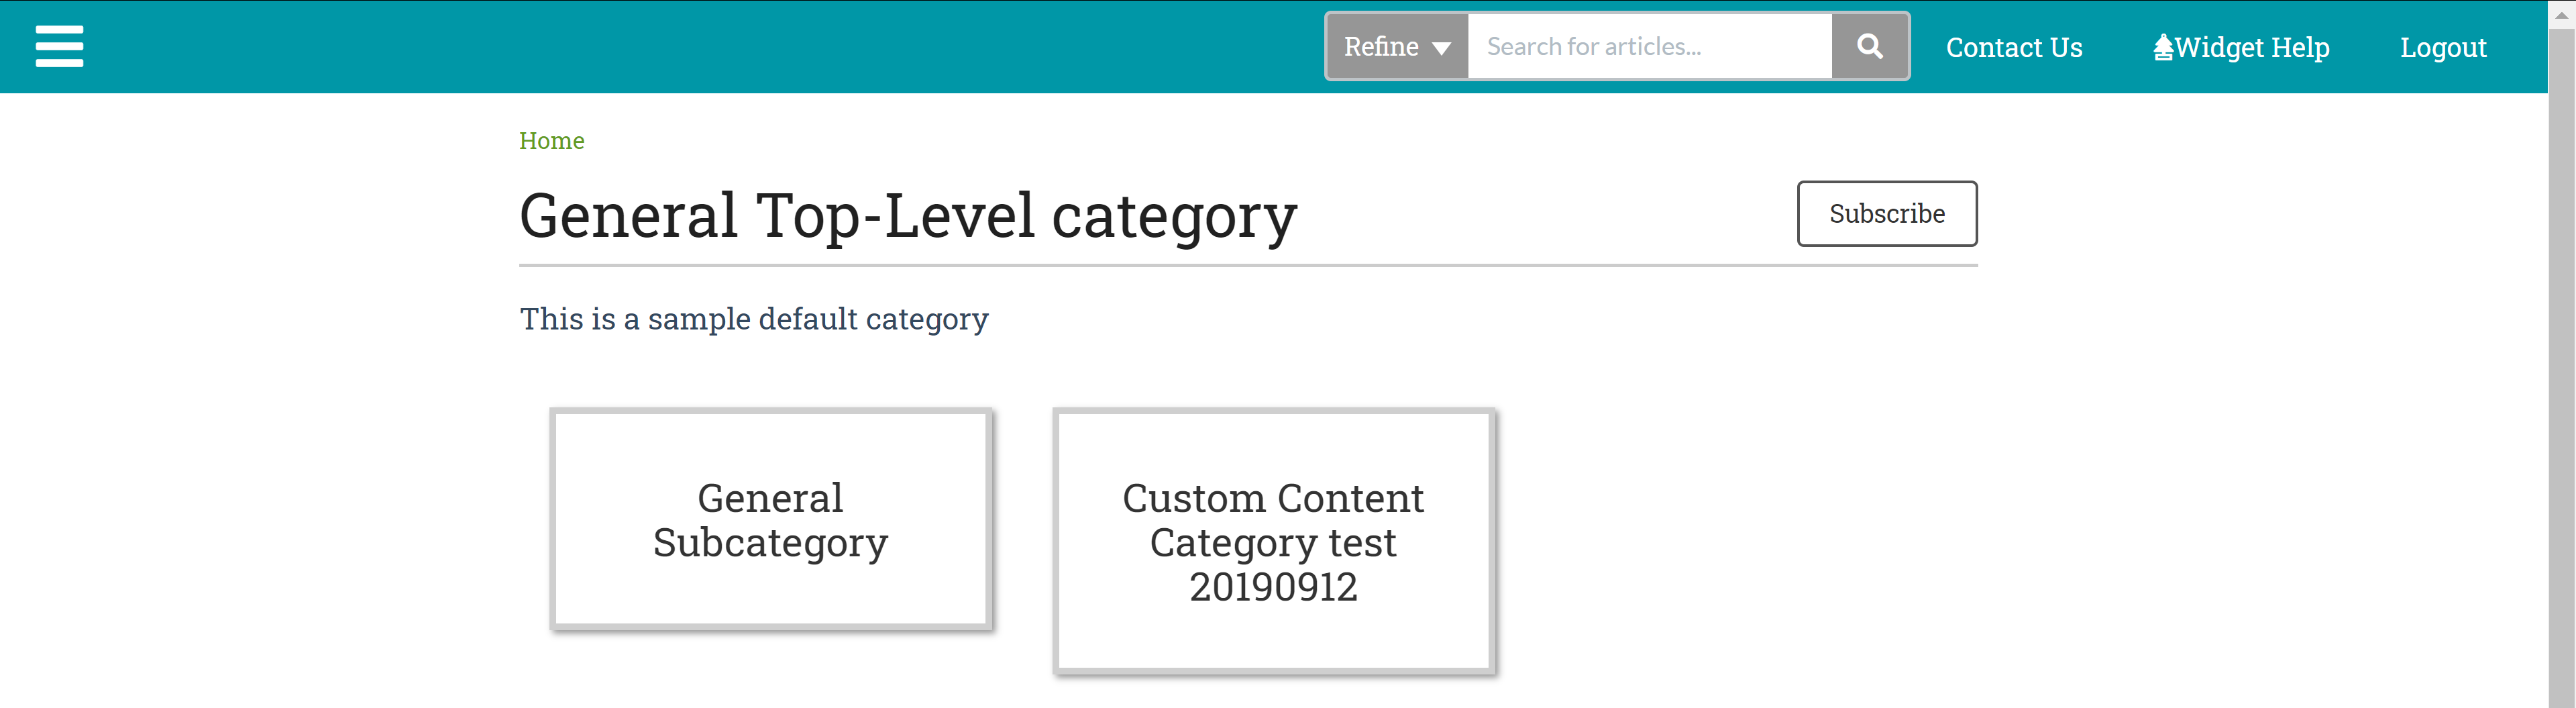 Sample default category, Subcategory panels subcategory display type
And with the inline display selected, where articles are displayed in the same panels:
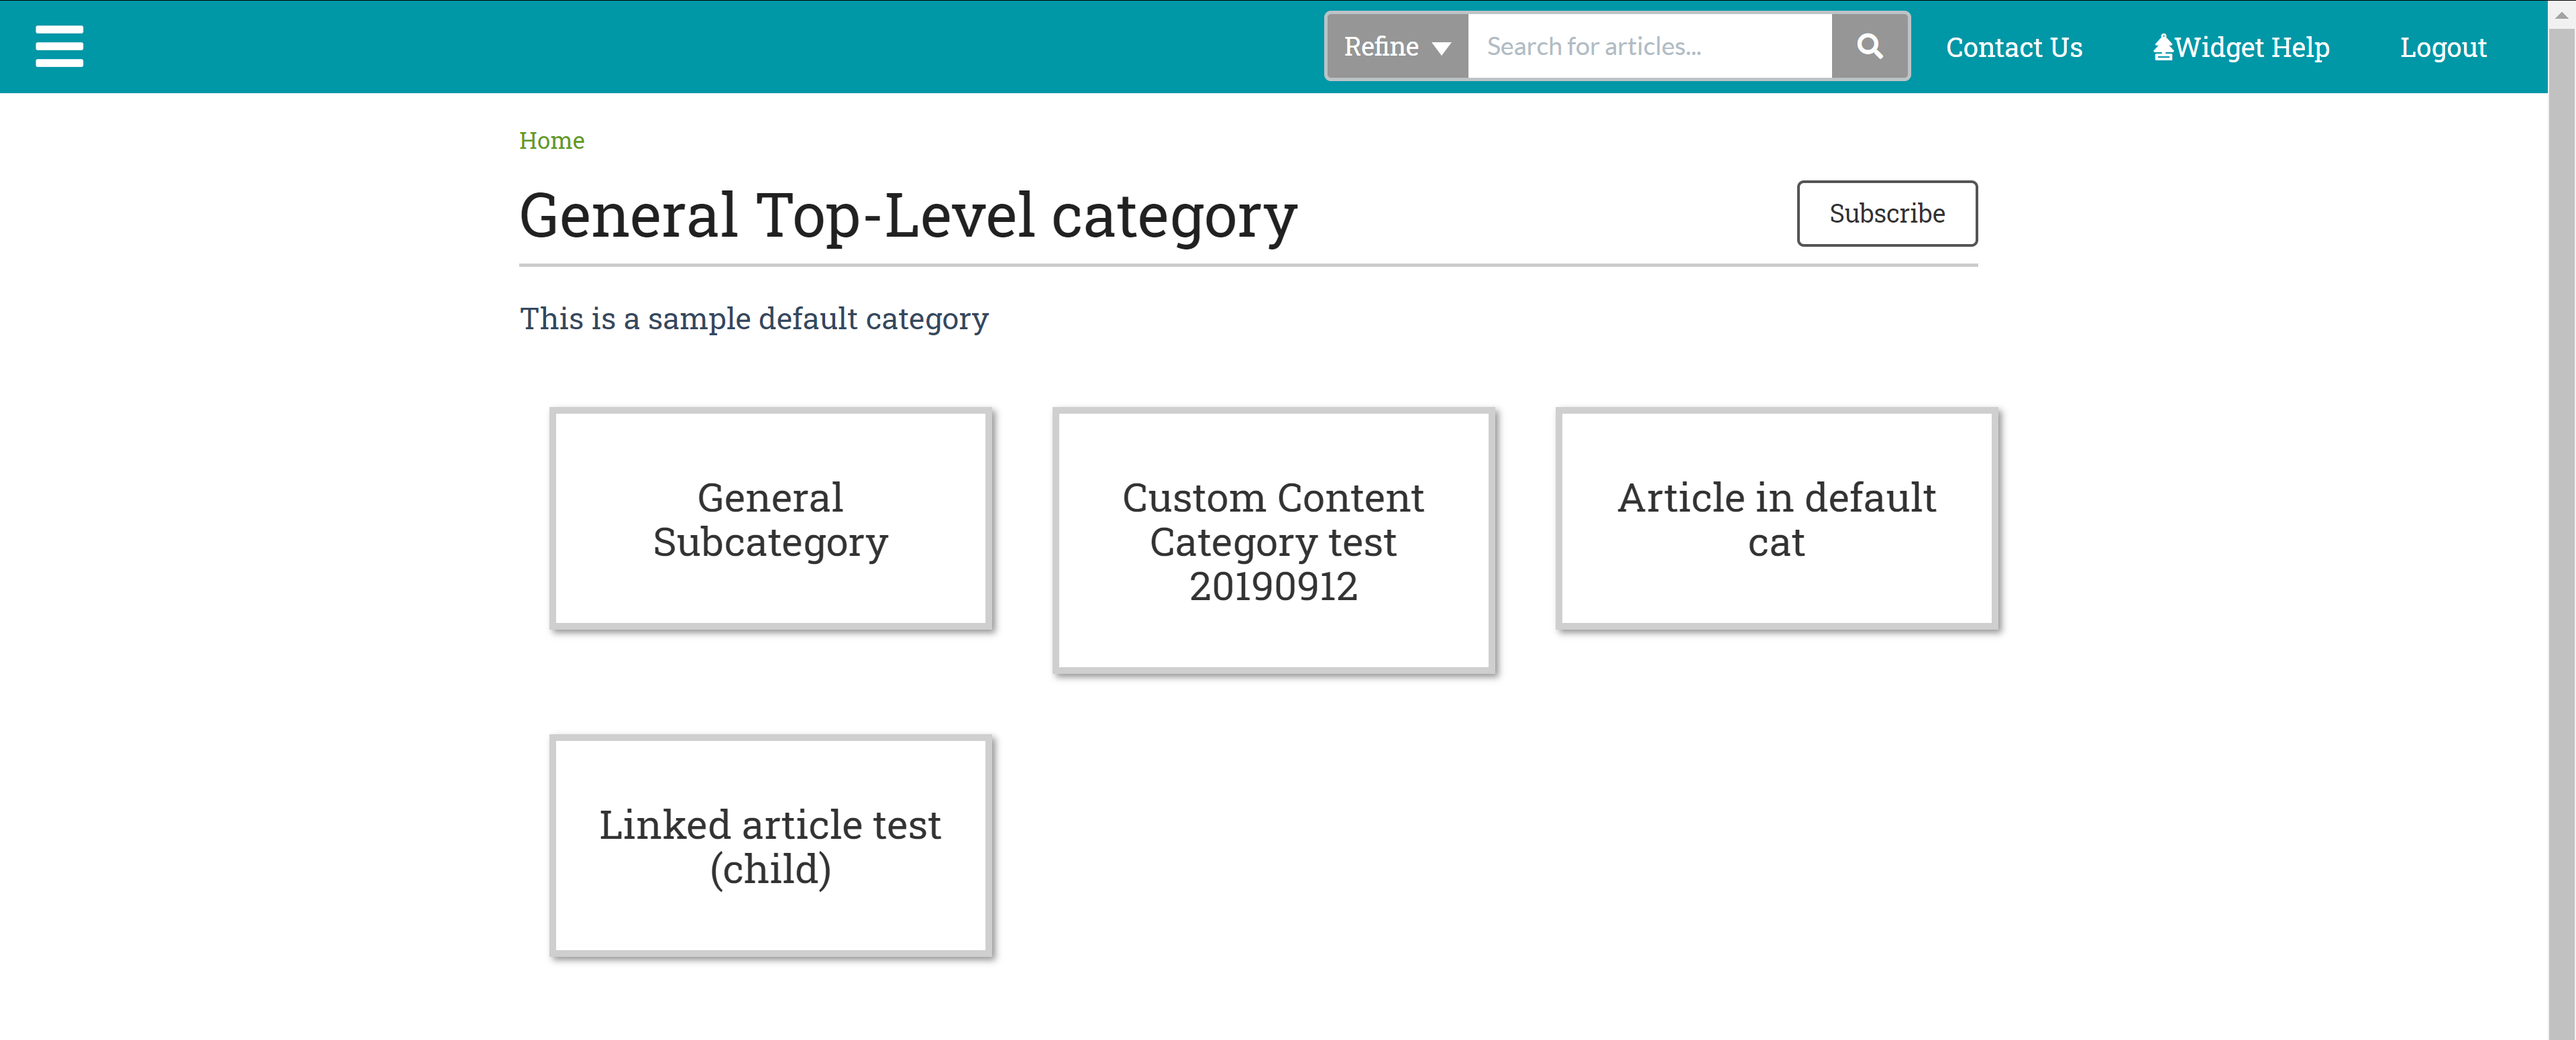 Sample default category, Subcategory panels + Inline article display
Content list
This Subcategory Display Type displays the title of each subcategory with a list of links to the first five subcategories or articles in the categories. The total number of subcategories and articles are displayed in parentheses with a link to view all. Example: Account and billing.
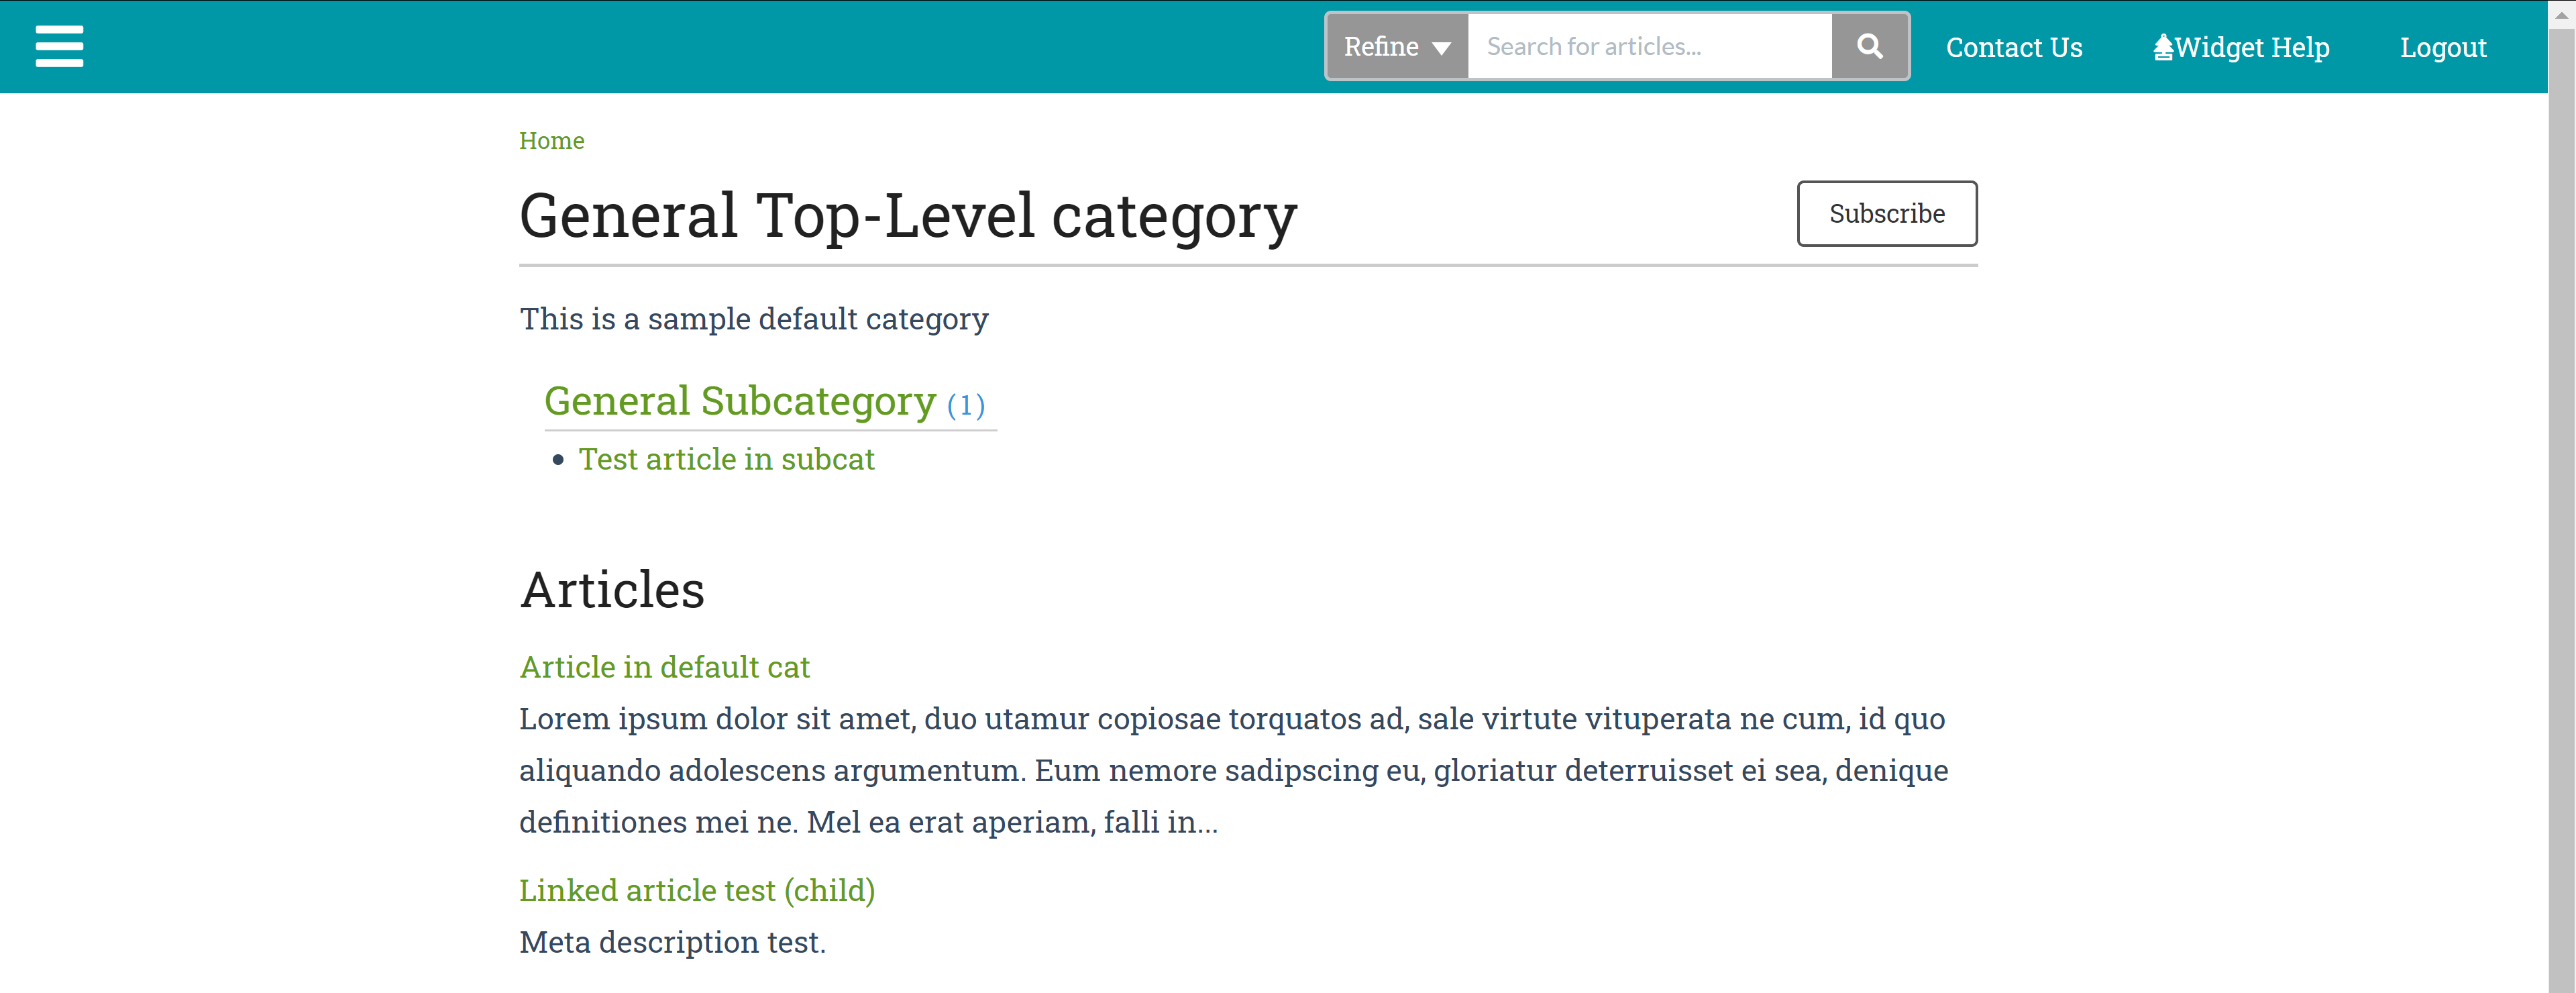 Sample Default category, Content list subcategory display type
Once you select this Subcategory Display Type, you have two additional Content List Options:
- Show all child content: By default, this display type only shows the first five articles or subcategories with a "See more" link to view the full list. Check this box to show all child content instead.
- Show category descriptions: By default, this display type won't display subcategory descriptions. Check this box to display them.
Icon panels
This Subcategory Display Type displays all subcategories in panels with icons, in the same style as Add category icons to your homepage category panels. These use the category icons you've set for each subcategory, and we have a few default icons that will be used if a category doesn't have an icon, too.
![]() Sample Default category, Icon panels subcategory display type
Sample Default category, Icon panels subcategory display type
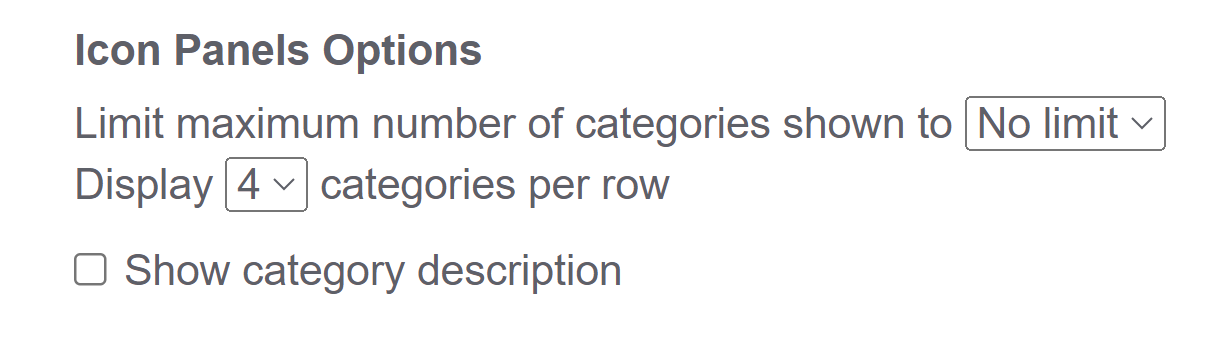
There are three additional Icon Panels Options:
- Limit the maximum number of subcategories displayed. This is useful if you have a lot of categories and only want to display the first few. (Default is no limit.)
- Set how many subcategories you'd like per row. When higher numbers are selected, the display is automatically responsive to device size, so 4 categories per row on a laptop may shift to 1 category per row on a cell phone. (Default is 4 categories per row):
- Show category description. If you'd like to display the category's description within the panel, check this box. (Default is no description.) We recommend using short category descriptions if you use this option.
 Additional Icon Panels Options to set max number of categories and categories per row
After you set up your category, KnowledgeOwl automatically displays the category's content in the chosen format.
Quick Add/default setting
All newly created Default categories (including Quick Add categories) will have these default settings:
- Icon panels subcategory display type
- No limit on the number of subcategories
- 4 categories per row
- No category description displayed
- Below subcategories article display
- Toggle option in the table of contents
When a reader clicks on a category in the table of contents, the default behavior is for the category menu to toggle open and closed to show and hide its content.
If you want clicking the category to navigate to the category landing page:
- Open the category settings. Refer to Edit a category for more information.
- Select Navigate under the Table of Contents Options on the category's settings page:
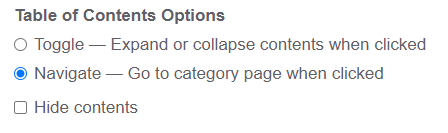
- Optional: by default, when using the Navigate setting, KnowledgeOwl both navigates to the category page on click, and toggles open the category menu. To hide the sub-menu and remove the toggle behavior, select Hide contents.

You can delete a category in two places:
- From the Articles page, using the trashcan icon.
- From the Category Editor when you're viewing that category, by selecting Deleted from the Status dropdown.
Below, we walk through each method in more detail.
Category deletes also delete content
When you delete a category, you also delete all the content inside the category. If you want to delete a category but not the content inside it, move the content out of the category before deleting. If you delete a category by accident or need to recover a deleted category, contact us so we can recover the category and all of its articles and subcategories.
Delete category from the Articles page
To delete a category from the Articles page:
- Select Articles from the left navigation.
- Find the category you want to delete. If it's a subcategory, you'll need to open the category it's located within.
- Hover over the category you want to delete.
- Select the Trashcan / Delete icon.
 Select the trashcan/Delete icon.
 - The Delete Category modal opens. Be sure the category name displayed here matches the category you want to delete!
- If it does, type the word delete into the textbox and select Delete Category:
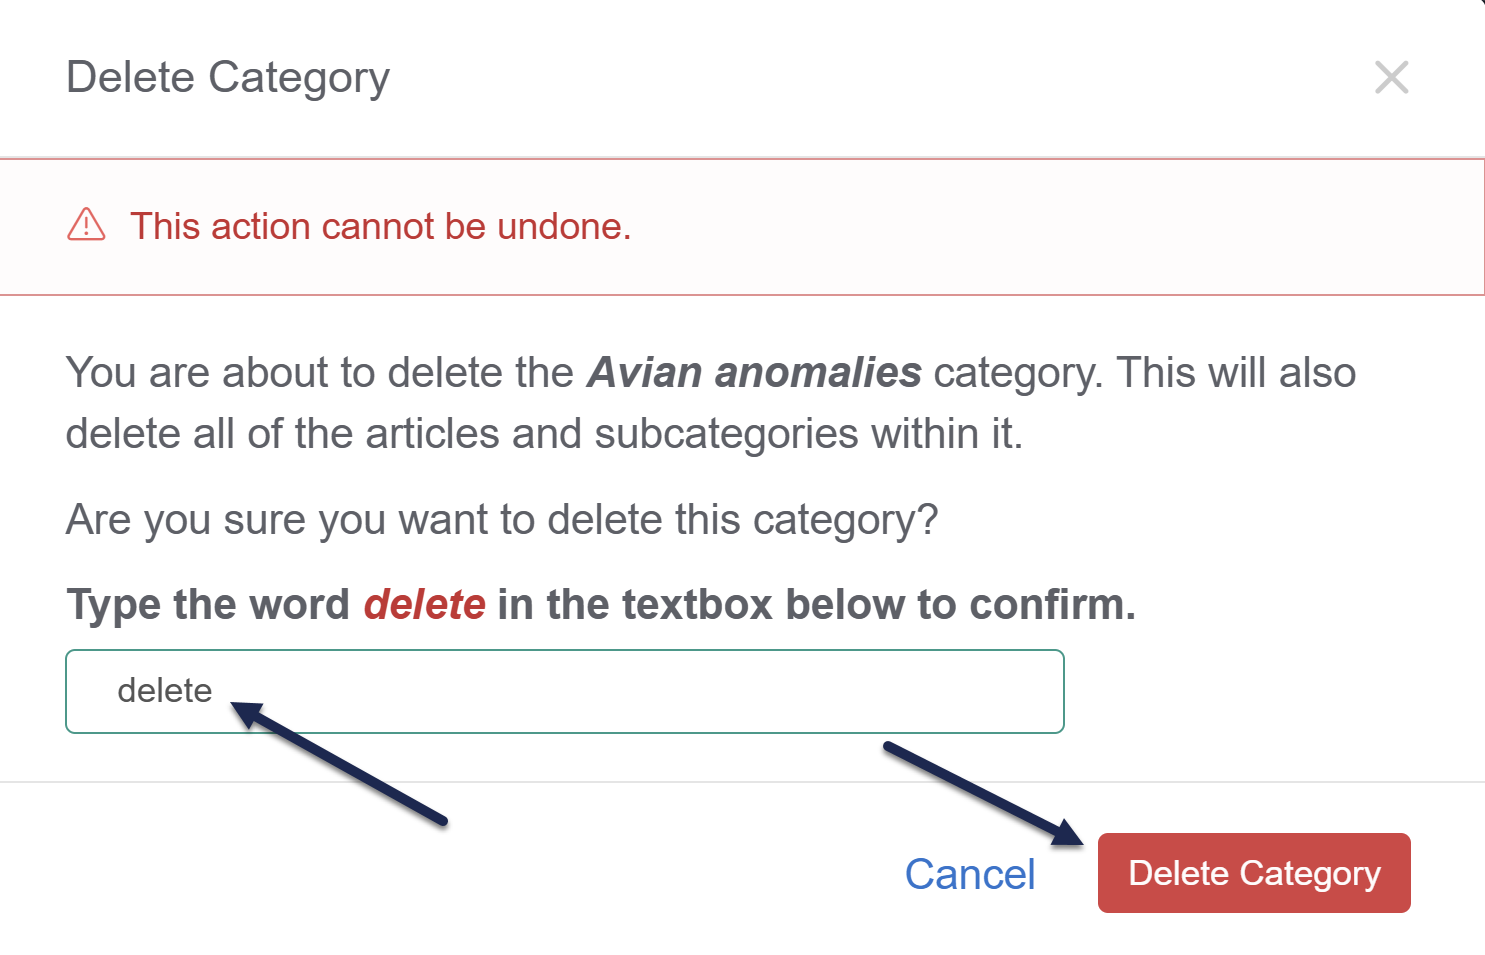 Type delete and select Delete Category.
 - The category and all of its subcategories and articles will be set to Deleted.


Delete category from the Category Editor
To delete a category from the Category Editor:
- Open the category you'd like to delete as if you're going to edit it.
- In the Status dropdown, select Deleted.
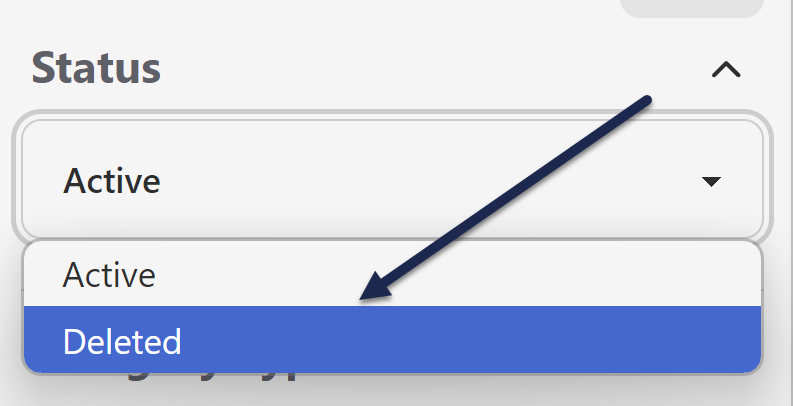 Select Deleted from the Status dropdown.
 - The Delete Category modal opens.
- To complete the deletion, type the word delete into the textbox and select Delete Category:Type delete and select Delete Category.
- Save your category to finalize the status change and deletion.
- Your category and all of its subcategories and articles will be set to Deleted.
