
Send Slack messages about your knowledge base events to keep your team aware of changes to your knowledge base content or let authors know when you have new comments or contact form submissions.
For the fastest setup, use our prebuilt KnowledgeOwl app for Slack, which will produce Slack notifications with our mascot owl Linus as the app name KnowledgeOwl Webhooks:

If you'd prefer to customize the icon or name of the app, create your own Slack app to use for the notifications.
Only authors with Full Account Admin rights can create, edit, and delete notifications.
To create a new Slack notification for your knowledge base, you'll complete two steps:
- Create the KnowledgeOwl notification.
- Select the Slack workspace and channel you want notifications sent to and authorize the KnowledgeOwl Slack app.
Refer to the more detailed instructions below to complete each step.
KnowledgeOwl app for Slack privacy policy
The KnowledgeOwl app for Slack is governed by our standard privacy policy.
Step 1: Create the KnowledgeOwl notification
- Go to Account > Notifications. The Notifications page opens.
- Select + Create notification. The Create new notification modal opens.
- Enter a Name for this notification. This name is displayed as the title of the card in the Email notifications display.
- Select Slack from the Notification channel dropdown.
- In Slack integration, select Connect directly through our Slack app for easy setup to use our pre-built KnowledgeOwl Webhooks Slack app.
- Enter the Knowledge bases you'd like to trigger these notifications for.
- The field defaults to All Knowledge Bases. Once you enter a specific knowledge base, the notifications will only send to the selected knowledge bases.
- If you've restricted your notifications to a single knowledge base, you can search for a category to Limit article events to a single category. This option isn't available if you've selected multiple or all knowledge bases for the notification.
- Select the Events you'd like to receive notifications about from the dropdown. Refer to Available Slack notification events for more detailed information about each event type and its expected message format.
- Select Create notification. The Authorize Slack integration modal opens.
- Select Continue to Slack to complete the authorization process.
Step 2: Complete Slack authorization
Once you select Continue to Slack, the window refreshes in Slack with your Slack workspace selected.
- If your browser selects the wrong Slack workspace, use the dropdown in the upper right to select the correct one.
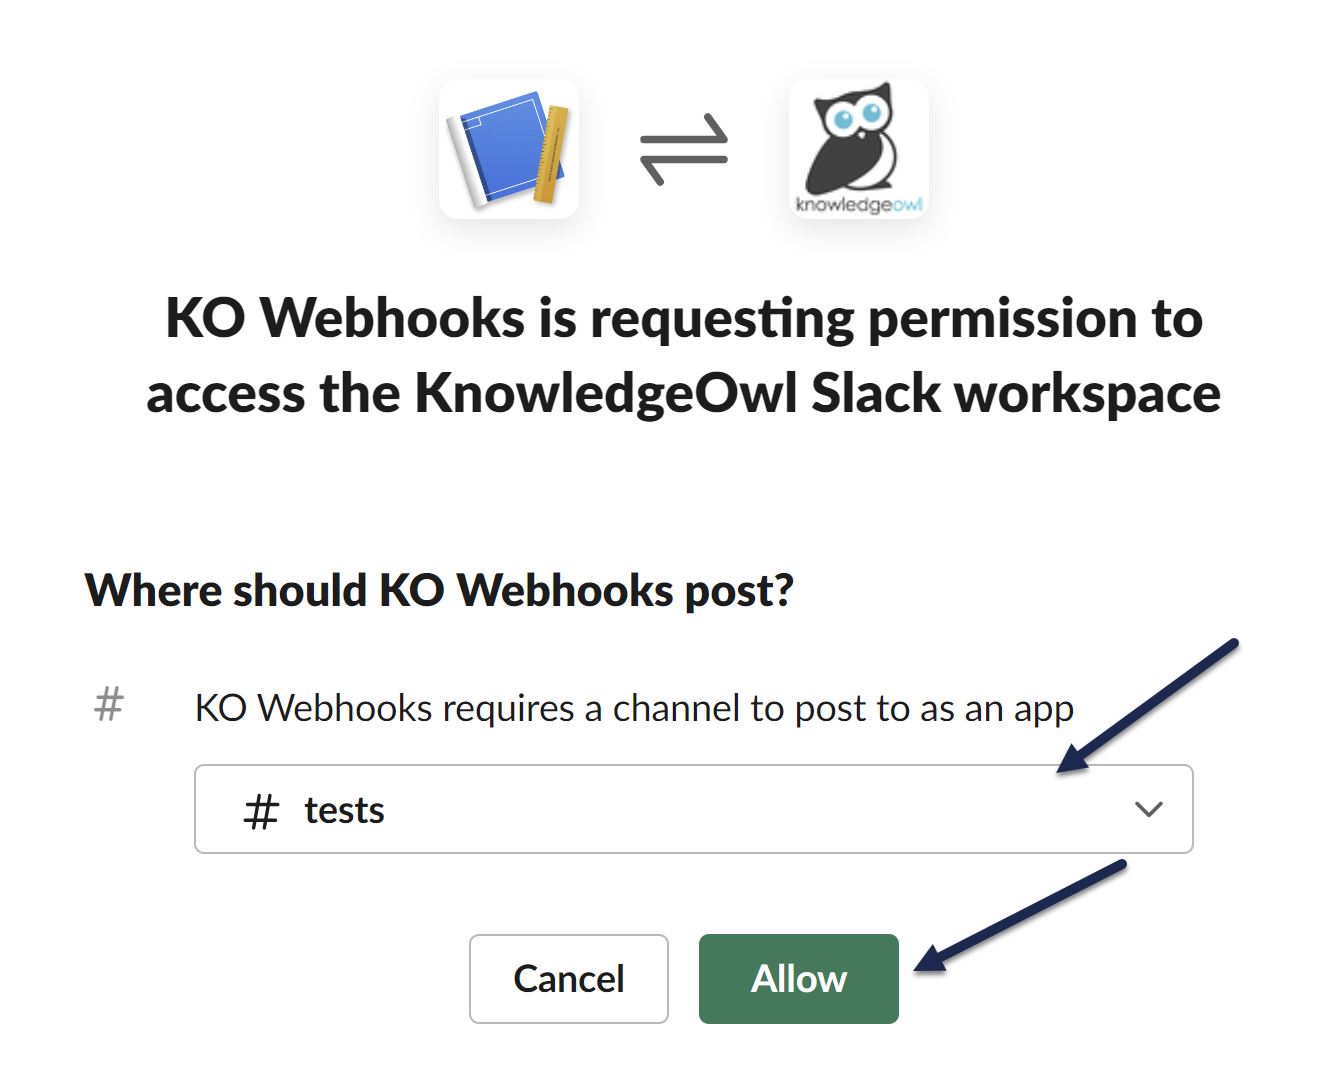
- In the Where should KnowledgeOwl Webhooks post? section, use the dropdown to select the Slack channel you want these notifications posted to.
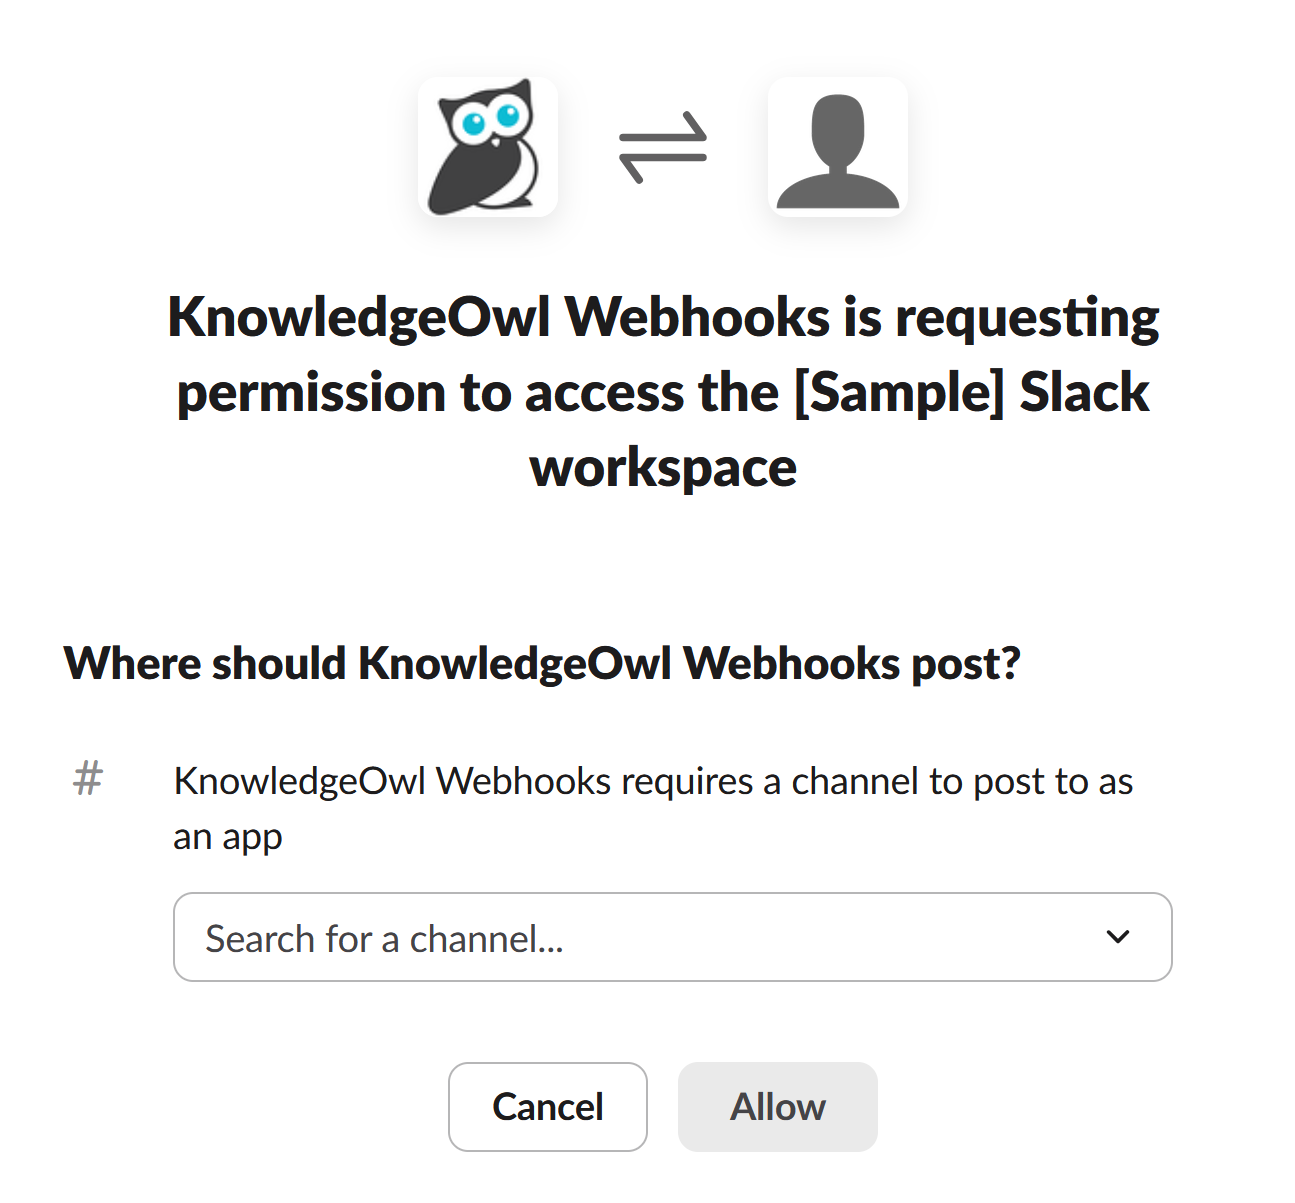 Sample Slack authorization screen showing the channel selector.
 - Select Allow to grant authorization. Your browser directs you back to KnowledgeOwl, to the Slack notifications tab. Your Slack notification is now live.
- Your Slack notification where the Endpoint is populated and the Channel and Workspace are saved and displayed.
- Your Slack channel should also have a new notification from the KnowledgeOwl Webhooks app saying "Webhook subscription test successful."

Any time one of your selected events occurs in the selected knowledge bases, this channel or person will receive a Slack message with details from the KnowledgeOwl Webhooks app, with our mascot owl Linus as the icon:
Only authors with Full Account Admin rights can create, edit, and delete notifications.
To create a new Slack notification for your knowledge base with a custom Slack app, you'll complete two steps:
- Create your own Slack app.
- Create the KnowledgeOwl notification using a custom endpoint from your Slack app.
Don't make life harder than it has to be
Only use these instructions if you don't want to use our pre-built KnowledgeOwl app for Slack.
Refer to the more detailed instructions below to complete each step.
Step 1: Create your own Slack app
- In a browser, go to https://api.slack.com/apps.
- Select Create an App.
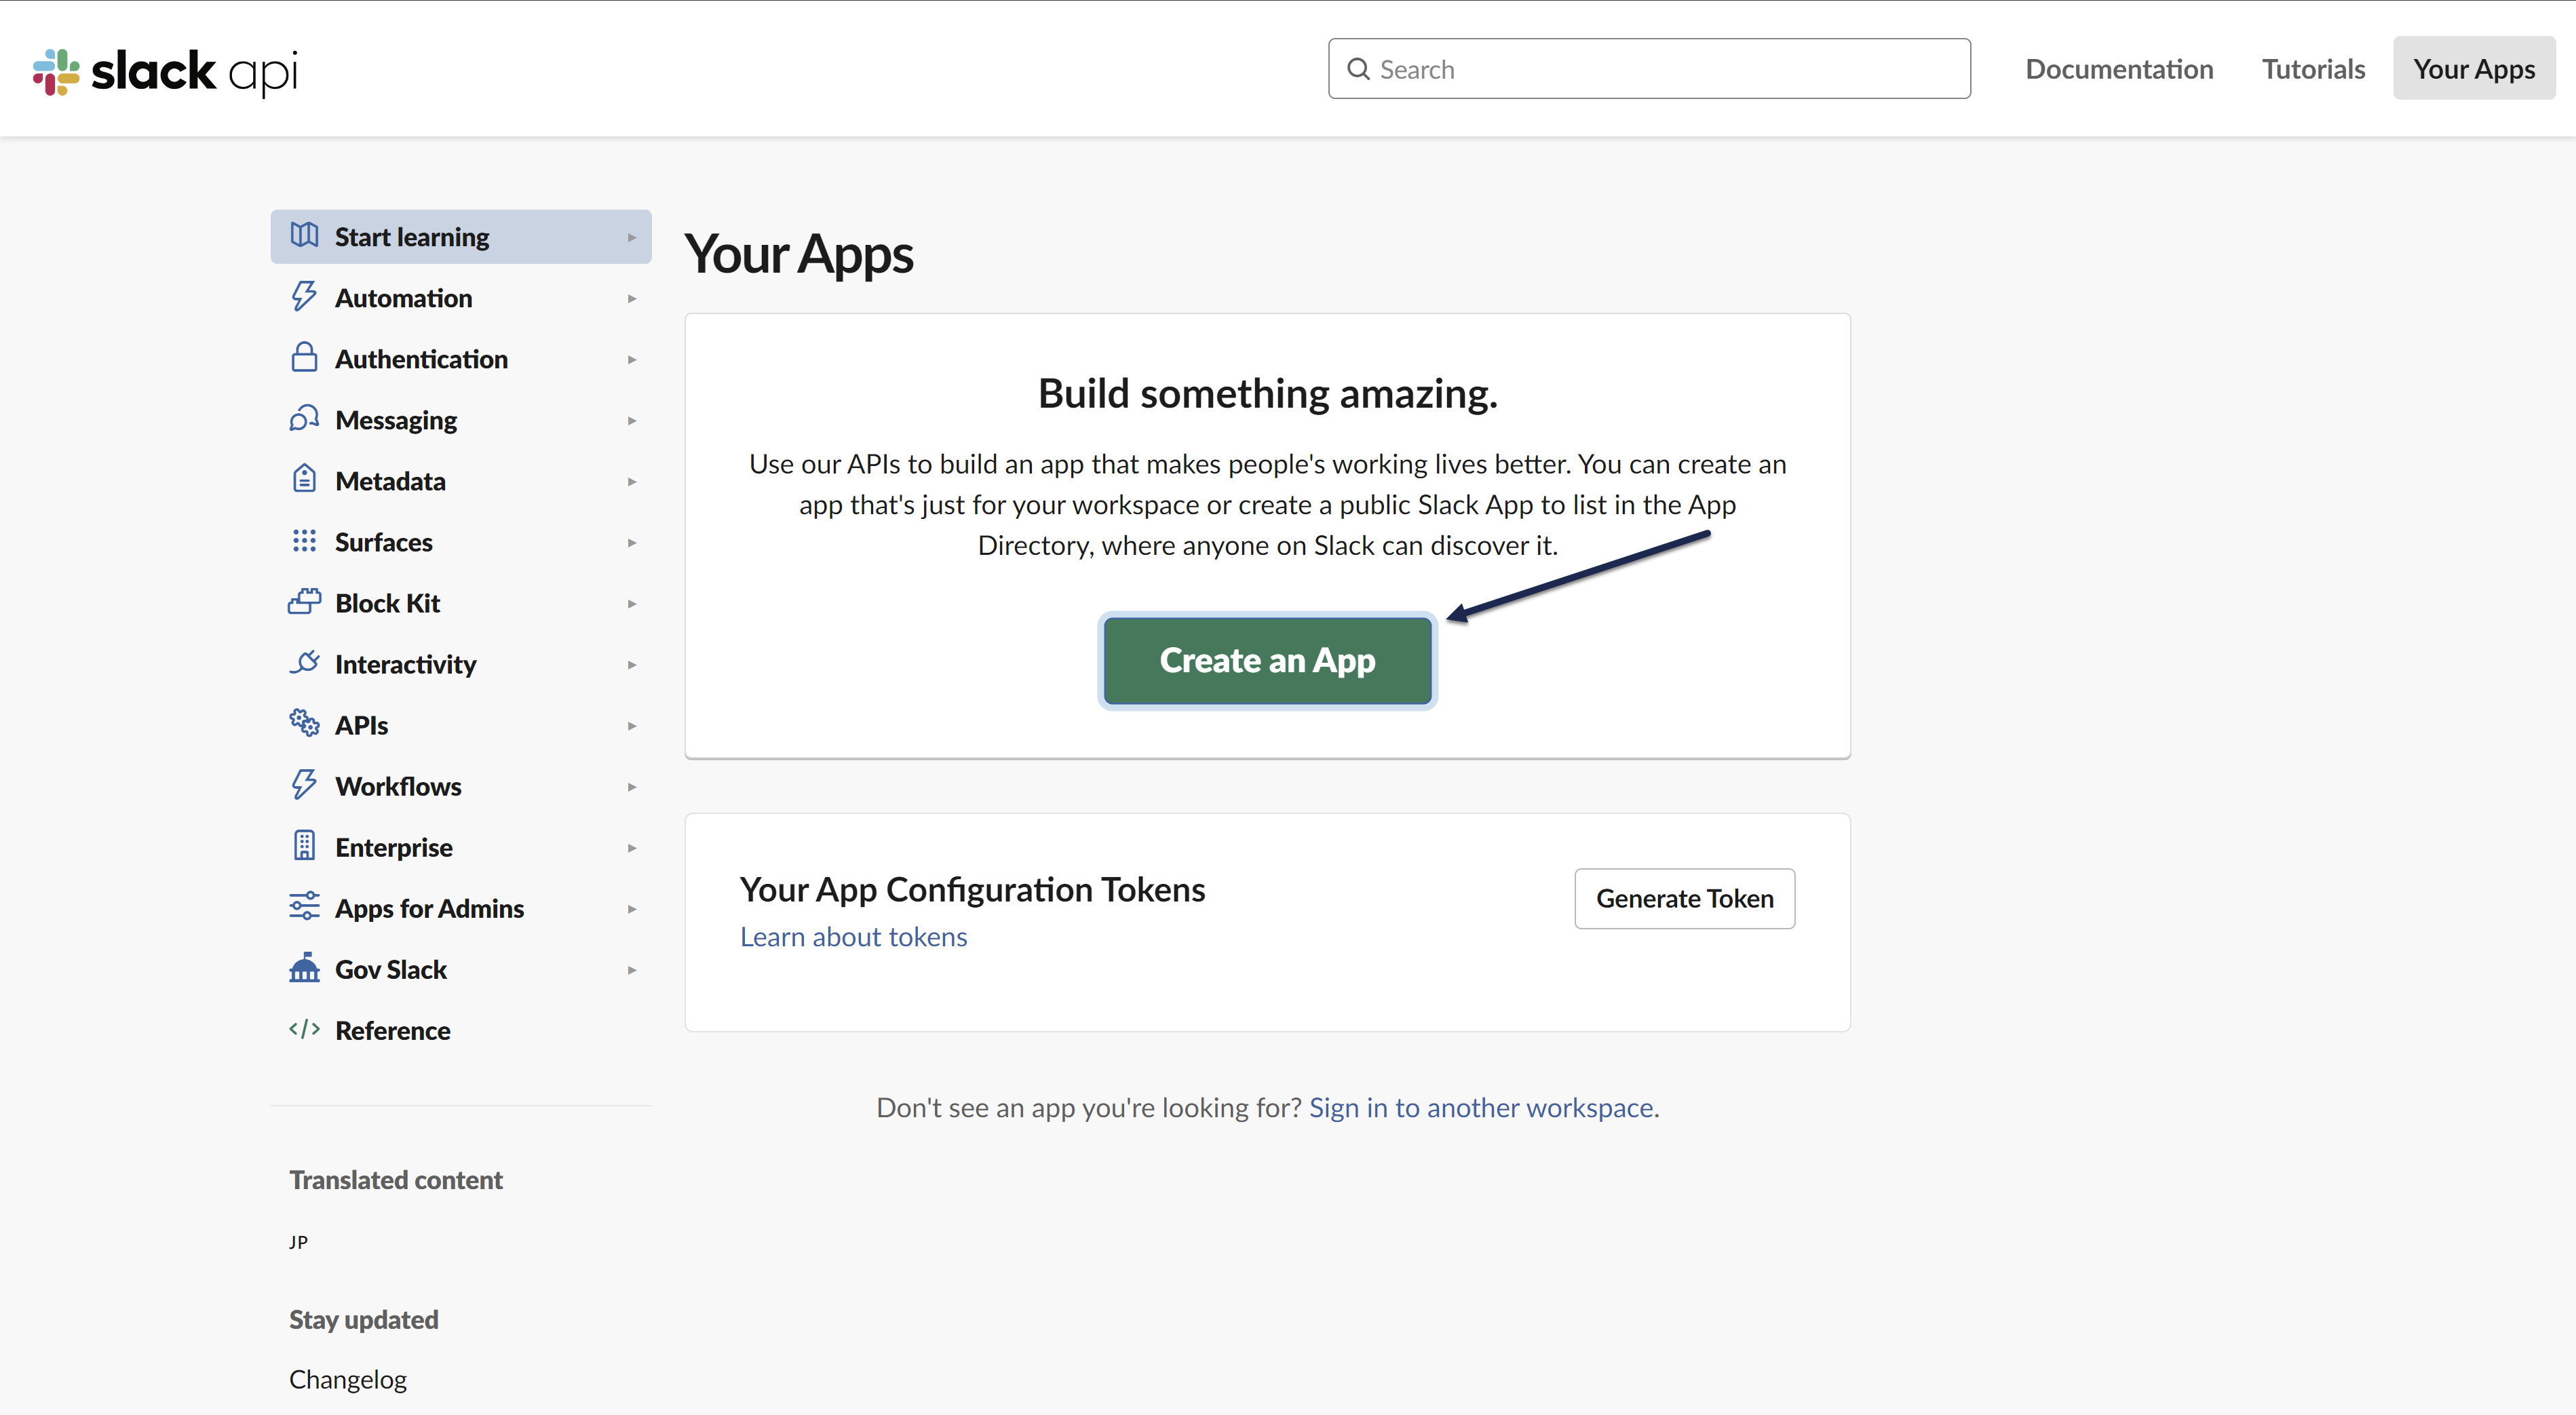 Create an App button
 - In the Create an app pop-up, select From scratch.
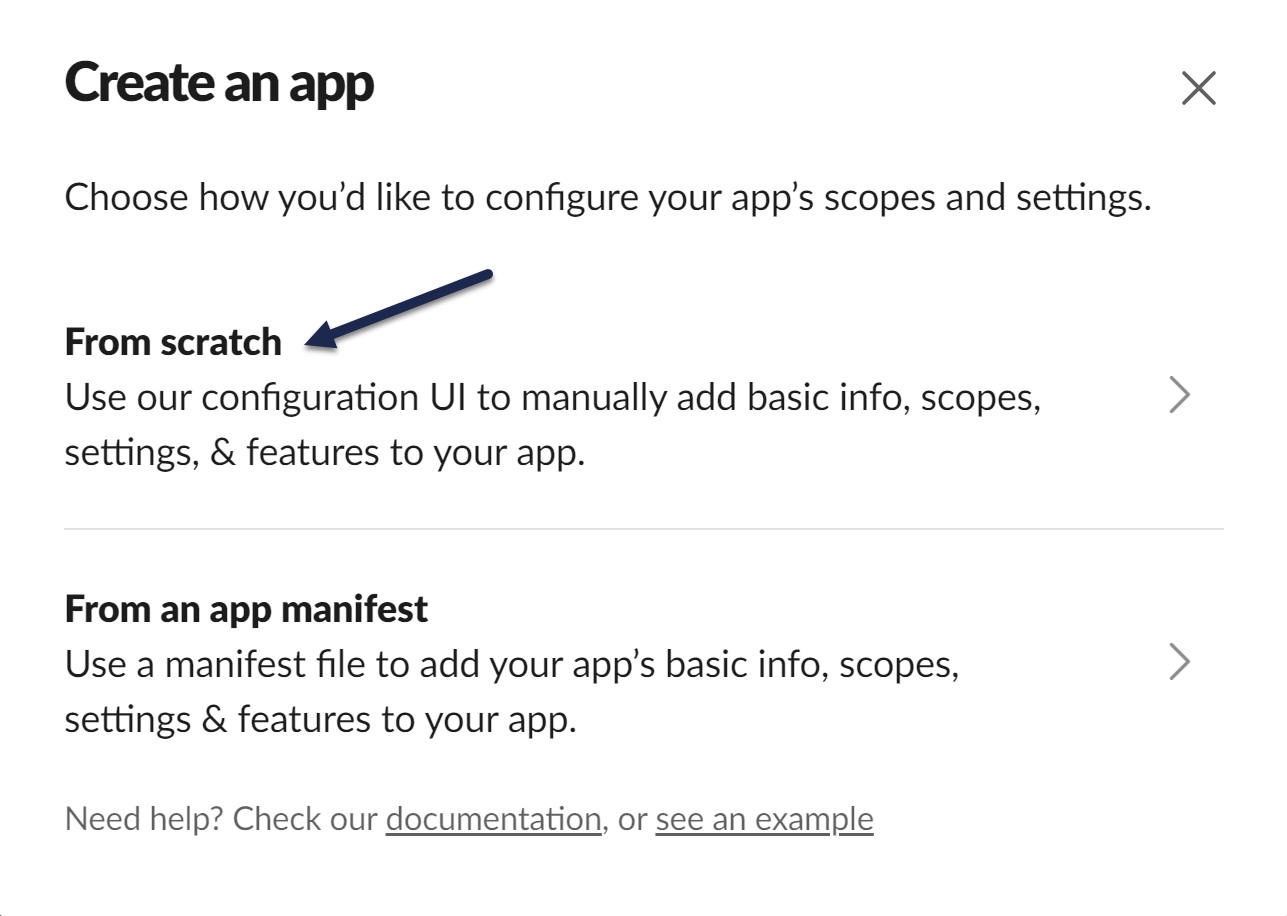 Select the "From scratch" option
 - Enter an App Name. Here, we use KO Webhooks.
- Select the Slack workspace to add the app to.
- Once you've finished making your selections, select Create App.
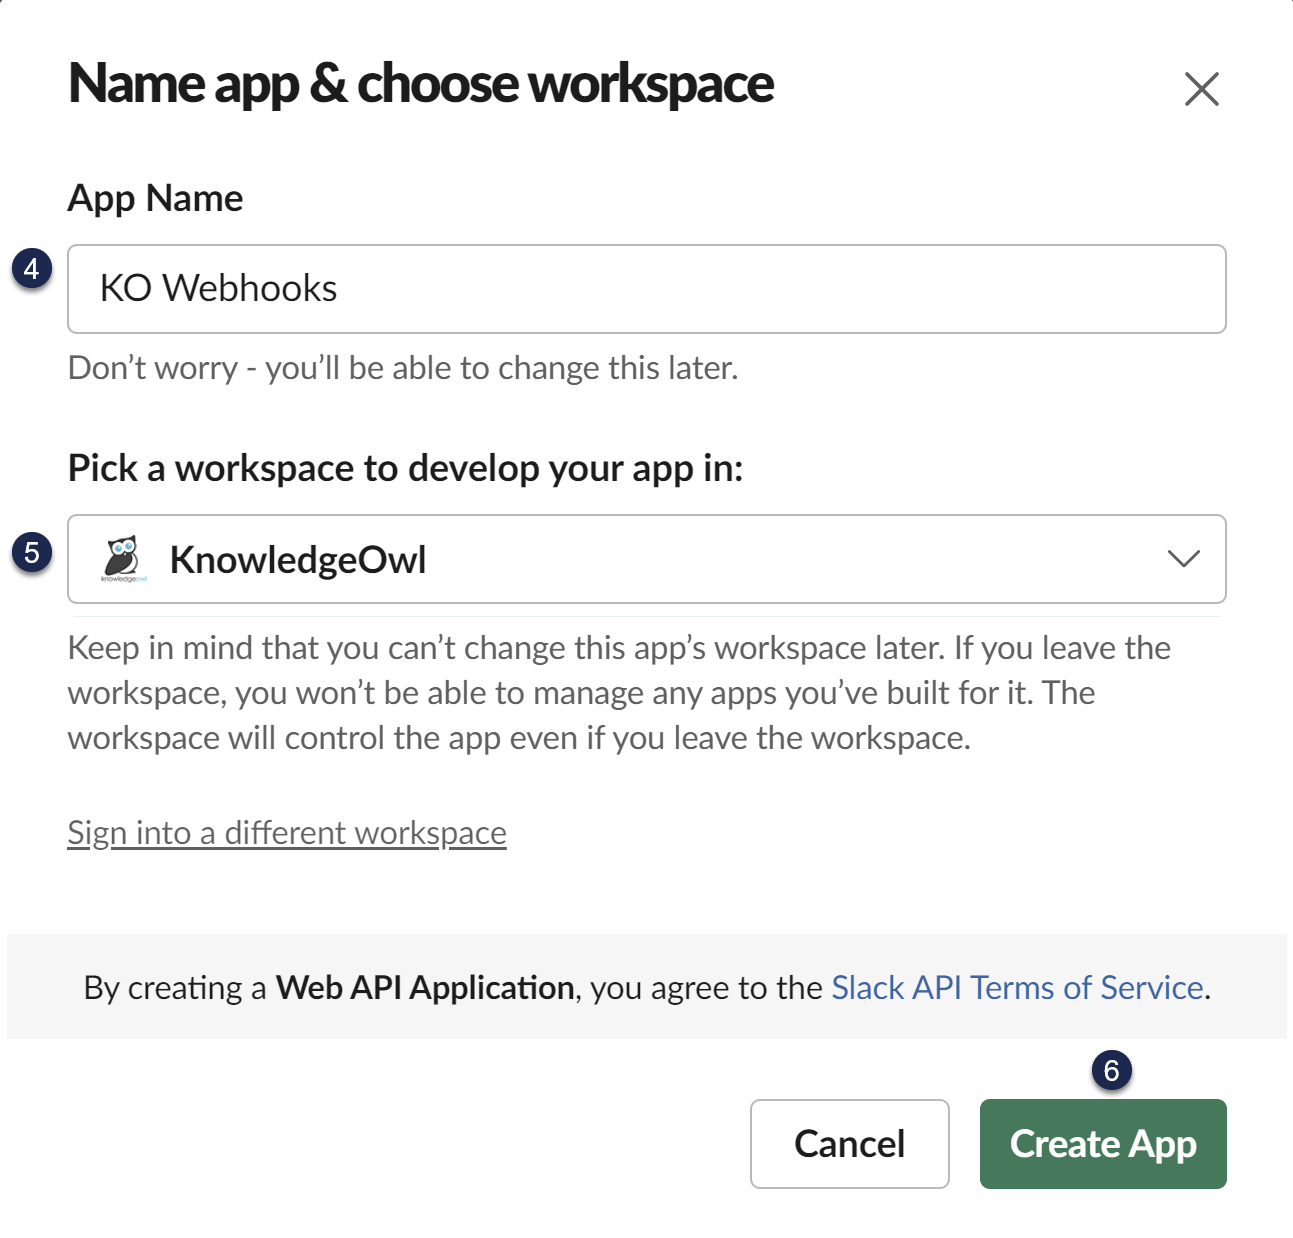 Name your app and choose the workspace to create it in
 - Optional: Your Slack App will use a default logo of a notebook and ruler and a specific background color when it posts. To update that image or background color, scroll down the page to the Display Information section to update the App Icon, background color, name, and various descriptions.
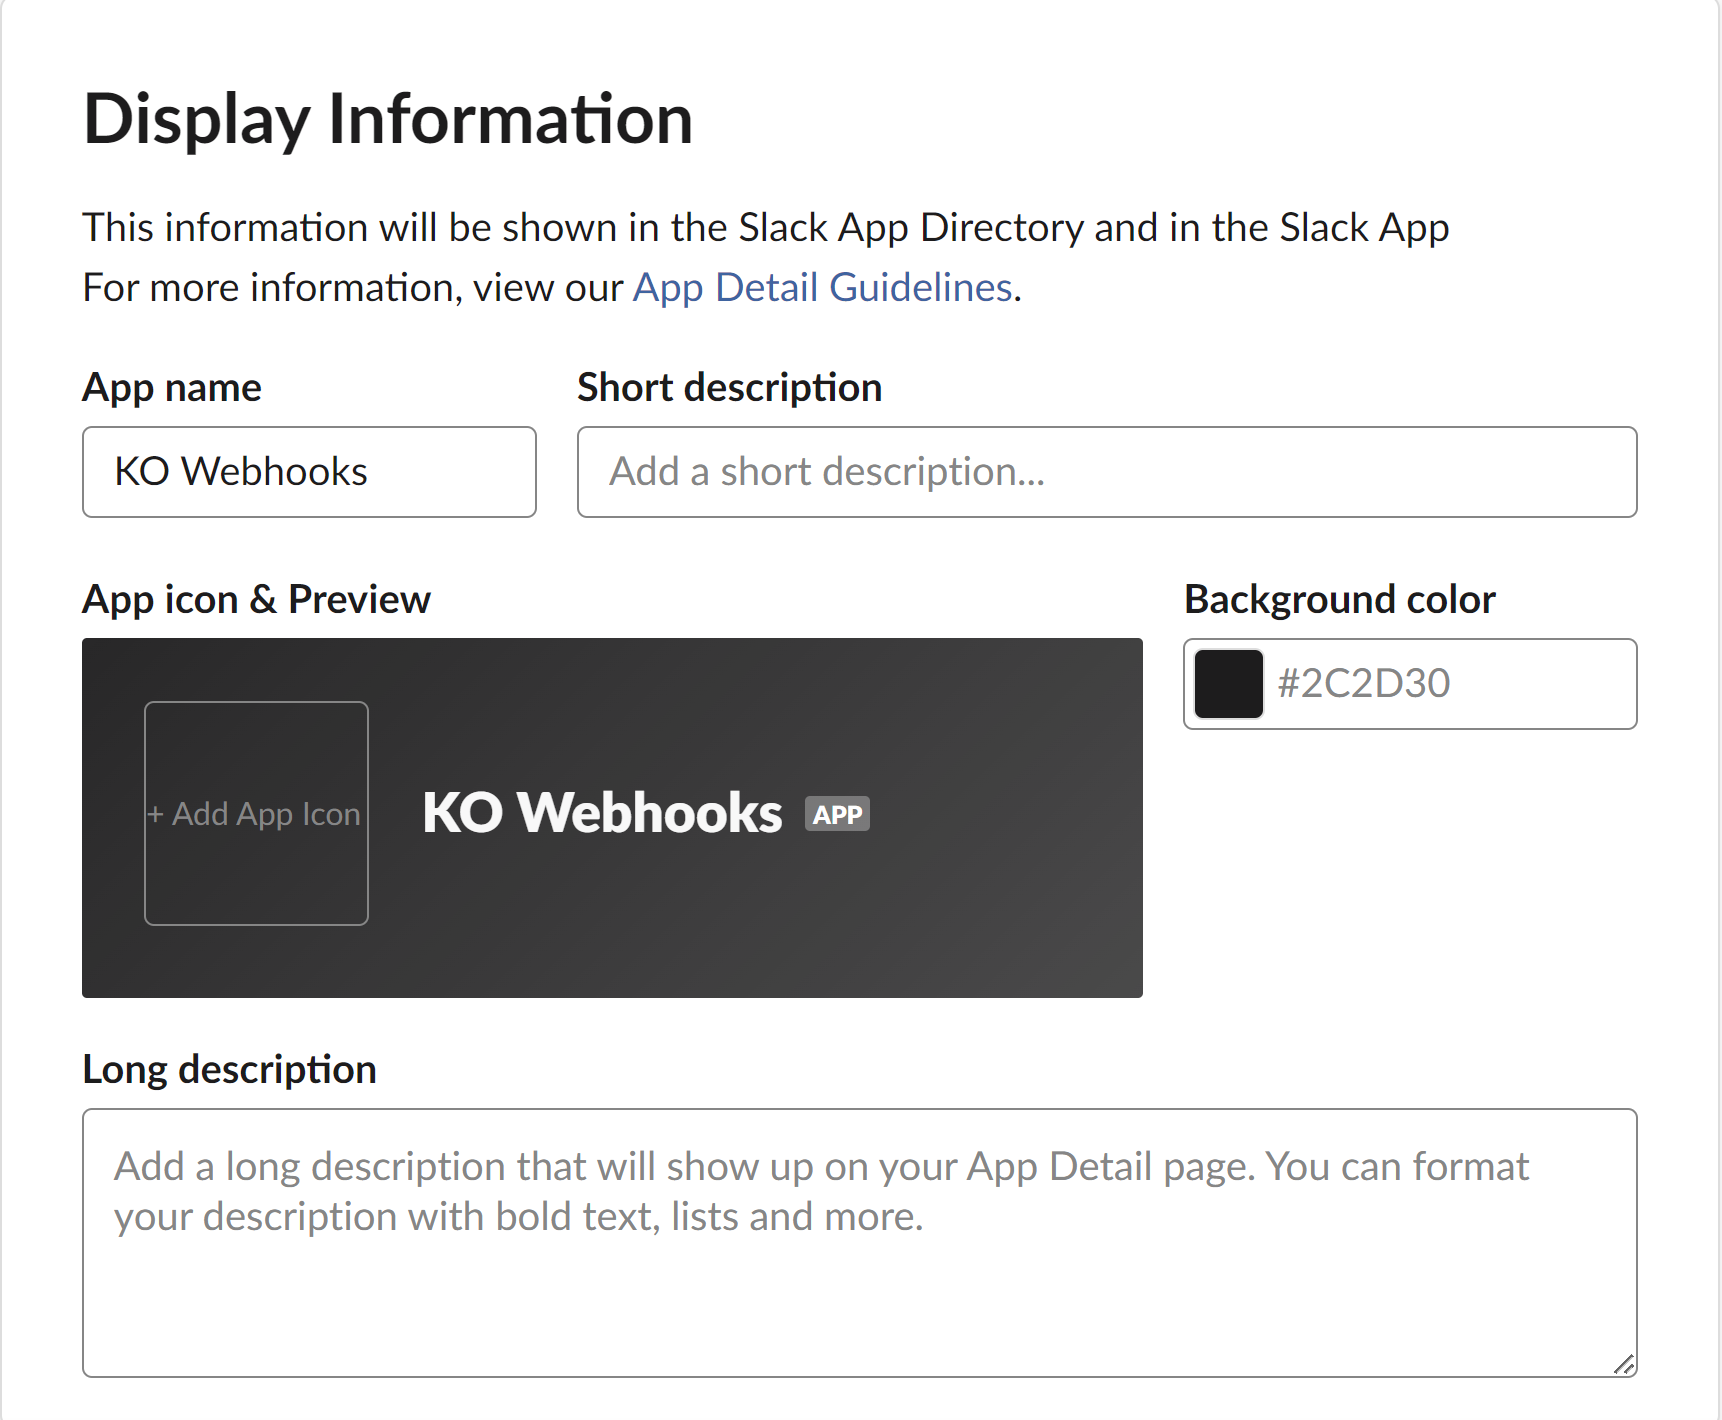 Scroll further down the page to adjust the app icon, name, description, and more!
 - Near the top of the page in the Add features and functionality section, select Incoming Webhooks.
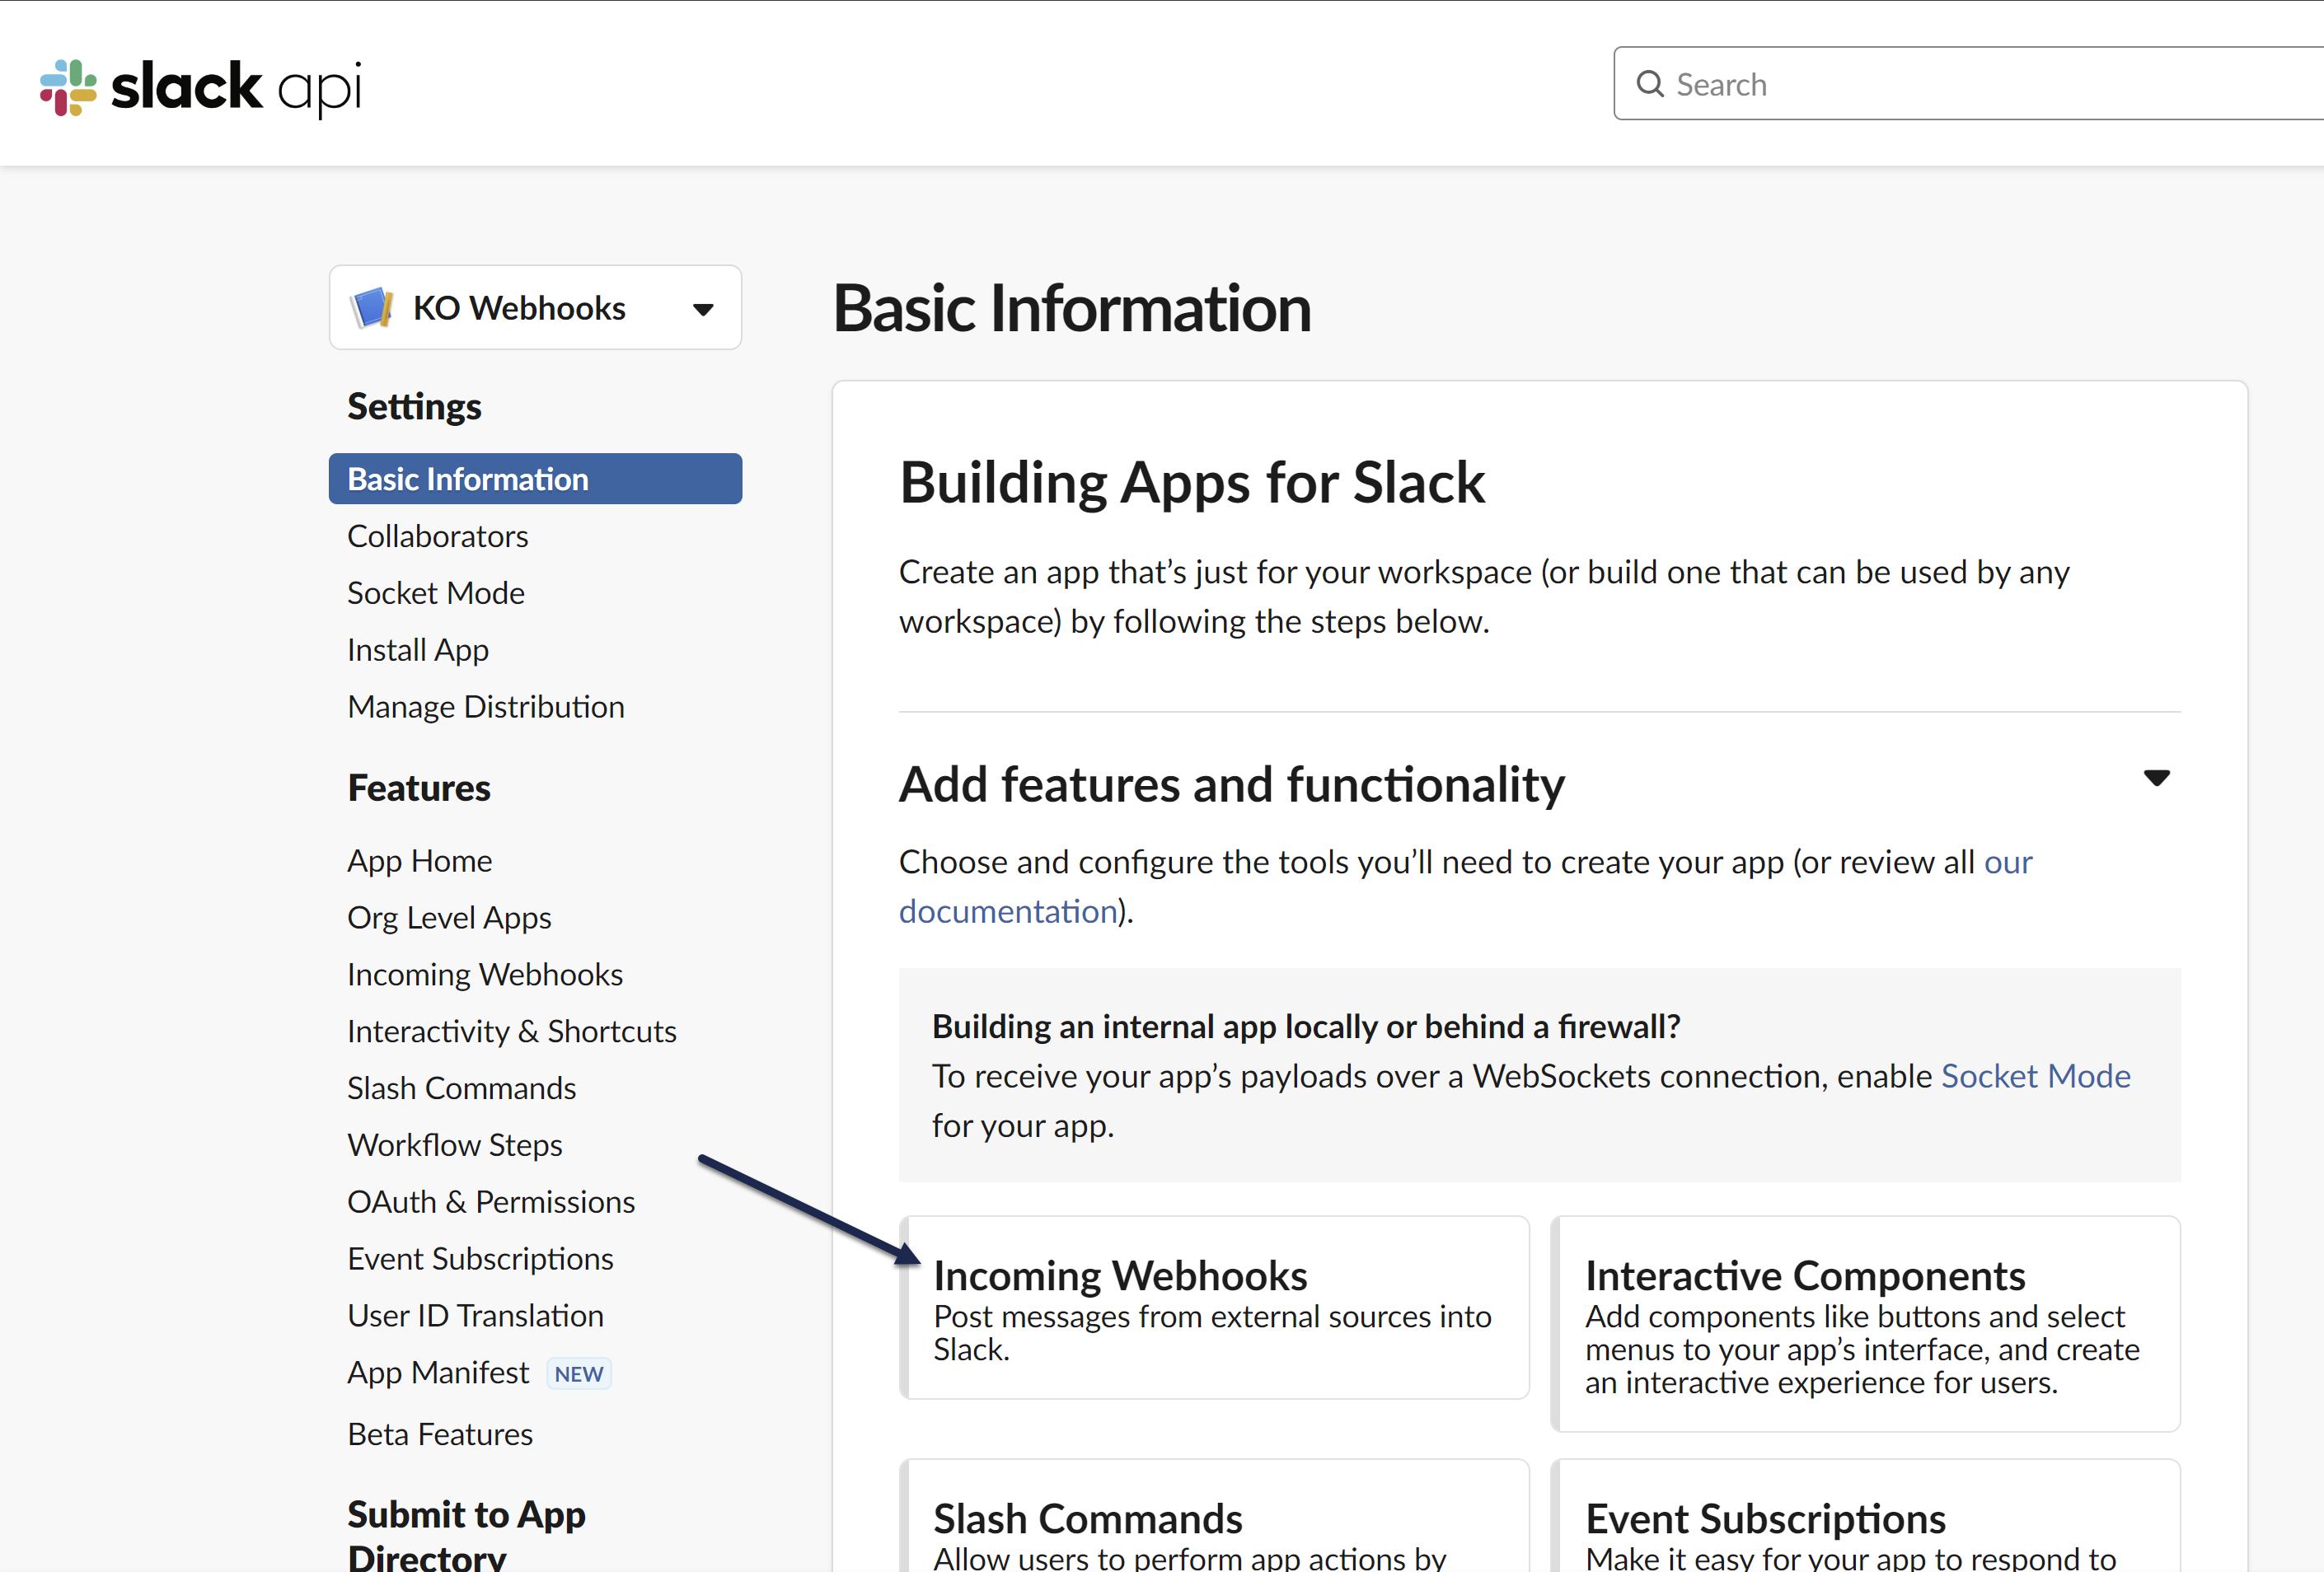 Select Incoming Webhooks from the Add features and functionality section
 - Once the Incoming Webhooks page opens, toggle the Activate Incoming Webhooks setting to On.
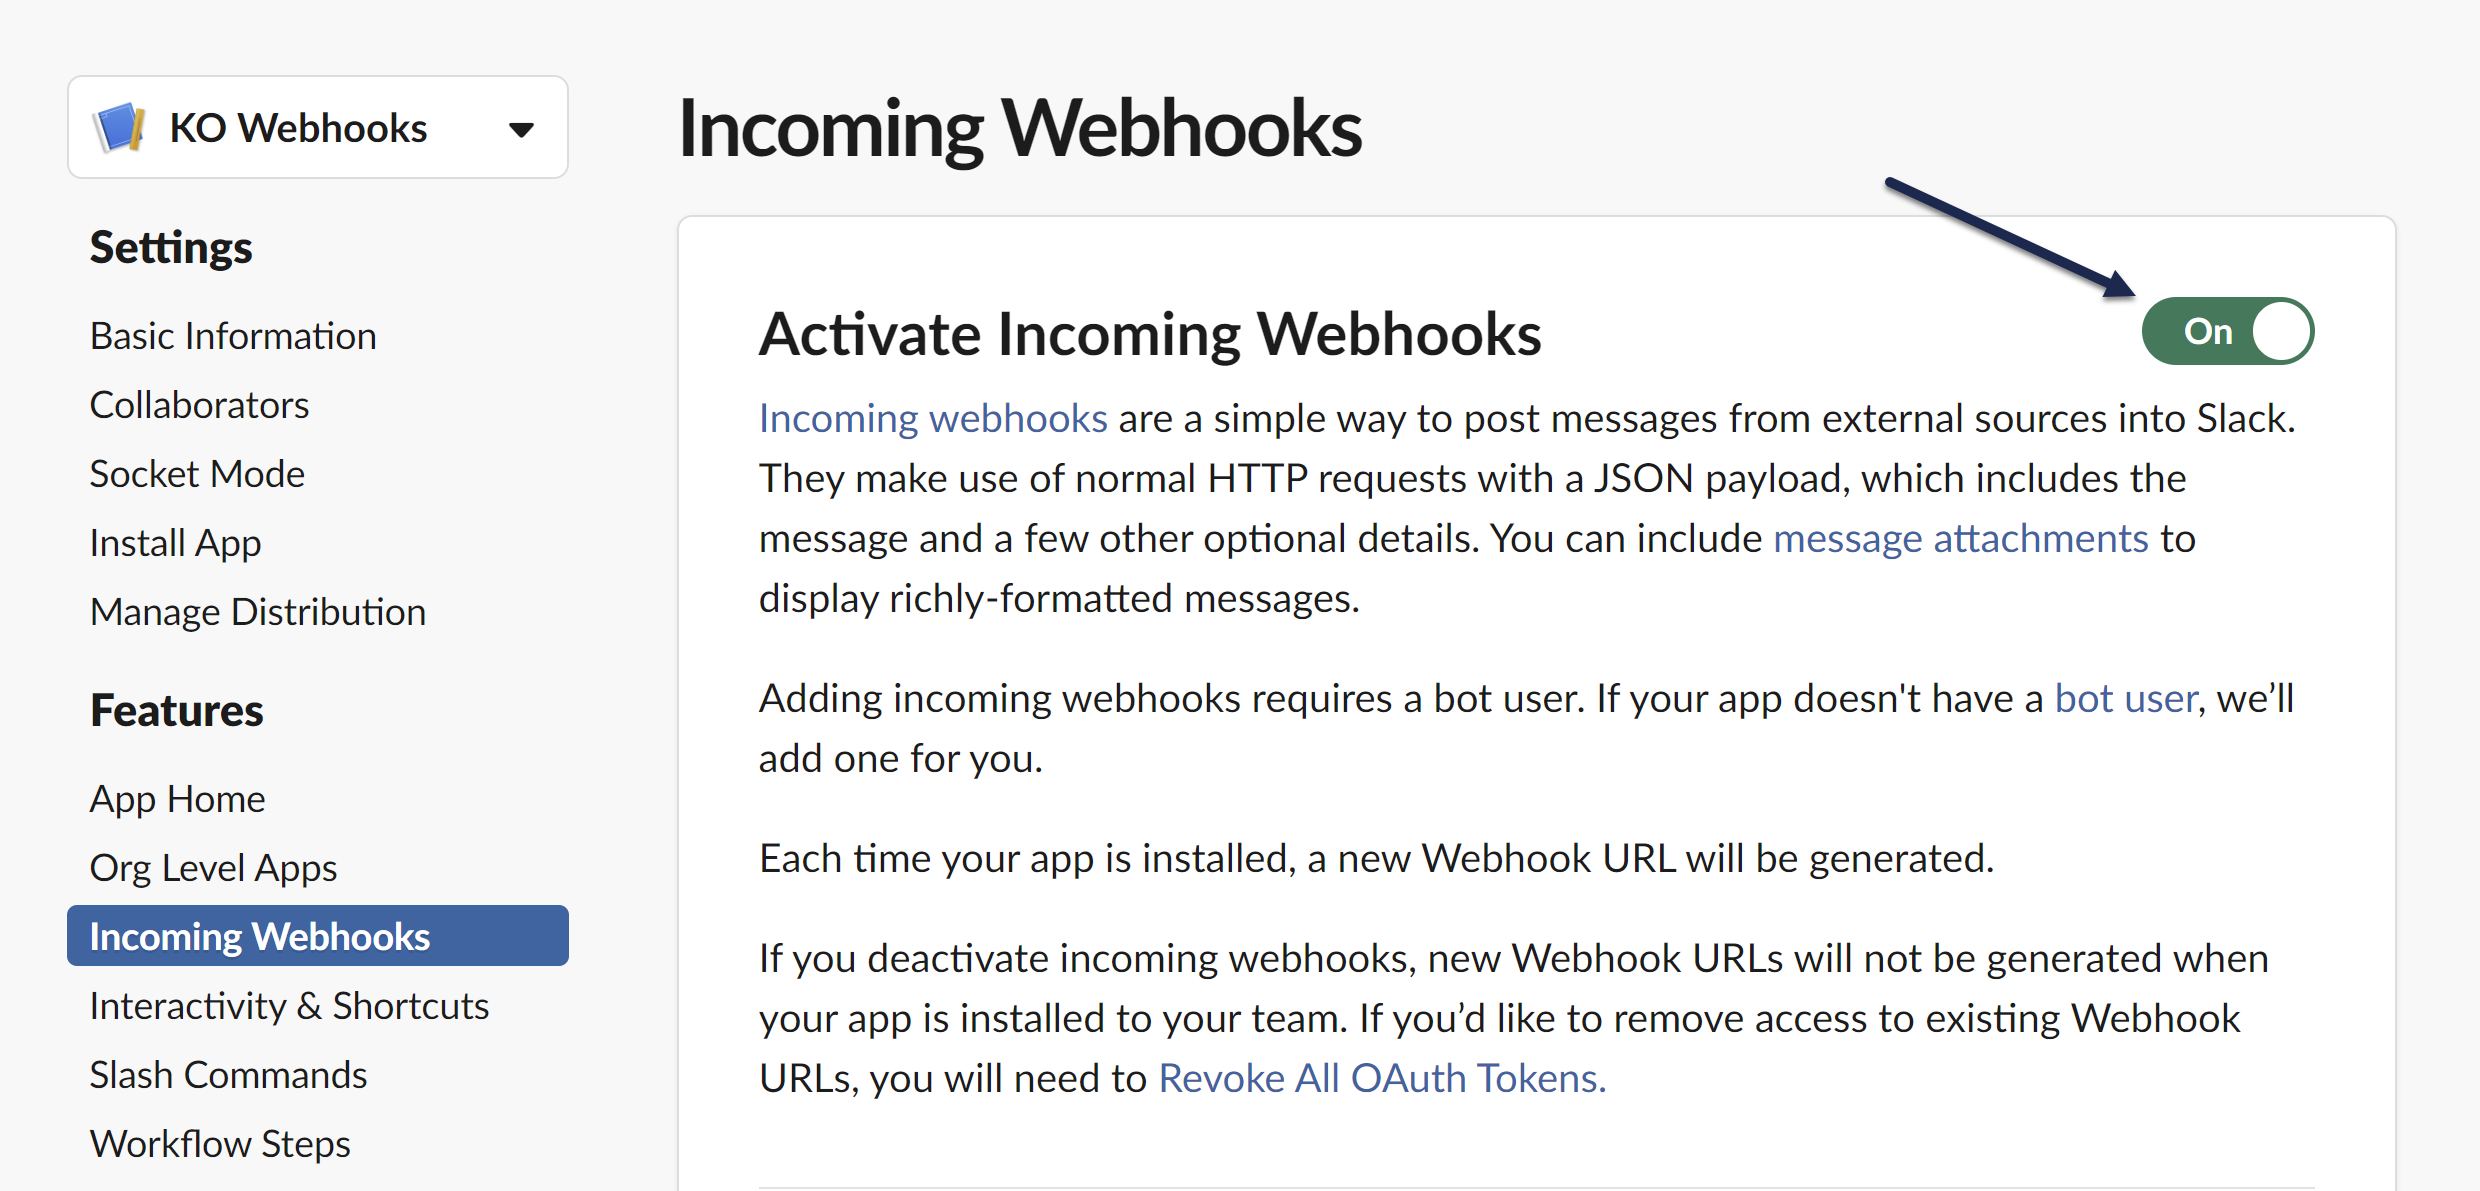 Slide the Activate Incoming Webhooks toggle to "On"
 - Go to the Webhook URLs for Your Workspace section and select Add New Webhook to Workspace.
 Find and select this option in the Webhook URLs for Your WorkSpace
 - The page prompts you to select a channel or DM to post to within the Slack workspace you selected in Step 5. Choose the channel you'd like the webhooks to post to and select Allow. Here, we're using the tests channel:
 The channel options and logos displayed will depend on your Slack App and Slack workspace settings.
 - The page updates to display a new Webhook URL in the Webhook URLs for Your Workspace section. Select Copy--we'll need to use it in the next set of steps!
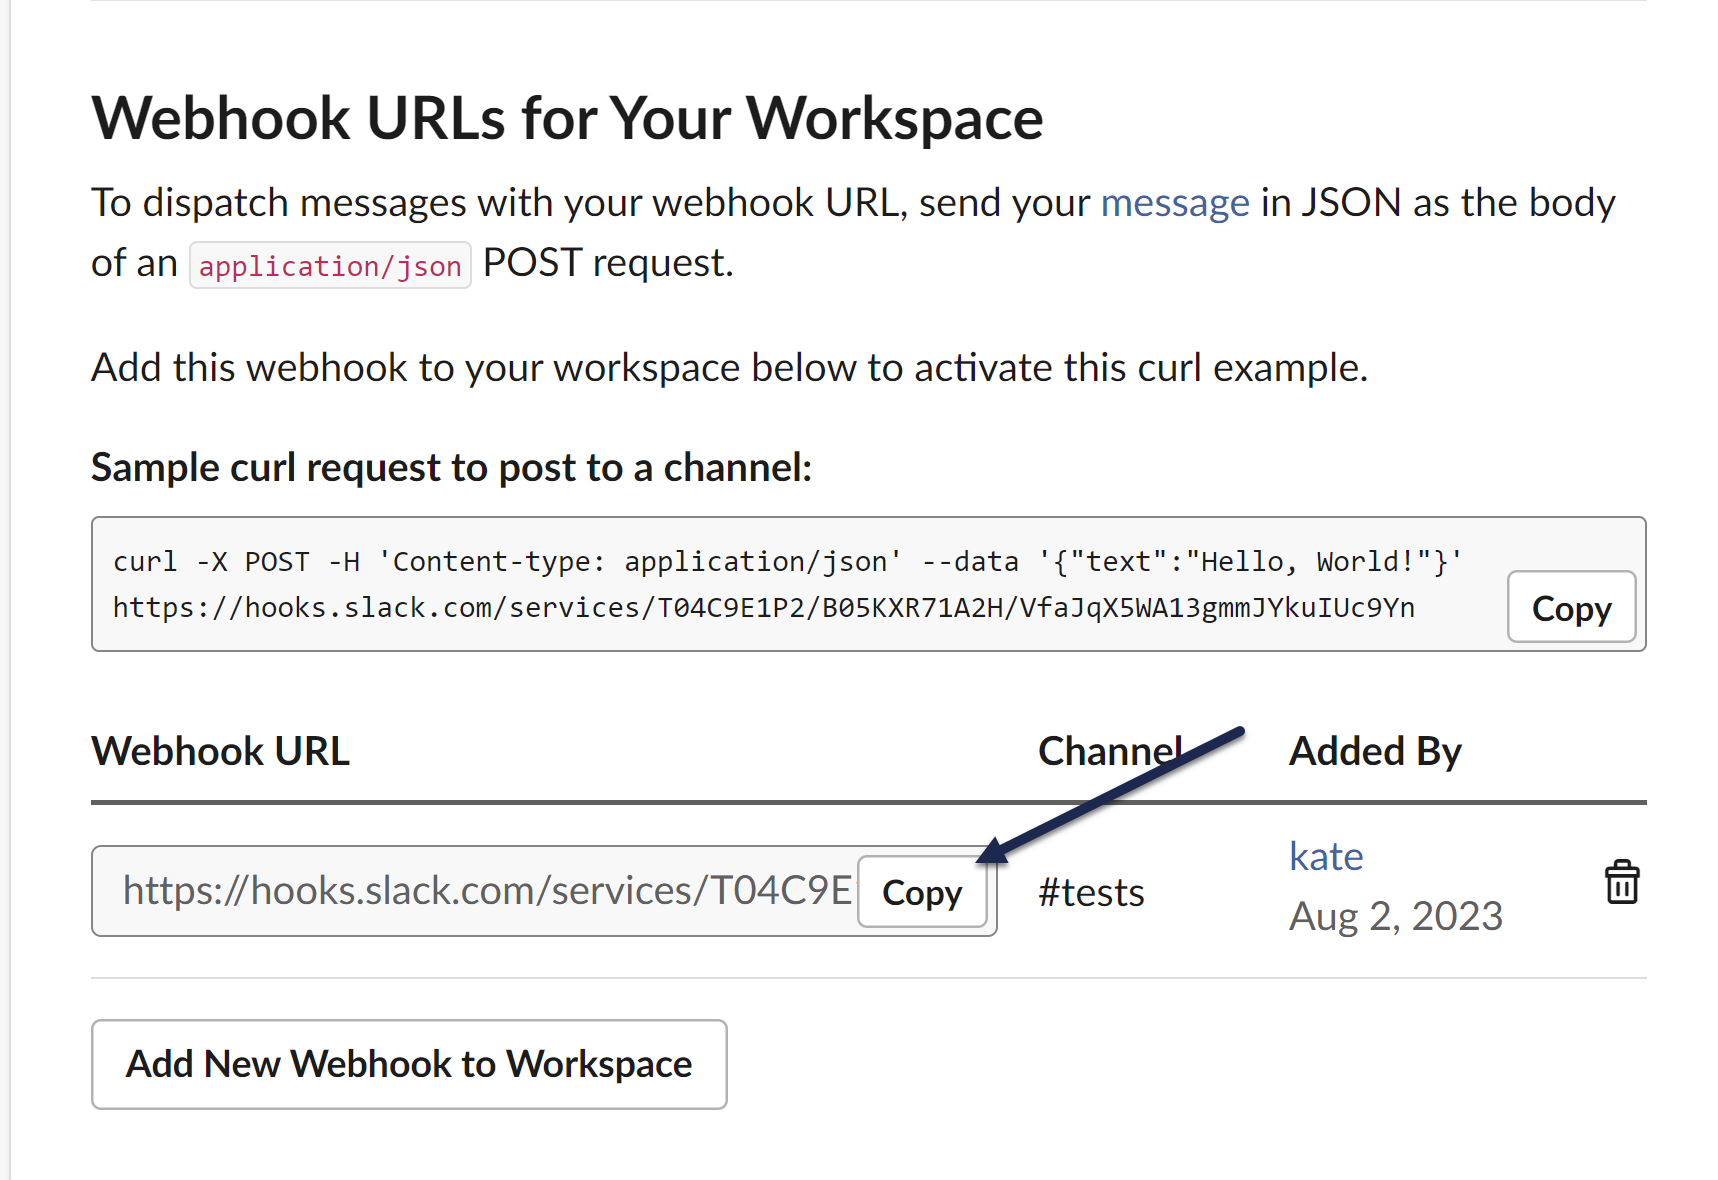 Copy the Webhook URL; we'll use that later!
 - You can confirm the app was set up correctly by viewing the channel you selected; you should see a message saying that you added an integration to the channel. This notification will show as a message from you, since you're the one who set up the app:
 Sample confirmation message in your channel that the app has been added


Now you're all set to move on to the KnowledgeOwl side of the configuration.
Step 2: Create the KnowledgeOwl notification
- Go to Account > Notifications. The Notifications page opens.
- Select + Create notification. The Create new notification modal opens.
- Enter a Name for this notification. This name is displayed as the title of the card in the Email notifications display.
- Select Slack from the Notification channel dropdown.
- In Slack integration, select Use your own custom Slack webhook endpoint.
- Paste the webhook you copied in the previous set of steps into the Slack webhook URL.
- Enter the Knowledge bases you'd like to trigger these notifications for.
- The field defaults to All Knowledge Bases. Once you enter a specific knowledge base, the notifications will only send to the selected knowledge bases.
- If you've restricted your notifications to a single knowledge base, you can search for a category to Limit article events to a single category. This option isn't available if you've selected multiple or all knowledge bases for the notification.
- Select the Events you'd like to receive notifications about from the dropdown. Refer to Available Slack notification events for more detailed information about each event type and its expected message format.
- Select Create notification.
Your Slack notification is created. If you've set everything up correctly, the app will send a confirmation message to the selected channel confirming the "Webhook subscription test successful", for example:
 Sample confirmation Slack notification test
Any time one of your selected events occurs in the selected knowledge bases, this channel or person will receive a Slack message with details.
Only authors with Full Account Admin rights can create, edit, and delete notifications.
To edit an existing notification:
- Go to Account > Notifications.
- Select the tab for the type of notification you wish to edit (Email, Slack, Teams, or webhook).
- Hover over the card for the notification you wish to edit.
- Select the wrench icon that appears in the upper right:
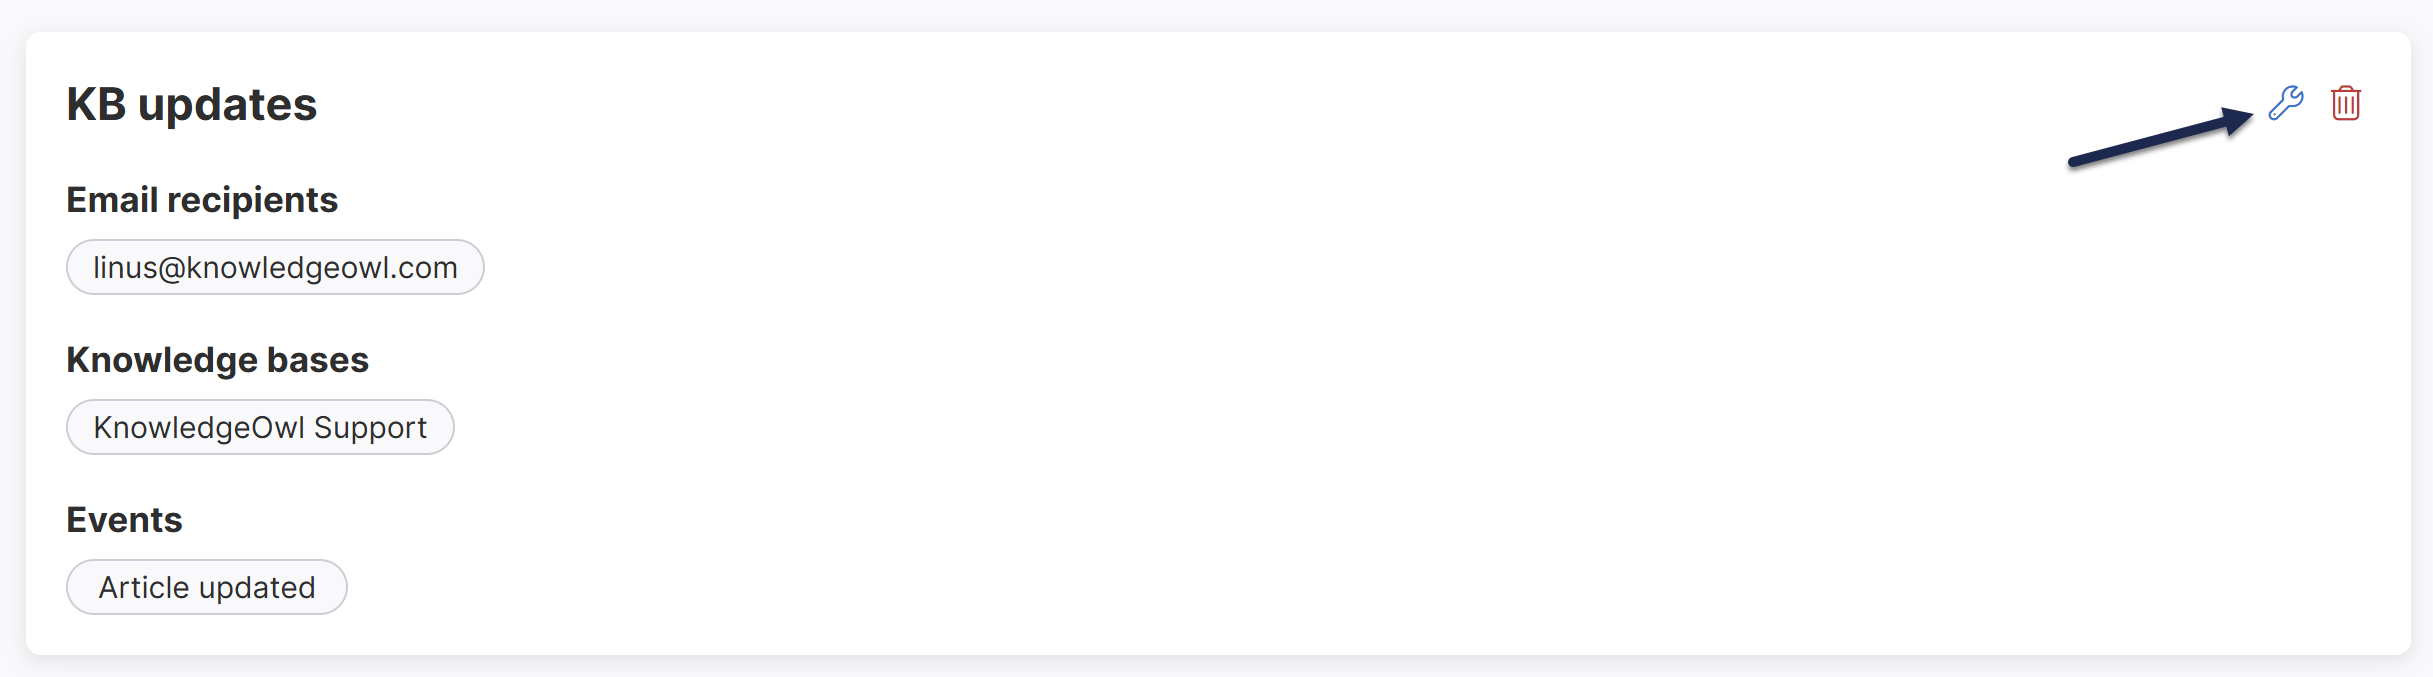 The Edit Notification modal opens.
 - Make the changes you'd like.
- Select Update notification to save your changes.
 The Edit Notification modal opens.
Only authors with Full Account Admin rights can create, edit, and delete notifications.
To delete a notification:
- Go to Account > Notifications.
- Select the tab for the type of notification you wish to Delete (Email notifications, Slack notifications, or webhooks).
- Hover over the card for the notification you wish to delete.
- Select the trash can icon that appears in the upper right:
The Delete notification modal opens. Verify that the named notification is the one you want to delete.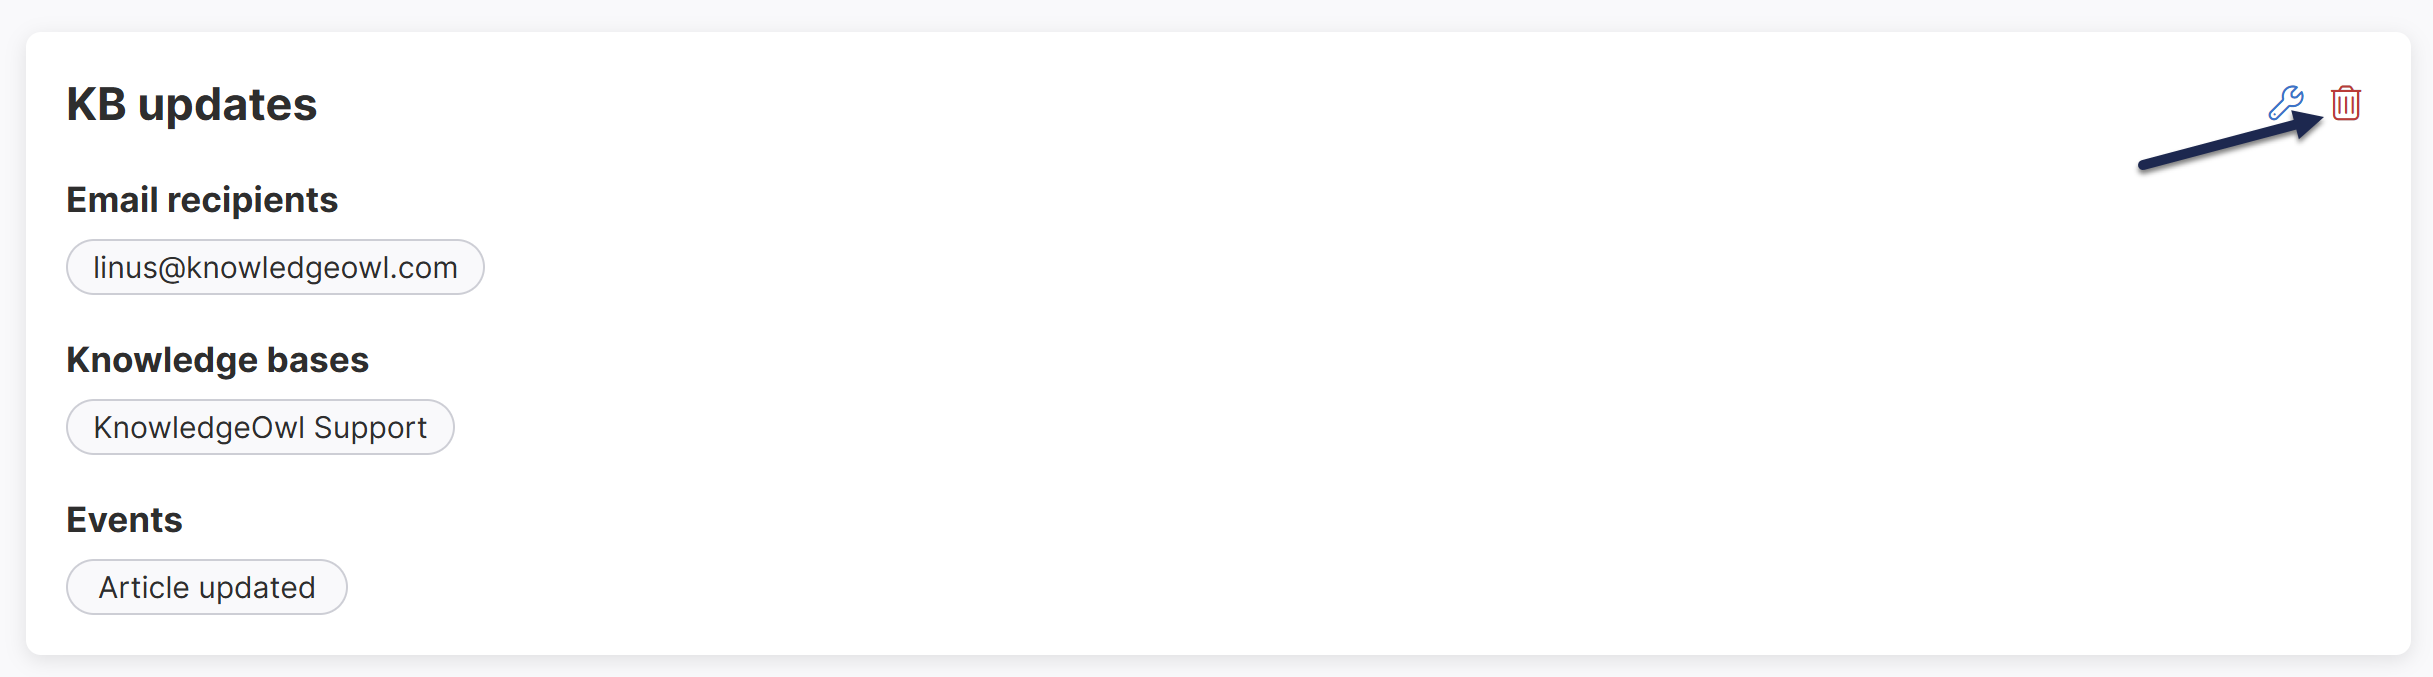 Select the trash can icon in the notification's card.
 - Select Delete to confirm the deletion.

You can trigger a Slack notification on article events, category events, comment events, and contact form events. Below is a complete list of the available knowledge base events along with some sample Slack notifications.
Need something else?
If you have an event that you'd like to receive Slack notifications on that's not listed below, contact us to request we add it!
Article created
The Article created event is triggered when an author selects Create for a new article.
Sample Article created Slack notification
Here's a sample Slack notification for when an article is created:
New article created
Edited by [Author name]
Article
[Article title] • Edit Article (link to the article in app.knowledgeowl.com)
Article updated
The Article updated event is triggered whenever an author saves changes to an article.
It does not provide information about what was changed.
Sample Article updated Slack notification
Here's a sample Slack notification for when an article is updated:
Article updated
Edited by [Author name]
Article
[Article title] • Edit Article (link to the article in app.knowledgeowl.com)
View live article (link to the article in your live knowledge base)
Article updated callout added
The Article updated callout added event is triggered when an author saves an article with the Updated callout. It's only triggered if the article previously didn't have an existing New/Updated callout.
Sample Article updated callout added Slack notification
Here's a sample Slack notification for when an article is saved with an Updated callout added:
Updated callout added
Updated callout that expires on [Expiration date] added by [Author name]
Article
[Article title] • Edit Article (link to the article in app.knowledgeowl.com)View live article (link to the article in your live knowledge base)
Article new callout added
The Article new callout added event is triggered when an author saves an article with the New callout. It's only triggered if the article previously didn't have an existing New/Updated callout.
Sample Article new callout added Slack notification
Here's a sample Slack notification for when an article is saved with an Updated callout added:
New callout added
New callout that expires on [Expiration date] added by [Author name]
Article
[Article title] • Edit Article (link to the article in app.knowledgeowl.com)View live article (link to the article in your live knowledge base)
Article published
The Article published event is triggered when when an author publishes a previously unpublished article, either in the article editor or through a bulk edit in Manage.
Sample Article published Slack notification
Here's a sample Slack notification for when an article is published:
Article published
Edited by [Author name]
Article
[Article title] • Edit Article (link to the article in app.knowledgeowl.com)View live article (link to the article in your live knowledge base)
Article archived
The Article archived event is triggered when an author saves an article with the Archived publishing status or archives articles in Manage.
Sample Article archived Slack notification
Here's a sample Slack notification for when an article is archived:
Article archived
Edited by [Author name]
Article
[Article title] • Edit Article (link to the article in app.knowledgeowl.com)
Article deleted
The Article deleted event is triggered when an author deletes an article, whether from the Articles page, the article editor, or as a bulk edit in Manage.
Sample Article deleted Slack notification
Here's a sample Slack notification for when an article is deleted:
Article deleted
Edited by [Author name]
Article
[Article title] • Edit Article (link to the article in app.knowledgeowl.com)
Article publishing status changed
The Article publishing status changed event is triggered when when an article's saved with a different publishing status.
This event will also trigger any time the Article published, Article archived, and Article deleted events trigger.
Sample Article publishing status changed Slack notification
Sample text of message:
Article status changed
Status changed from [Previous status] to [New status] by [Author name]
Article
[Article title] • Edit Article (link to the article in app.knowledgeowl.com)View live article (link to the article in your live knowledge base--only shown if the new status is Published or Needs Review)
Category created
The Category created event is triggered when an author selects Create for a new category.
Sample Category created Slack notification
Here's a sample Slack notification for when a category is created:
New category created
Edited by [Author name]
Category
[Category title] • Edit Category (link to the article in app.knowledgeowl.com)View live category (link to the category in your live knowledge base)
Category deleted
The Category deleted event is triggered when an author deletes a category, whether from the Articles page or the category editor.
Sample Category deleted Slack notification
Here's a sample Slack notification for when a category is deleted:
Category deleted
Edited by [Author name]
Category
[Category title] • Edit Category (link to the category in app.knowledgeowl.com)
Category status changed
The Category status changed event is triggered when a category is saved with a different status than it had before. Categories only have two statuses, Active and Deleted, so in practice this fires alongside the Category deleted event.
Sample Category status changed Slack notification
Sample text of message:
Category status changed
Category
[Category title] • Edit Category (link to the article in app.knowledgeowl.com)View live category (link to the category in your live knowledge base--only shown if the new status is Active)
Category updated
The Category updated event is triggered whenever an author saves changes to a category.
It does not provide information about what was changed.
Sample Category updated Slack notification
Here's a sample Slack notification for when a category is updated:
Category updated
Edited by [Author name]
Category
[Category title] • Edit Category (link to the category in app.knowledgeowl.com)
View Live Category (link to the category in your live knowledge base)
Comment created
The Comment created event is triggered when a reader submits a new comment or an author creates a new comment from Reporting > Comments.
Sample Comment created Slack notification
Here's a sample Slack notification for when someone submits a new comment on an article:
New comment submitted
[Commenter name] (commenter-email@domain.com)
[The text of the comment submitted.]
[Article title] • Edit Article (link to the article in app.knowledgeowl.com)
View Comments (Link to your knowledge base's Reporting > Comments)
If the comment was created by an author in Reporting > Comments, that author is identified in an additional Who entry between What and Posted by.
Comment deleted
The Comment deleted event is triggered when an author deletes a comment.
Sample Comment deleted Slack notification
Here's a sample Slack notification for when an author deletes a comment:
Comment deleted
Edited by [Name of author who deleted the comment]
[Original commenter name] (commenter-email@domain.com)
[The text of the comment submitted.][Article title] • Edit Article (link to the article in app.knowledgeowl.com)
View Comments (Link to your knowledge base's Reporting > Comments)
Comment updated
The Comment updated event is triggered whenever an author edits a comment, such as by approving or deleting it.
Sample Comment updated Slack notification
Here's a sample Slack notification for when an author updates a comment:
Comment updated
Edited by [Name of author who made the update]
[Original commenter name] (commenter-email@domain.com)
[The text of the comment submitted.][Article title] • Edit Article (link to the article in app.knowledgeowl.com)
View Comments (Link to your knowledge base's Reporting > Comments)
Comment status changed
The Comment status changed event is triggered when an author changes a comment's status, for example from Pending to Approved or Deleted.
Sample Comment status changed Slack notification
Here's a sample Slack notification for when an author changes a comment status:
Comment status changed
Status changed from [Old status] to [New status] by [Name of author who made the update]
[Original commenter name] (commenter-email@domain.com)
[The text of the comment submitted.][Article title] • Edit Article (link to the article in app.knowledgeowl.com)
View Comments (Link to your knowledge base's Reporting > Comments)
Contact form submitted
The Contact form submitted event is triggered when a reader submits the Contact Form.
Sample Contact form submitted Slack notification
Here's a sample Slack notification for when someone submits the contact form:
Contact form submission sent
[Contact form subject text]
[Contact form body text]
Customer
[Submitter name] [submitter-email@domain.com]