
Every file you add to an article in your knowledge base is stored in your Files page. You can access files there to update:
- The name of the file
- The file itself
- The file labels associated with that file
- The file description
You can also delete files you no longer need and recover files that have been incorrectly deleted.
And for each file, you can view its references: all the places that this file is being used.
Adding file labels, deleting, and recovering files can be done for individual files or for multiple files in bulk. Changing file names or the files themselves must be done for individual files only.
To access your Files page, select Files from the left navigation. The Files page opens:

- To add files directly to the Files page, select + Add Files. The Upload Files modal opens where you can add the files you'd like to upload. Refer to Add files in bulk for more detailed instructions.
- You can choose to Show Active Files or Show Deleted Files. If you select Show Deleted Files, the page displays a Restore option instead of Delete.
- If you've created File Labels, use the Filter by Labels dropdown to filter the Files display to files containing one or more file labels. Refer to Use labels as filters for more information on this process.
- You can filter the Files display by File Types, including images, videos, PDFs, Word files, Excel files, Powerpoint files, audio files, and zip files.
- Search for a word or file name. Any search phrases entered here will search within the selected filters. Use the default settings (Show Active Files, no Filter by Labels, Show All File Types) to search your entire Files page of active files.
- Once you select an individual file, you can Edit it to change the file's name, the file itself, and add or remove file labels. Refer to Edit and update files for more information on editing files.
- When you've selected more than one file, you can Bulk Label them to add the same file label(s) to all selected files.
- When you've selected one or more files, you can Delete them. If you've selected the Show Deleted Files option, a Restore option displays instead of Delete. Refer to Restoring deleted files for more info on restoring deleted files!
Check before you delete
Deleting files will not delete references to those files from categories, articles, or your Customize > Style settings. Be sure the file is no longer in use before deleting! - Use the Files per page options to change how many files are displayed per page in the display. Options are 20, 50, and 100. (Default is 20.)
- Choose between two Display Modes. The default mode is the icon or thumbnail view, represented by the icon with six squares in two rows, which displays a thumbnail of each file. List view displays a list of file names and metadata with no thumbnail. Refer to Which Files page display mode should I use? for more information on the two display modes.
In order to edit, bulk label, or delete files, you'll need to select them. In icon view, select a file by clicking anywhere on the file's thumbnail. Select all four files in a row by checking the box to the left of the row.
When a file is selected in the icon view, a white checkmark on a blue square will appear in the upper right corner of the thumbnail.
Refer to List View for making file selections in List View.
To open an individual file for viewing rather than editing, select the hyperlinked name below the file thumbnail. The file should open in a new tab if it's supported by your browser, or download if it's not.
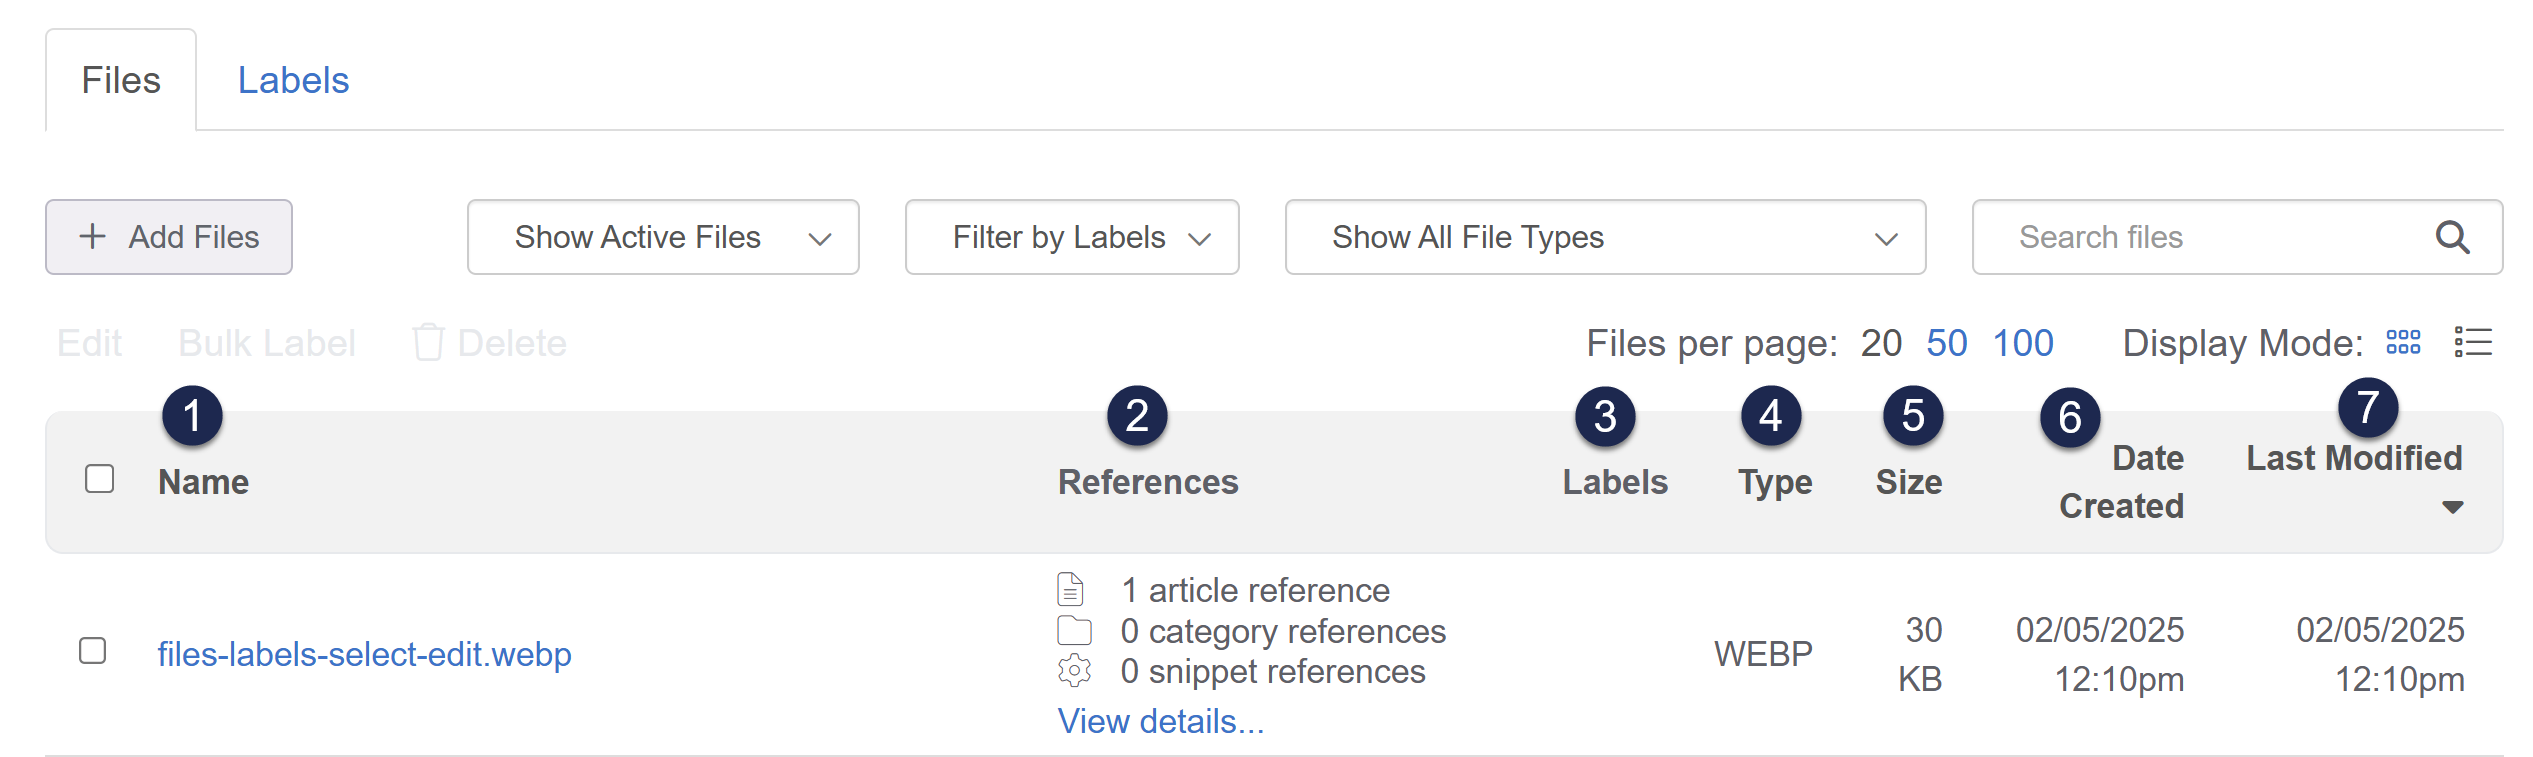
The Files page defaults to a thumbnail/icon view. If you'd prefer to view your files in a list, sortable by name, date, type, and size, select the list icon in the Display Mode section.
The filter options and other controls remain, but the view updates to show a list:
 Sample List View
Now, you'll see a table with various columns:
- Name: The file's name.
- References: A summary count of the places this file is used. Select View details to show a more detailed list.
- Labels: Any File Labels added to the file.
- Type: The file's type, as designated by the file extension.
- Size: The total size of the file. KnowledgeOwl only allow files up to 200MB in size.
- Date Created: The date the file was originally created.
- Last Modified: The date the file was last edited. If it has never been edited, this date will match the Date Created.
Select any any column other than References or Labels to sort the view by that column. Selecting the same column multiple times will toggle between ascending and descending sort. The sorted column displays an up arrow or down arrow next to it. For example, in the screenshot above, our Files page is sorted by Last Modified, descending order.
To select a single file in list view, select anywhere in that file's row or explicitly in the checkbox to the left of the file name. A checkmark appears in the box to the left of the file Name to indicate it's selected. To select multiple files, check multiple boxes. To select all files in the view, select the checkbox to the left of the Name column header.
Select the hyperlinked file name to open an individual file. The file will open in a new tab if it's supported by your browser or download if it's not.
The Display Mode in Files lets you toggle between Icon view and List view. Each view has its own best use cases:
Icon view or thumbnail view is best used for:
- "Seeing" the files: if you're working a lot with visual or video content, icon view can help you visually scan your files quickly to see if they need updates or confirm you have the right file
- Seeing the most recently edited files first (they are always presented at the start of the icon view)
- Quick visual reminders of your file types. For non-image files, we display an icon based on the file type, like a video clip for videos, the PDF icon for PDFs, and so on. If we don't recognize the file type, the thumbnail displays a paperclip icon.
List view is best used for:
- Sorting your files in different ways
- Seeing the file labels that are added to various files
- Seeing the exact date the file was created or last modified
- Auditing file types to, for example, remove all .jpg files and replace them with .png files
- High-volume bulk labeling or bulk delete/recovery. If you can use the filters and search to display only the files you need, you can bulk-select all your files for these bulk operations!
They're equally useful for:
- Editing individual file details (name, file labels, the file itself)
- Deleting or restoring files
Refer to the Introduction to the Files page for an overview of the Files page and the icon view; refer to List View for more details on that view.
To add multiple images, videos, or files at once:
- In the left navigation, select Files. The Files page opens.
- Select + Add Files. The Upload Files modal opens.
- Add files to the modal using one of these two methods:
- Drag files from your desktop or File Explorer and drop them in the modal near Drag files here.
- Select Browse to Files, select the files you want to add, and open them.
- Once you've added the files you'd like to upload, select Upload Files... to complete the upload.
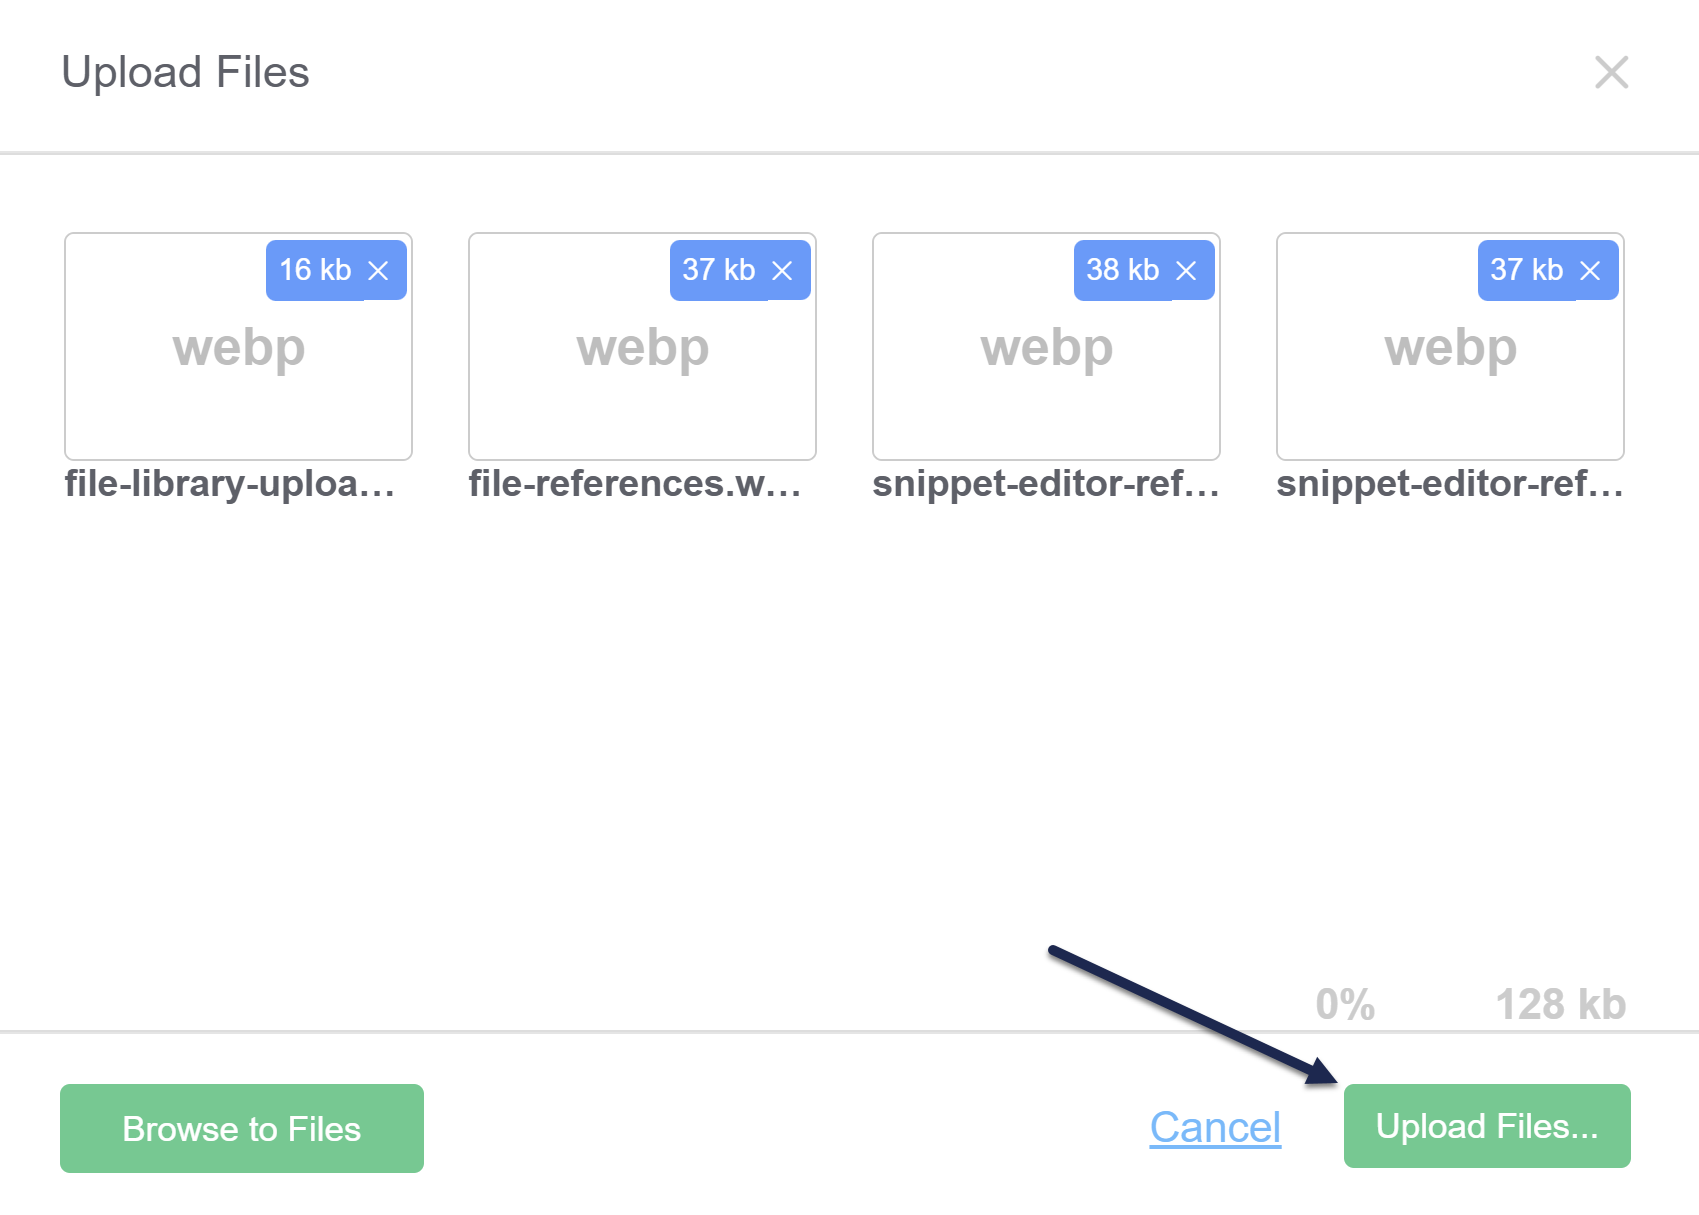 Sample Upload Files modal with files added
 - A progress bar displays in the modal while the upload runs. Once the upload is complete, the modal closes.

Duplicate files
If you upload a file with the same name as something that already exists in your Files page, KnowledgeOwl appends a random 6 character code on the end, using a-f0-9. This helps enforce uniqueness in the file names and URLs and makes it easier to identify when you may have duplicate files.
Every file you add to an article in your knowledge base is stored in Files. You can access files there to:
- Rename the file
- Update the file itself, such as uploading a new screenshot or Excel sheet
- Add or remove labels.
- Add, edit, or remove a file description.
Rename a file
By default, files are uploaded with a name based on the file name you originally uploaded (or a random string if you copied and pasted an image into the article editor). This is the name that will show up when the file is downloaded/opened.
If you'd like to edit this to something more human-friendly or search-friendly:
- In the left navigation, select Files. The Files page opens.
- Select the file you'd like to edit. If you have a lot of files, you may need to use the labels or search to find it.
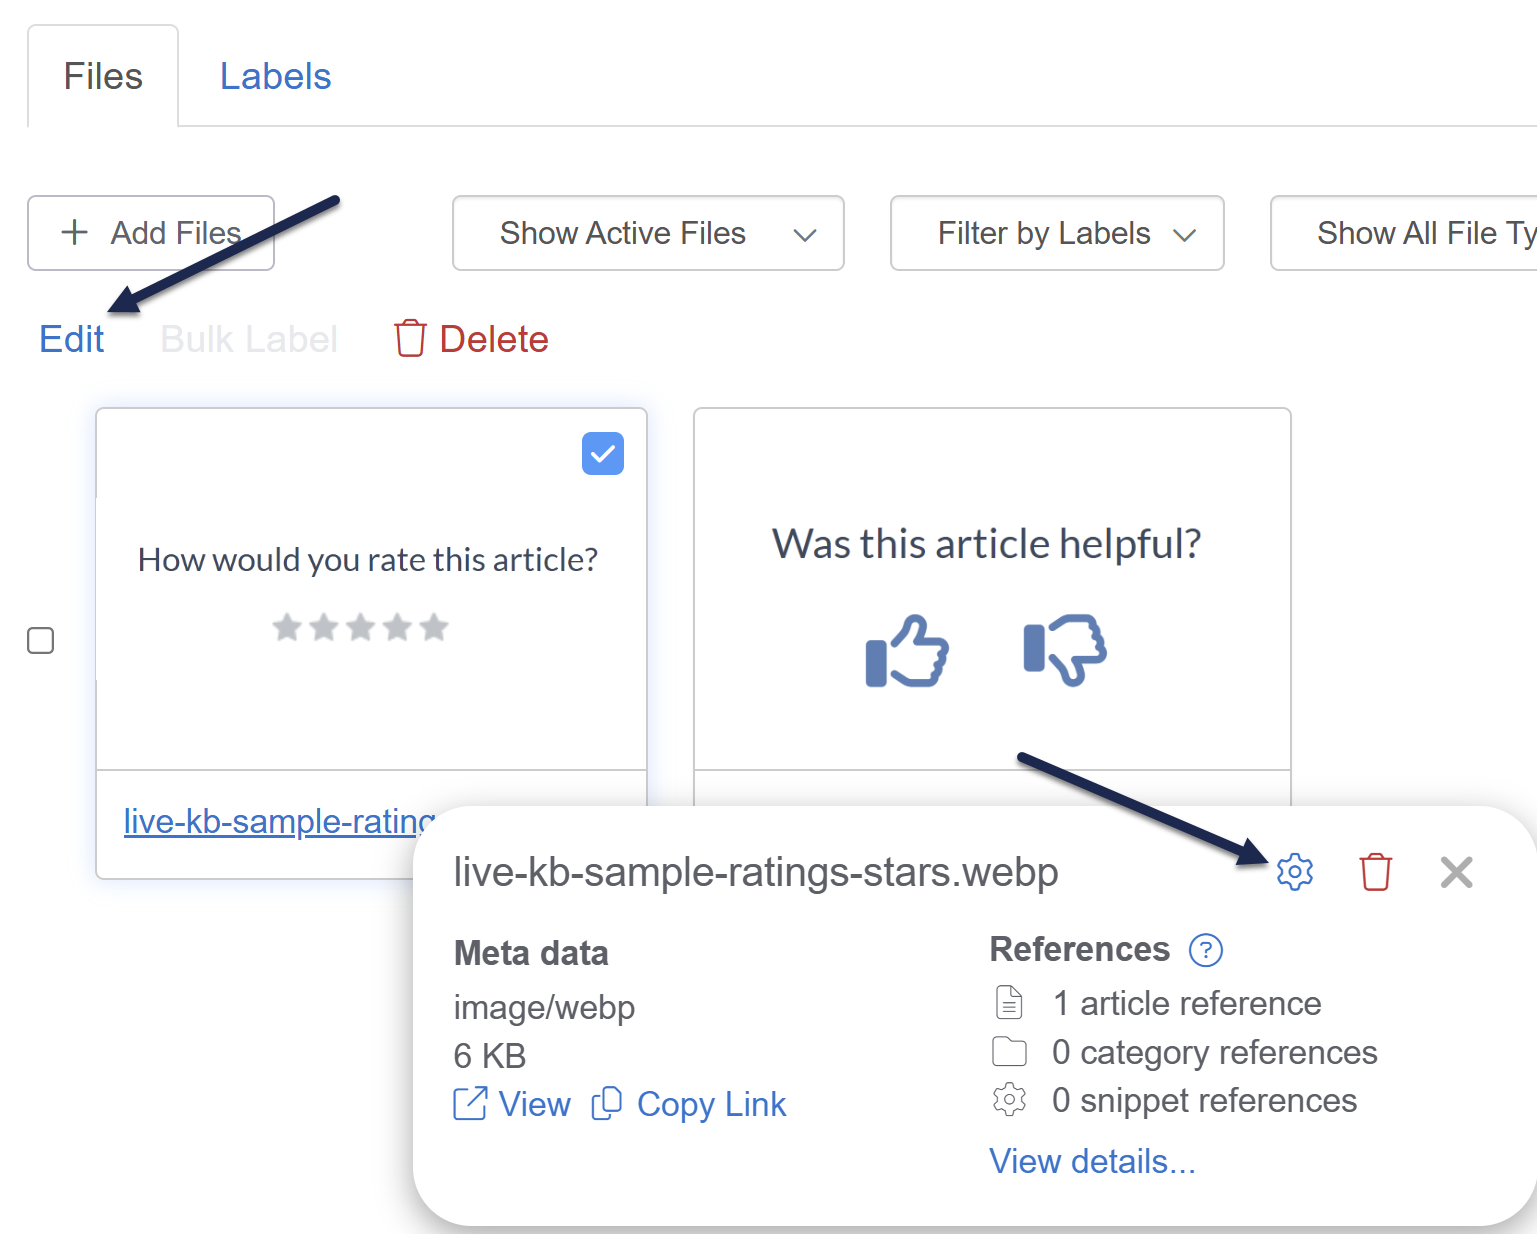
- Select the Edit link near the top of the page or the gear cog icon in the file metadata modal at the bottom of the page:
The Edit file modal opens. - Edit the File name to be what you'd like, then Save File.

Update a file
Linus is a busy little owl, and he updates a lot of screenshots and articles. Whenever he can, he reuses existing screenshots in the Files page. When it comes time for him to update that screenshot, rather than manually replacing the screenshot in every single article he used it in individually, he updates the existing file in Files with the new screenshot. This approach has some great advantages:
- It's a real time-saver for editors (one update in Files rather than manually editing a bunch of articles).
- It prevents Files from getting bloated with old/outdated/duplicate copies of files.
- It guarantees that everywhere the screenshot was used, it's updated to the latest version of the file.
Highly recommended
We strongly recommend updating files this way!
To make this kind of update:
- In the left navigation, select Files. The Files page opens.
- Select the file you'd like to edit. If you have a lot of files, you may need to use the labels or search to find it.
- Select the Edit link near the top of the page or the gear cog icon in the file metadata modal at the bottom of the page:
Select file and click one of the two Edit links
The Edit file modal opens. - Select Upload New File:
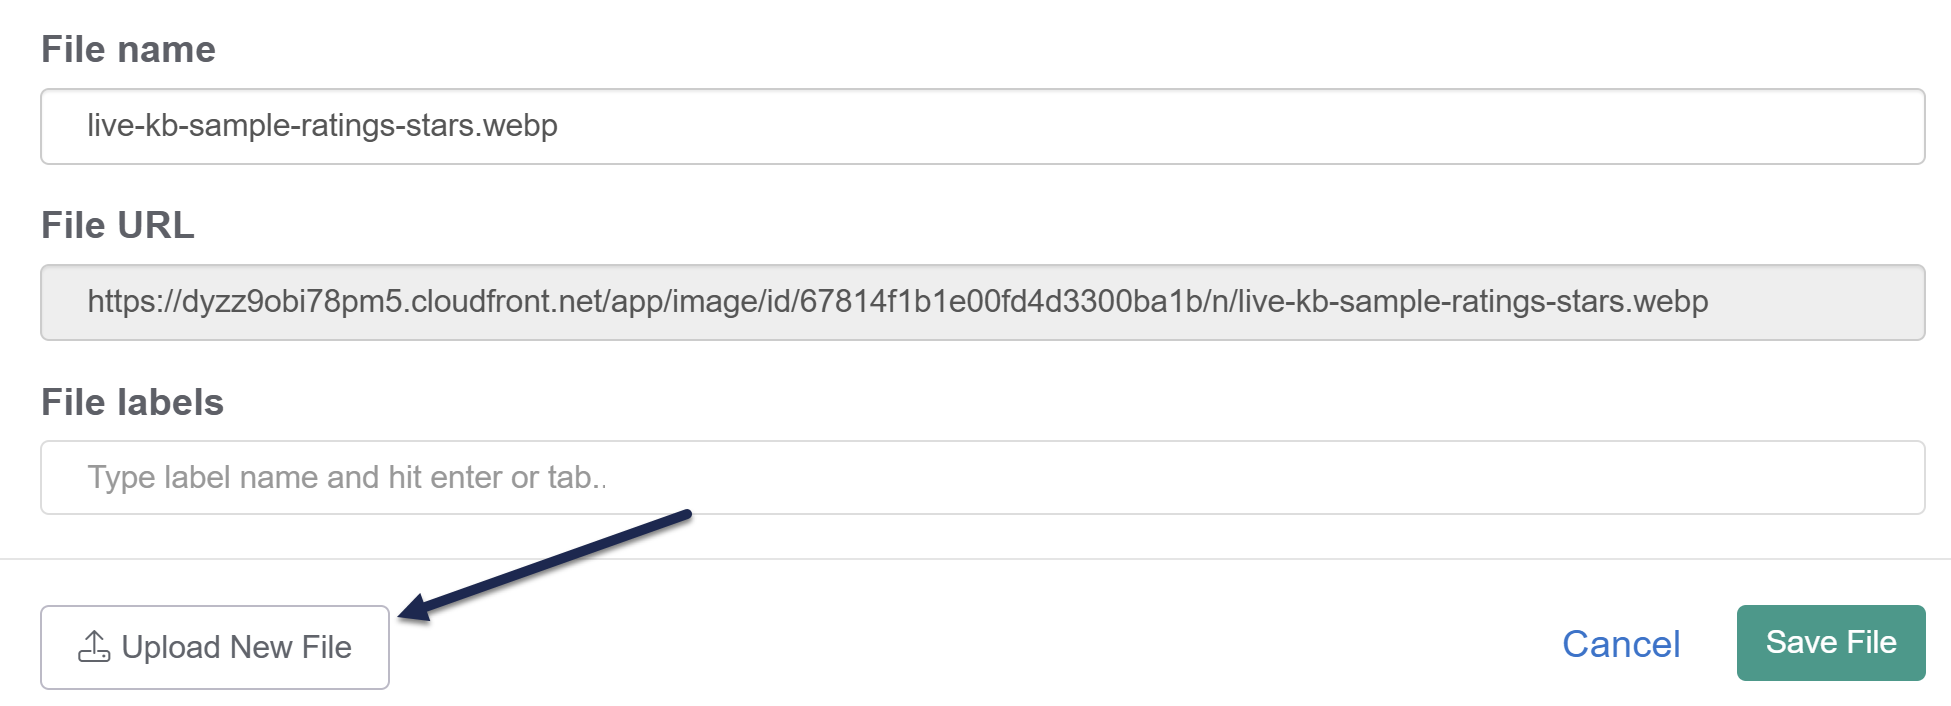 Select Upload New File
- Navigate to and select the new version of the file you want to replace the existing one. The name of the new file you've selected displays in the lower left corner.
- Once you confirm the file you uploaded is the correct one, select Save File.
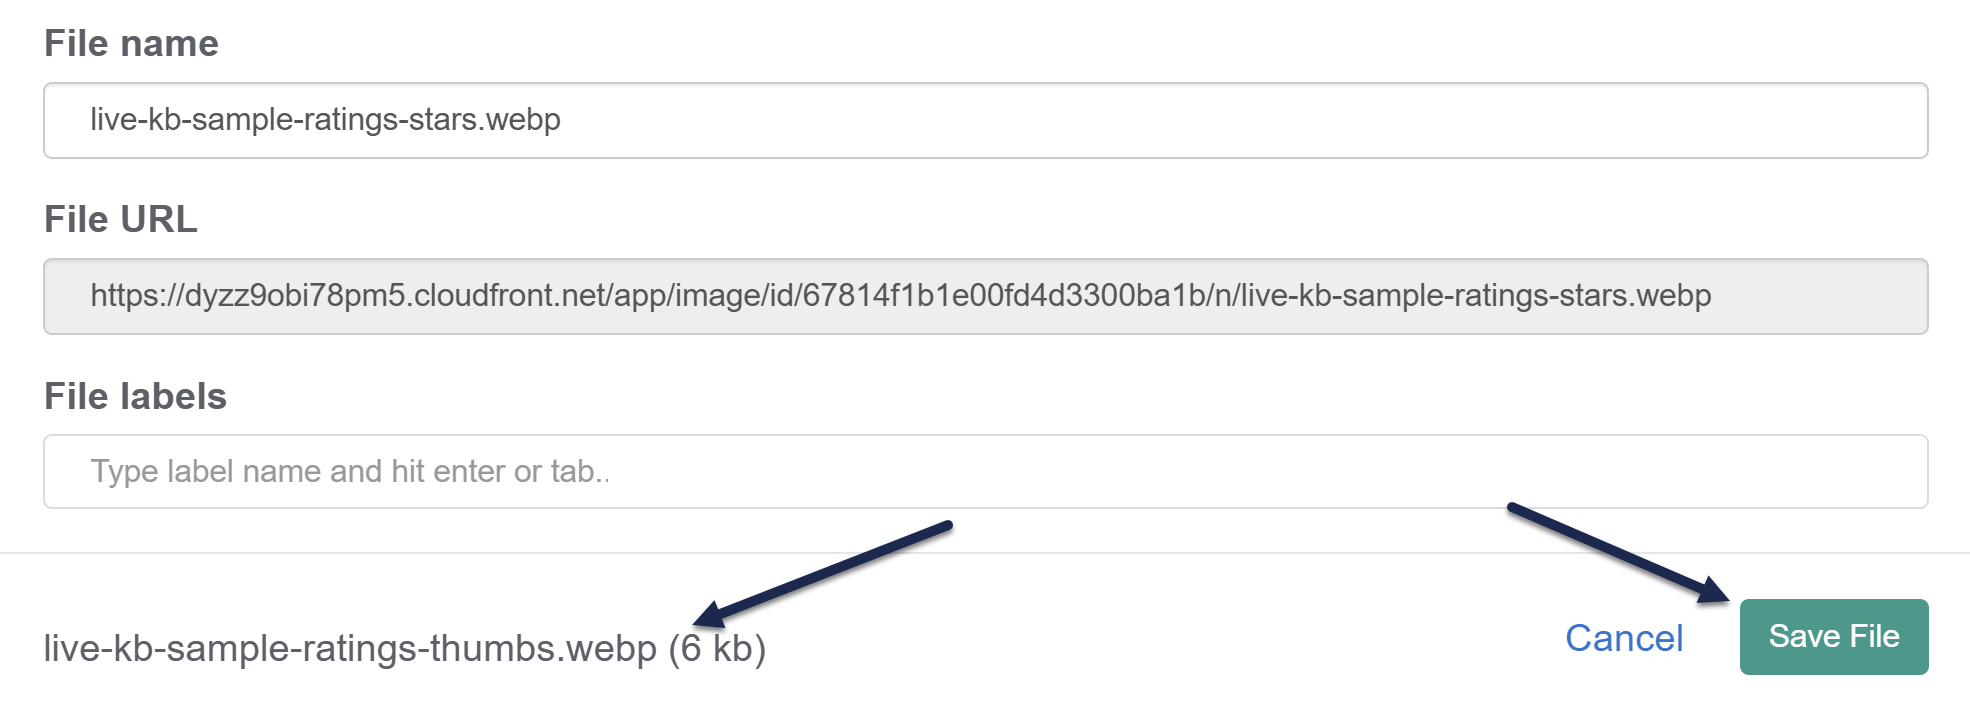 Confirm new file to be uploaded in lower left is correct and Save File


Still seeing the old file?
Browser caching may prevent you from immediately seeing an updated file. If you're still seeing a previous screenshot or file, try a hard refresh.
As the warning at the top of the Edit file modal says, while most articles will update immediately, some can take up to an hour to update. Contact us if you have issues with a file not updating.
It's an accessibility best practice to add alternative text to images that appear in your content.
While you can add alt text each time you insert an image to your articles, we recommend adding the alt text to the file itself as the File description. File descriptions are automatically added as the alternative text when you insert image files into your content, saving you some time in writing or standardizing the alt text!
To add a file description to an existing file:
- In the left navigation, select Files. The Files page opens.
- Select the file you'd like to edit. If you have a lot of files, you may need to use the labels or search to find it.
- Select the Edit link near the top of the page or the gear cog icon in the file metadata modal at the bottom of the page:
The Edit file modal opens. - Enter the alternative text you'd like to store for the file in the File description field, then Save File.
Whenever the file is inserted from library into a new article or category, the file's current File description is added as the alt text attribute.
Updates to file description don't change existing content
Changes to the File description will only appear on images that have been added to content AFTER the file description was saved.
To update the alt text for images that were already in content before you edited the File description, we recommend removing and re-adding the image manually to each article. Use the File references as a punchdown list!
There are a few places within KnowledgeOwl where you might need to have the URL to your image. Many Look and feel customizations need a file URL, for example.
You can copy the URL for a file quickly from your Files:
- In the lefthand navigation, select Files. The Files page opens.
- If you're viewing the Files page in Icon view, select anywhere in the file's card. A checkmark displays in the upper right of the thumbnail once you've selected it. If you're viewing the Files page in List view, select the checkbox to the left of the file Name or select anywhere in the file's row to select it. The file's details open in a modal at the bottom of the page once you select it.
- Select Copy Link in the file detail modal to copy the URL to your clipboard:
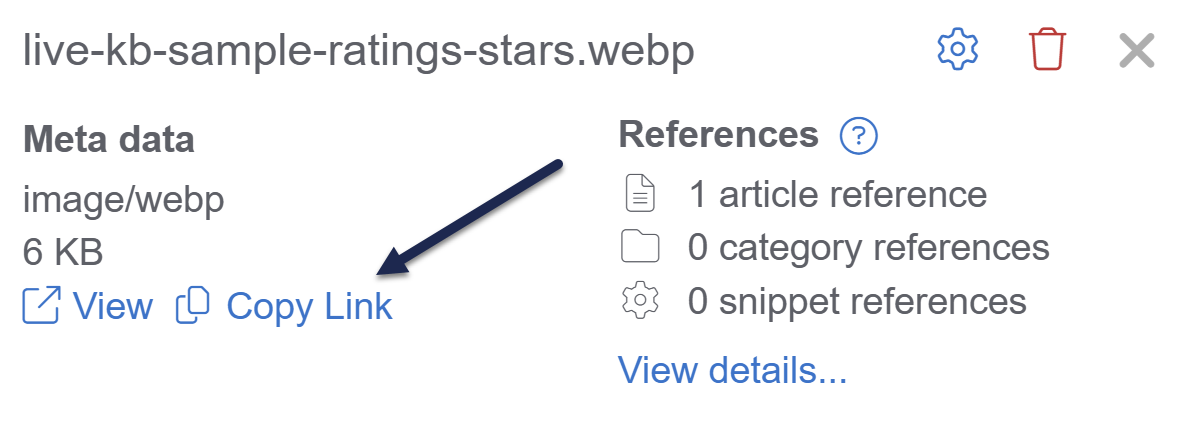 Select Copy Link in the file detail modal to copy the file's URL to your clipboard

Any time a file is used, we track the reference so that you know whether it's safe to delete that file.
File references are tracked for:
- Articles
- Article body content: will check all draft articles and published articles. Will not check inactive article versions.
- Article URL redirect
- Article thumbnail
- Article banner
- Categories
- Category URL redirect
- Category icon
- Category description
- Custom content category body
- Category thumbnail and banner (for custom content categories and topic display categories)
- Snippet body content
- Theme
- Customize > Style (Custom HTML & CSS) logo
- Customize > Style (Custom HTML & CSS) favicon
- Customize > Style (Custom HTML & CSS) > Customize HTML, CSS, and JS > Custom HTML templates
- Customize > Style (Custom HTML & CSS) > Customize HTML, CSS, and JS > Custom CSS
- Other
- Customize > Homepage content editor
The file references will update once you save changes on any of these pages.
Limitations
Refer to Limitations for some use cases where references aren't tracked.
You can view the file references in Files in two places:
- In Icons View and List View, when you select an individual file, the file metadata modal at the bottom of the page displays the file's references:
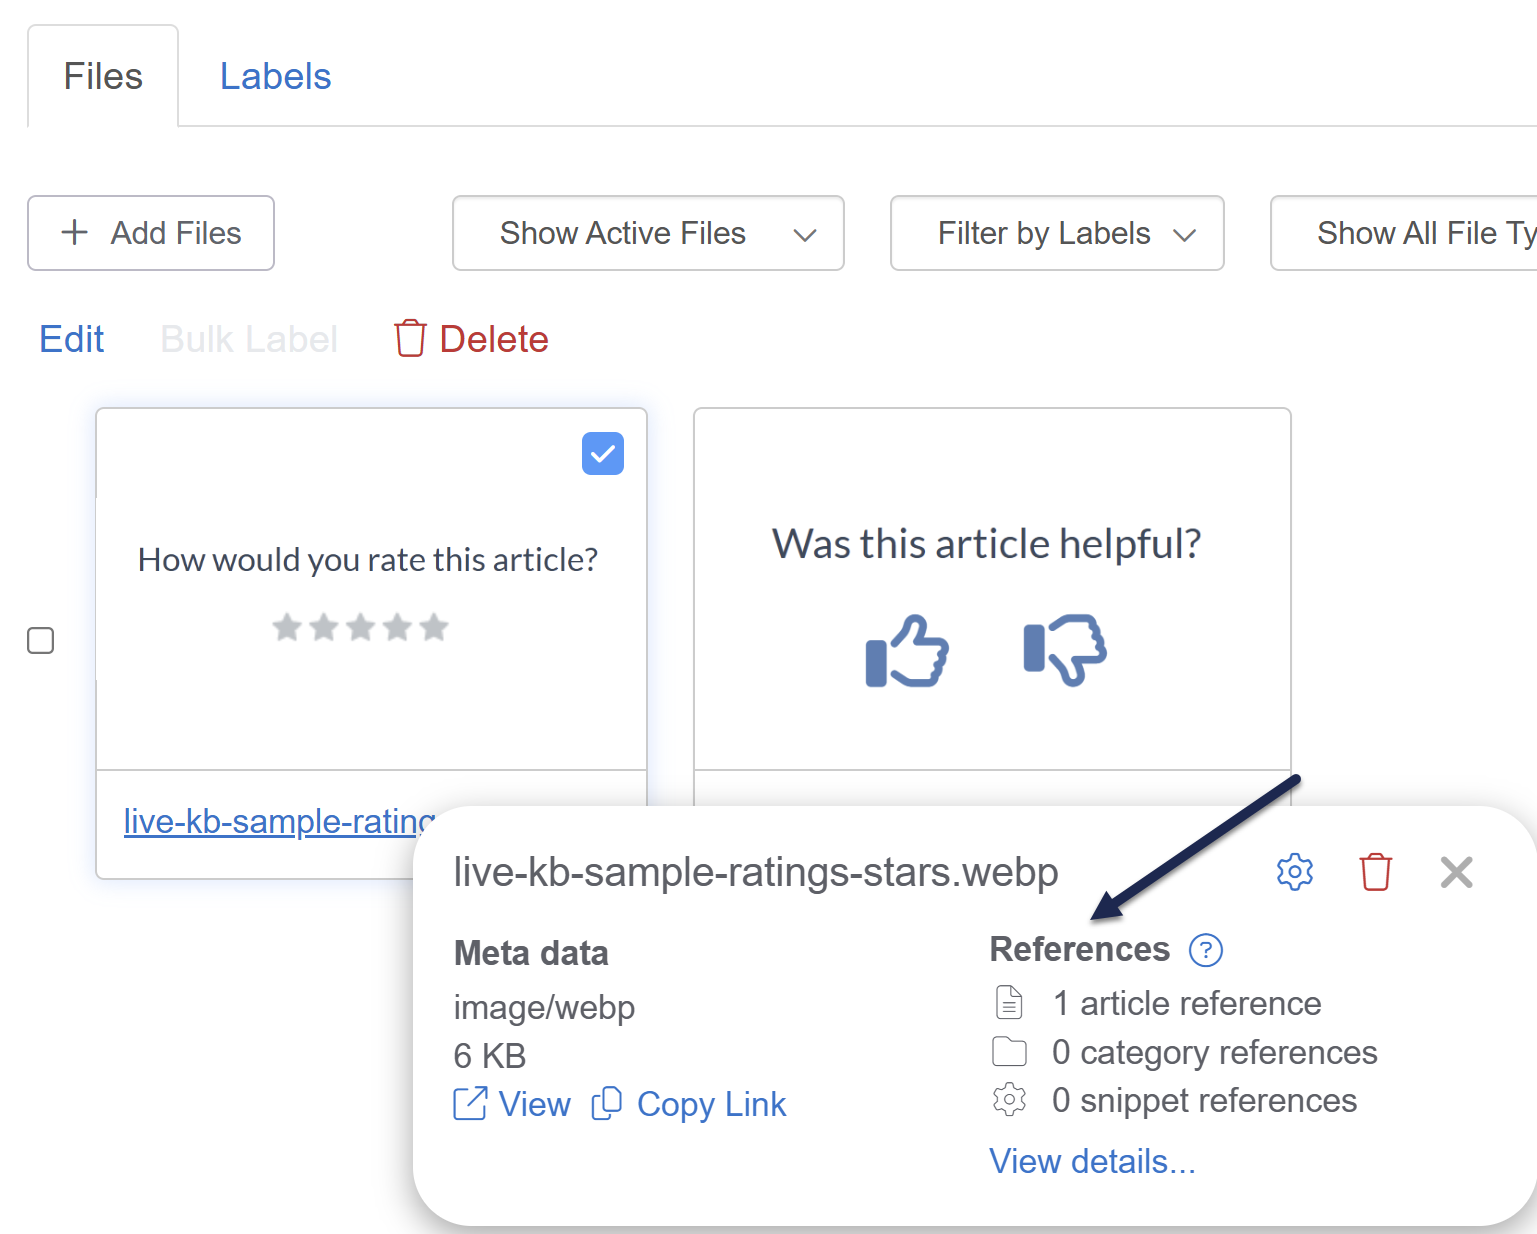 Sample references in the file metadata modal
 - In the List View, References is included as its own column. This column displays the same format as the file metadata modal:
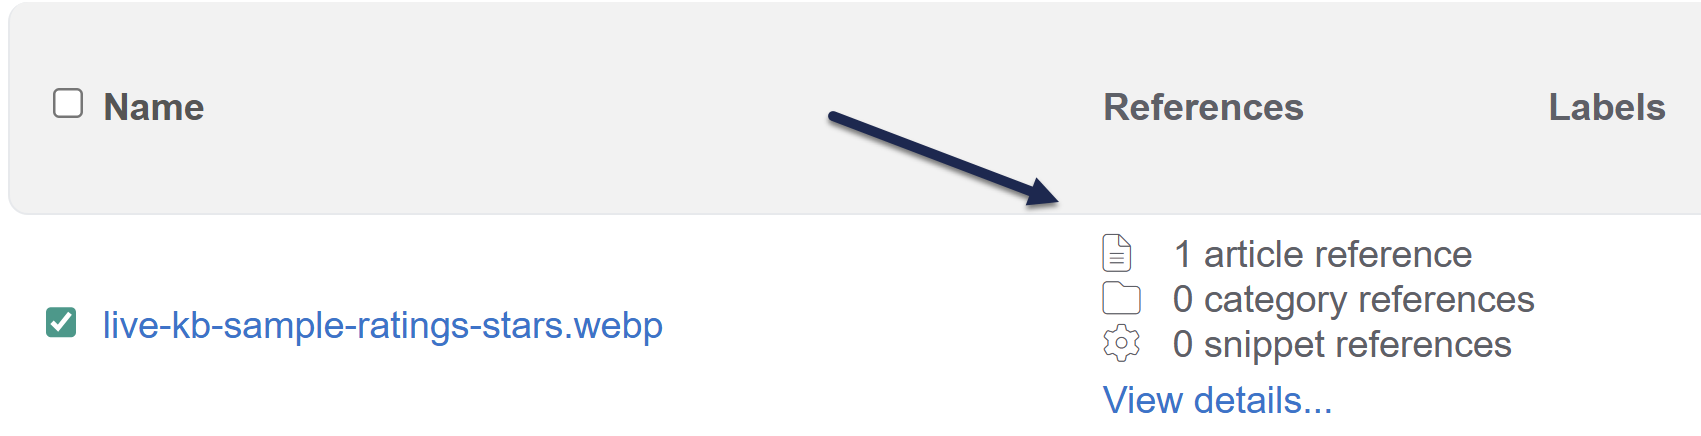 Sample references in the List View References column


In either location, select View details... to open the References modal. References will display in 5 sections:
- Theme References: Contains references in Customize > Style (Custom HTML & CSS), including the logo, favicon, Custom HTML templates, and Custom CSS.
- Article References: Contains references within article body, URL redirect, banner, thumbnail. Each article includes a badge that displays the article's current publishing status.
- Category References: Contains references within category description, icon, URL redirect, etc. Each category includes a badge that displays whether it's active or deleted.
- Snippet References: Contains references within snippet body. Each snippet includes a badge that displays whether it's active or deleted.
- Other References: Contains references within Customize > Homepage custom content editor.
Here's a sample showing references in all areas:
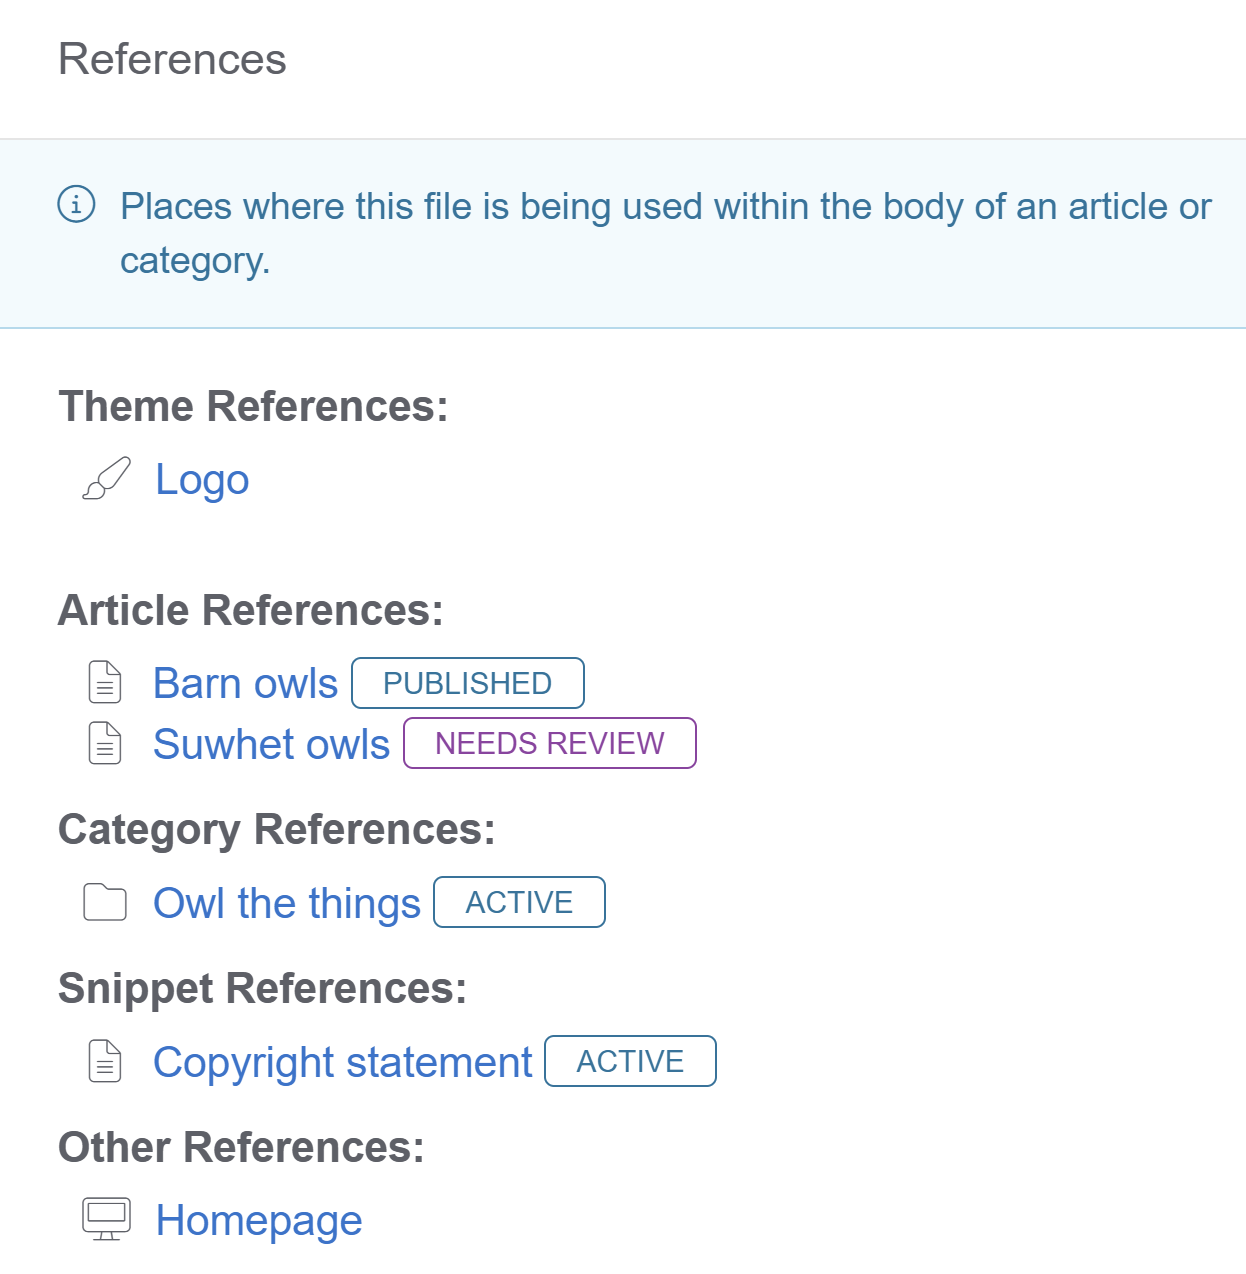 Sample file References list showing all possible references.
You should be able to safely delete any files which show 0 references for all reference options. This also lets you track down all the places a file is used in case you need to update content relating to it!
Limitations
There are a few limitations to using the file references:
- Files used in snippets: Files used in snippets only list the snippet reference. They won't list all the places that snippet may be referenced.
Suggested workaround
If a file has Snippet References, check the Snippet references for a complete list of all the places the file is used. - Only files in this knowledge base: File references will track references to the file within the same knowledge base the file is stored within. If you have multiple knowledge bases and the file is used in other knowledge bases, those references aren't tracked.
Suggested workaround
Add a file label or some other method to alert yourself not to delete files referenced by other KBs. For example, we useused by [other KB name]anddo not deletefor files we reference in other knowledge bases.
Sometimes, you delete the wrong file by accident--maybe you didn't realize you'd selected an entire row of files, or two files are named identically and you deleted the wrong one.
KnowledgeOwl allows you to restore files you've deleted. Restoring files will:
- Restore access to them by the original URL.
- Restore any links to files using that original URL.
- Add the file back to your main Files view.
- Add the file back into the Add from Library search within the editor.
To restore deleted files:
- In the left navigation, select Files. The Files page opens.
- The first dropdown defaults to Show Active Files. Select the second option from this dropdown: Show Deleted Files.
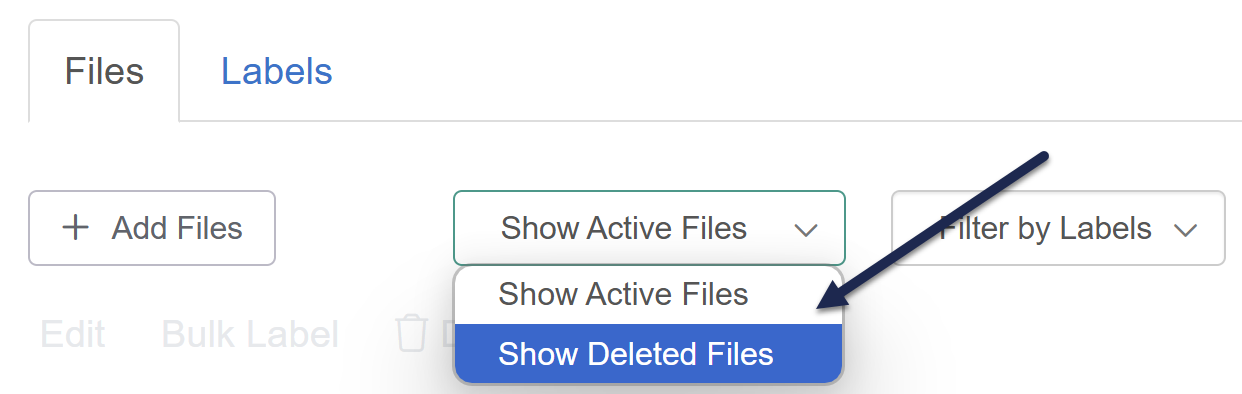 Select Show Deleted Files instead of Show Active Files
 - The Files list updates to display all deleted files in your knowledge base, with the most recently deleted listed first. You can use the other dropdown filters or the search to locate the file(s) you'd like to restore.
- For each file you'd like to restore, select the file:
- In icon view, select anywhere in the file thumbnail to add a checkmark in the upper right. To restore an entire row of files, select the checkbox to the left of the row.
- In list view, select anywhere in the file's row to add a checkmark to the left of the file. To select all files within a filter/search, check the box in the upper left next to the Name column header.
- Once you've finished selecting the files, select Restore near the top of the page.
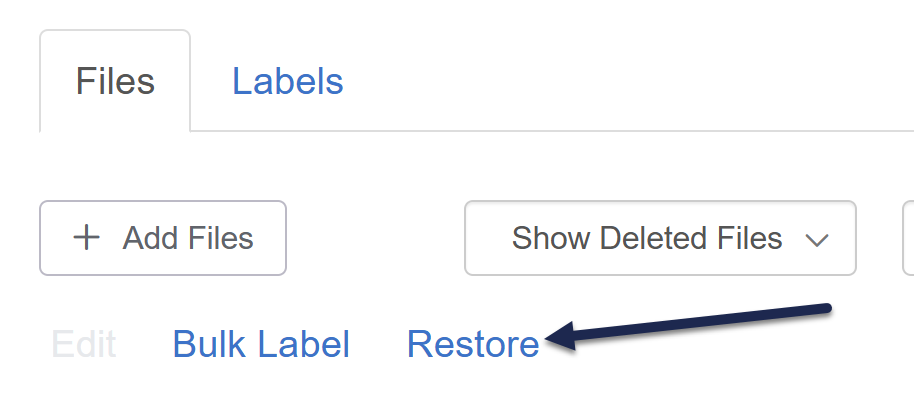 Select Restore to begin the restoration process.
A confirmation modal opens. - Review the file names listed in the modal. Select OK to confirm the restoration. When the restoration is complete, the restored file won't display in the Show Deleted Files view.
- You can now use the dropdown at the top to Show Active Files. The restored file will be there and will again display in your knowledge base.


When you delete a file from the Files page, KnowledgeOwl doesn't fully delete this file--you can still see it and restore it.
However, there are times when you might want to fully purge or remove deleted files in a knowledge base:
- Just to keep things tidy/avoid confusion
- Due to a GDPR request or other incident
Our support team can run a full purge of all deleted files in your knowledge base. If you need this service, please contact us and let us know which knowledge base you'd like to purge all deleted files from. Once purged, files will be completely removed from your knowledge base.
Behind the scenes, we move these files to a different storage location for 30 days. We can recover them during that 30-day window, but after 30 days, they are fully deleted from all of our systems and are not recoverable, so use this service with caution!
Similar to tags in articles, you can add labels to files so that you can filter your Files more easily.
File Labels:
- Are only visible to authors with access to Files in app.knowledgeowl.com.
- Can be used as filters in the Files page.
- Can be added to/removed from files in the Files page.
- Can be created in the Files page or in the Labels tab.
- Can be edited, deleted, and merged in the Labels tab.
For more information, refer to File Labels.
Once you have added file labels to your files, those file labels can be used to filter your Files page. To do so:
- In the left navigation, select Files. The Files page opens.
- Select the Filter by Labels dropdown.
- Select the label(s) you'd like to use as filters. If you select more than one label, only files with all the selected labels are displayed.
 Sample Filter by Labels selection.
 - Once you select a label, the Files display updates to show only the files with that label.
- To remove a label from your filter, select it again to deselect it or reload the page.

You can combine the labels filter with the Show Active/Deleted Files and Show File Type filters, too.
The Security settings for your knowledge base (Security and access > Security settings) determine the general security requirements for readers to access your knowledge base.
The files you upload to your knowledge base—PDFs, Excel sheets, screenshots, Word documents, etc.—do not automatically use this same security.
By default, even if your knowledge base requires login, the files you've uploaded don't require login. This is by design so that you can give readers the link to specific documents and they can easily download the file by clicking on that link or URL without having to log in to your knowledge base.
However, you can adjust your security settings so that readers have to be logged in to access files and images stored within your knowledge base.