
Every article has its Full Article Title, which is what displays at the top of your article. There is also an optional short title, which is used in the table of contents.
Sometimes, you need a place to leave notes for other authors (or yourself) that isn't the Version Notes field. This might include notes on who the subject matter expert is, or that if you update this article, you should also update another article, or some type of quality control note (such as Article Confidence levels if you use KCS).
This type of note is exactly what we designed the Internal Note field for.
Internal notes:
- Are notes you want front-and-center when you or other content creators are editing a given article or category.
- Are displayed only in app.knowledgeowl.com, not to your readers.
- Accept very simple HTML markup, so you can include hyperlinks and lists.
- Will be displayed at the top of ALL versions of the article.
- Are available in the Manage Articles CSV export.
- If used in a template article, will be copied to new articles created from that template.
- If in an existing article, will be copied when a new article is created from that existing article.
Add an internal note
Authors with the default Editor or Writer role can add internal notes. If you're using a custom role, you'll need to have the Internal Notes Permission to Create new internal notes.
Authors who don't have permissions to create, edit, or delete internal notes will still be able to see internal notes created by other authors who do.
To add an internal note:
- Select the Add Internal Note link to the right of the title:
 Click Add Internal Note
 - Add the HTML you want to use for your note. If you're just putting in regular sentences, you don't need to add HTML, but you can use it for formatting lists, hyperlinks, and so on.
- Select the style you want to use for your note from the dropdown; we default to Alert Info. Here, we've added a one-line note and selected the Alert Warning style.
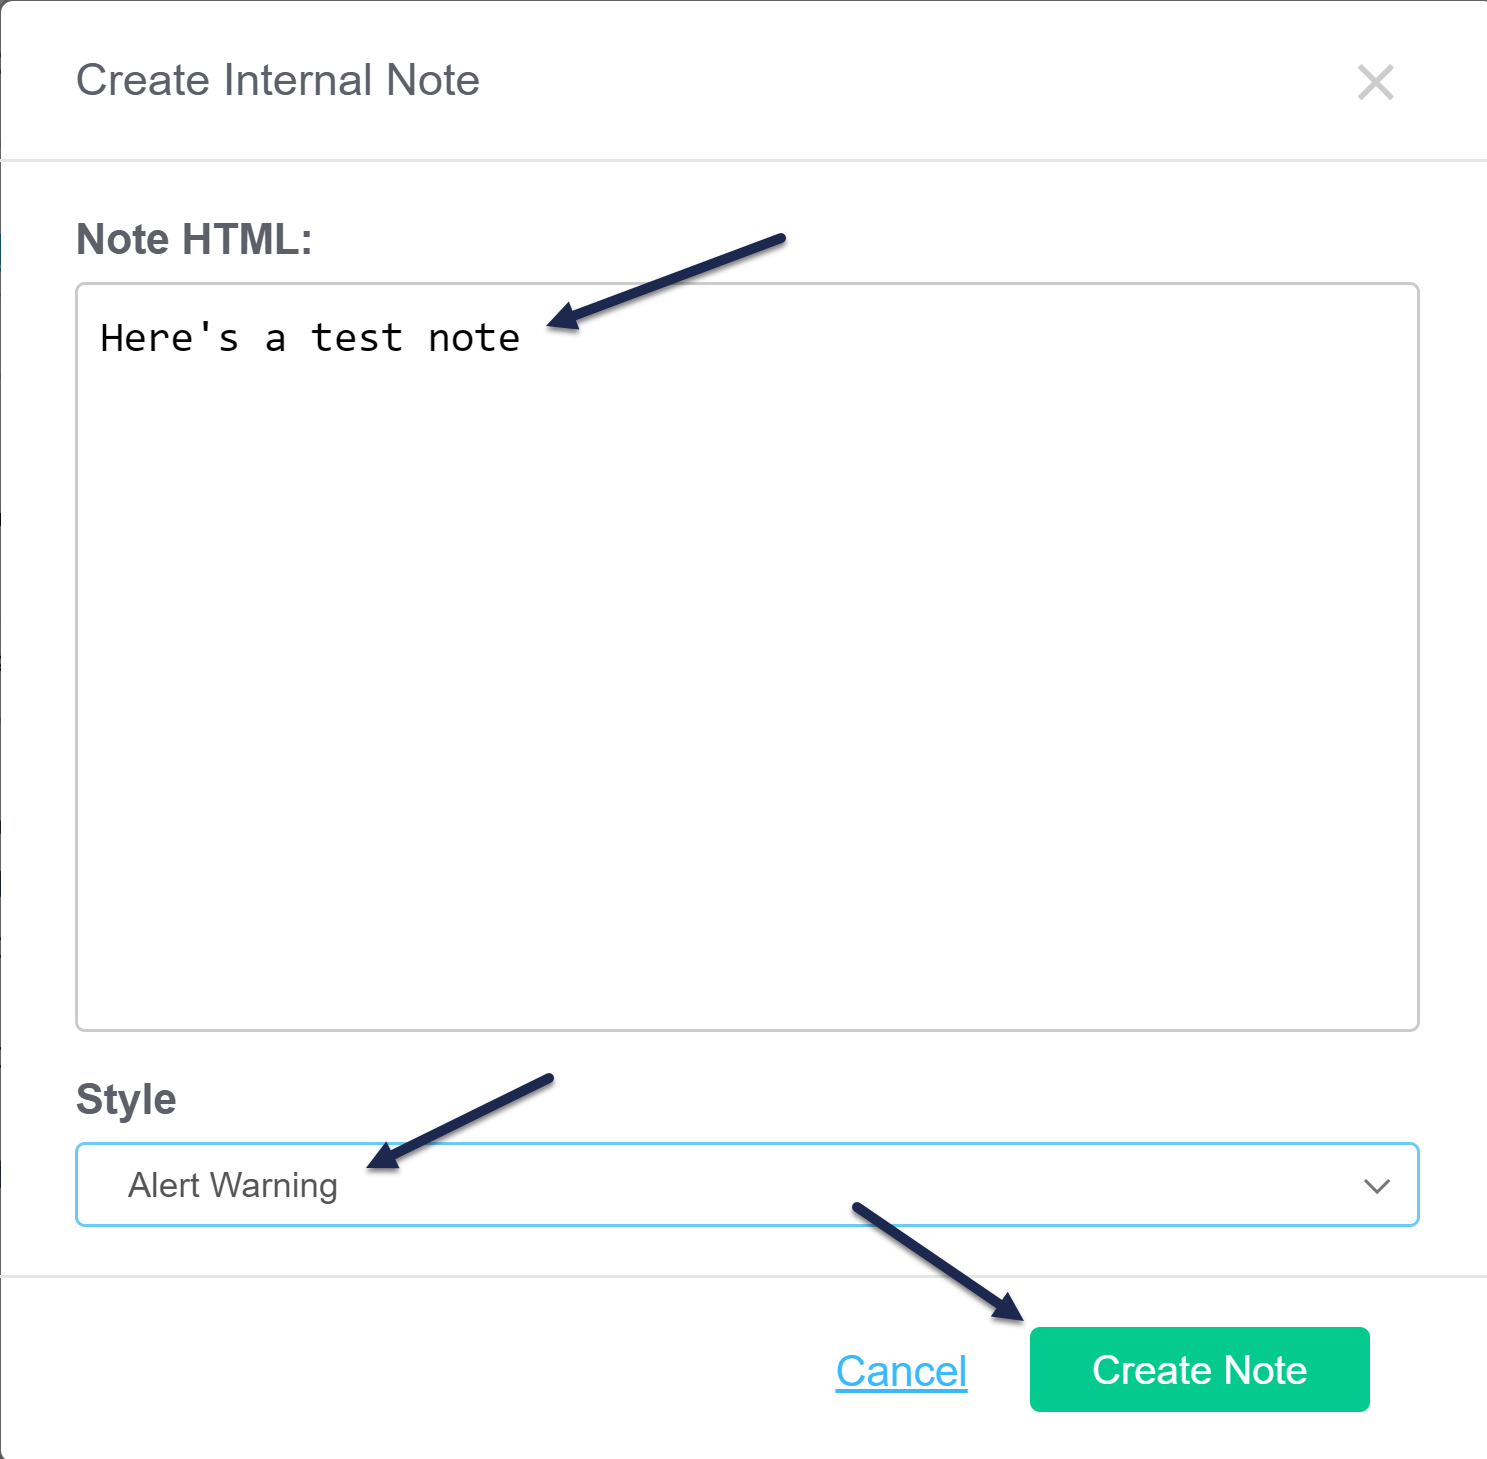 Sample Create Internal Note pop-up. Click Create Note to add it.
 - Select Create Note.
- This creates the note and displays it using the style you selected between the title and the editor. You do not need to resave the article itself for the note to be saved.
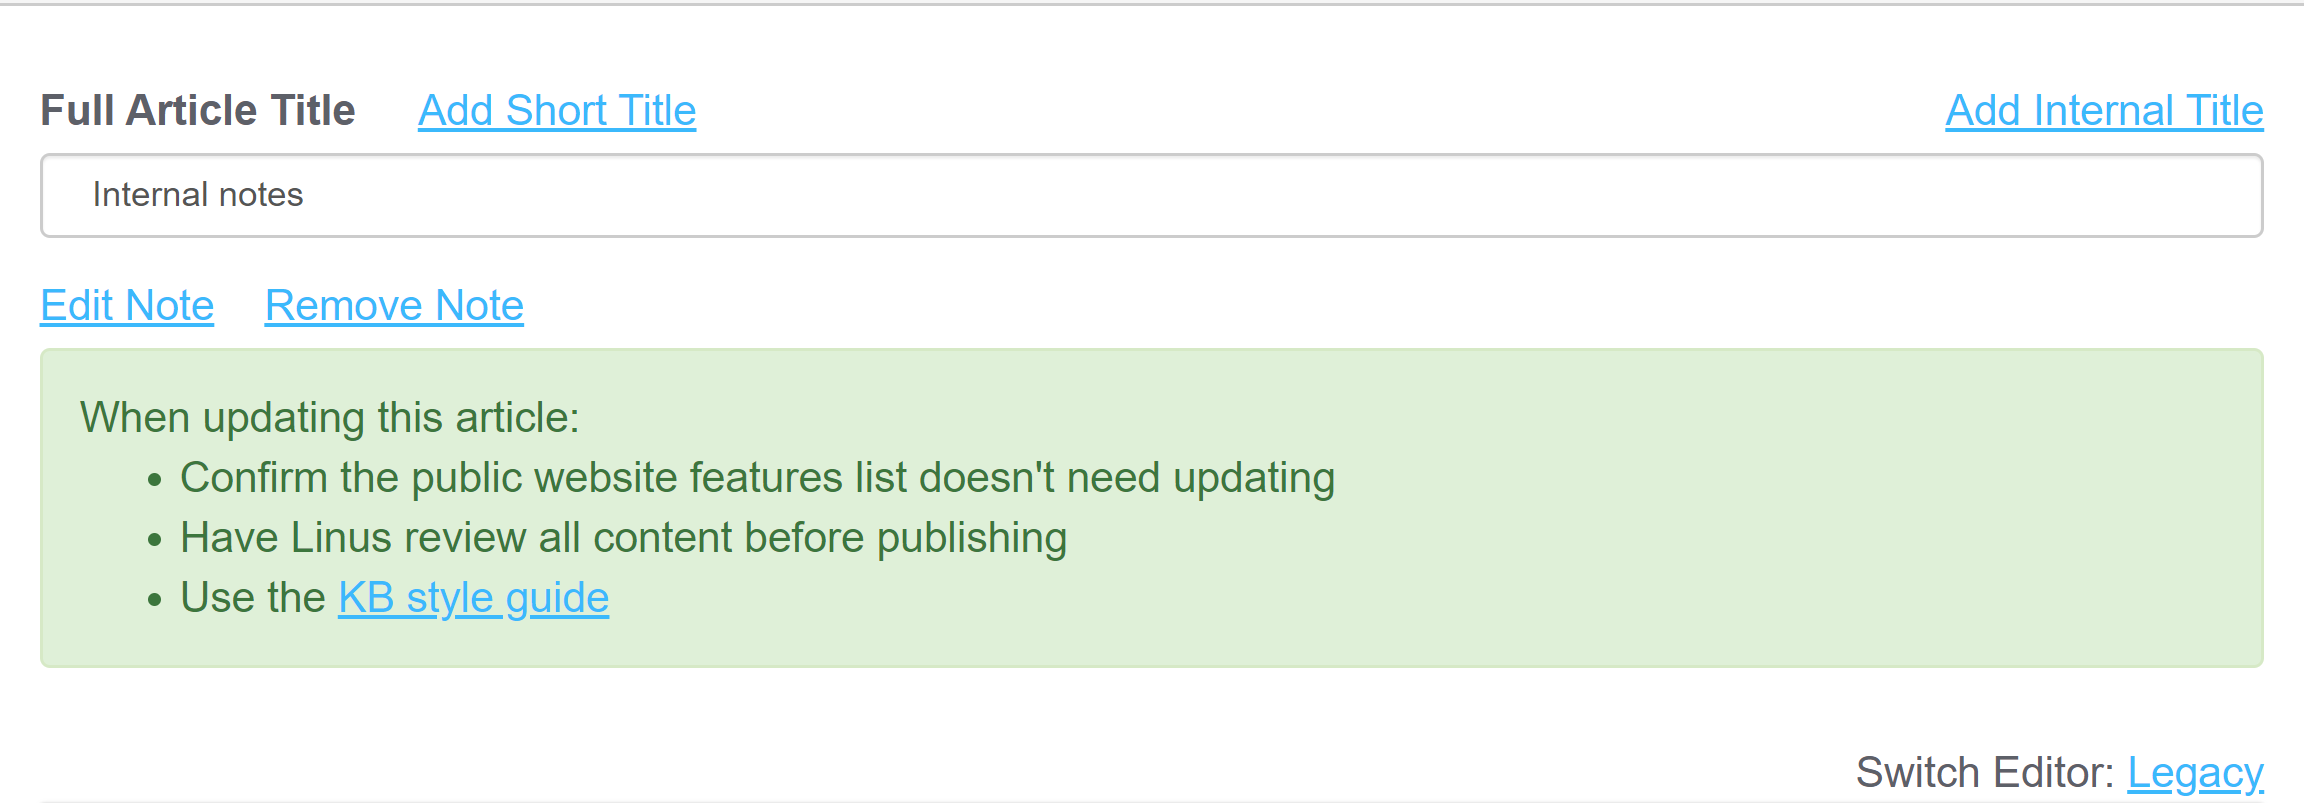
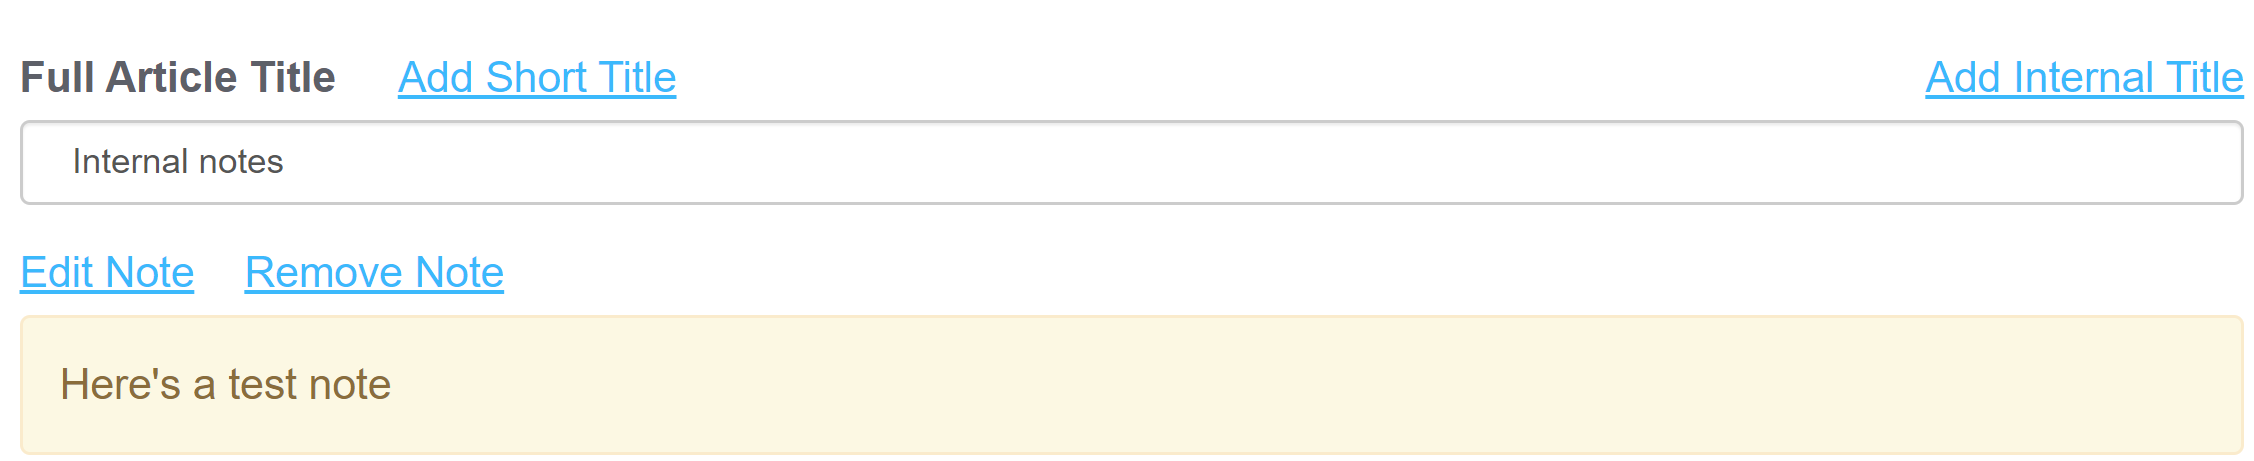 Sample Internal Note from the configuration used above


Edit an internal note
Authors with the default Editor or Writer role can edit internal notes. If you're using a custom role, you'll need to have the Internal Notes Permission to Edit internal notes.
Authors who don't have permissions to create, edit, or delete internal notes will still be able to see internal notes created by other authors who do.
Once an internal note exists, you can edit it to make updates. To do so:
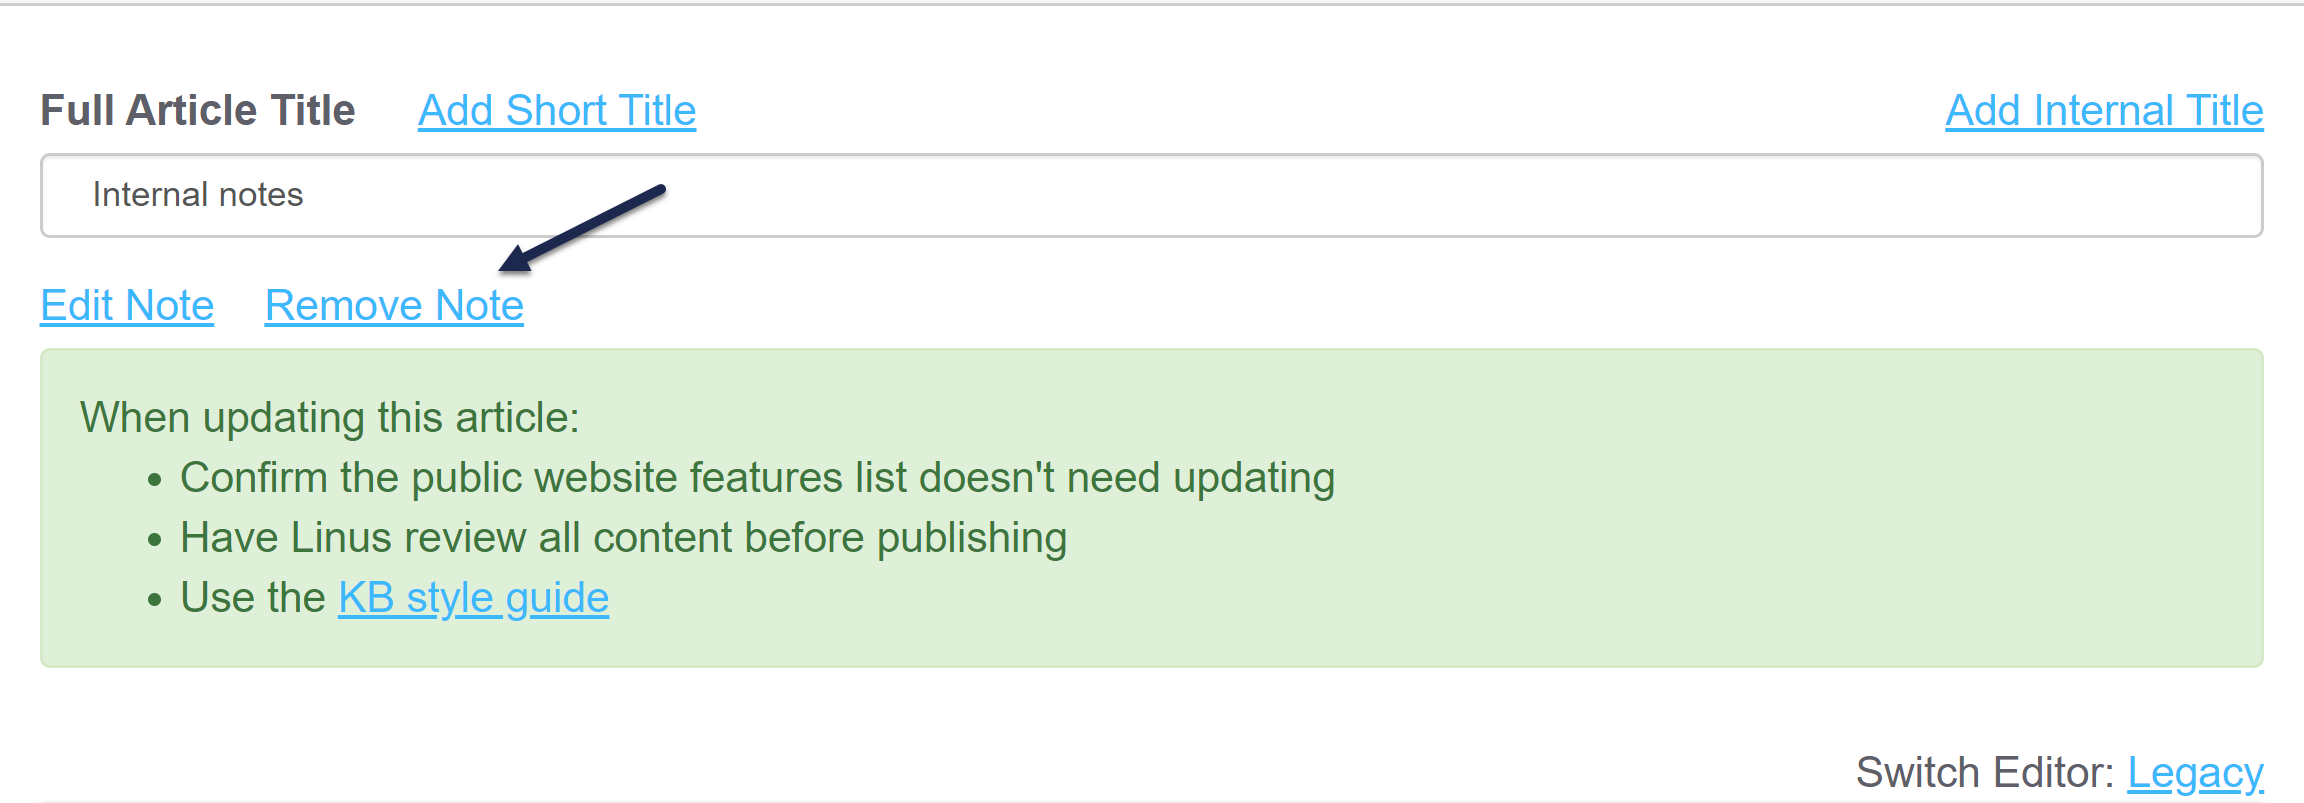
- Select the Edit Note link that appears just above the note:
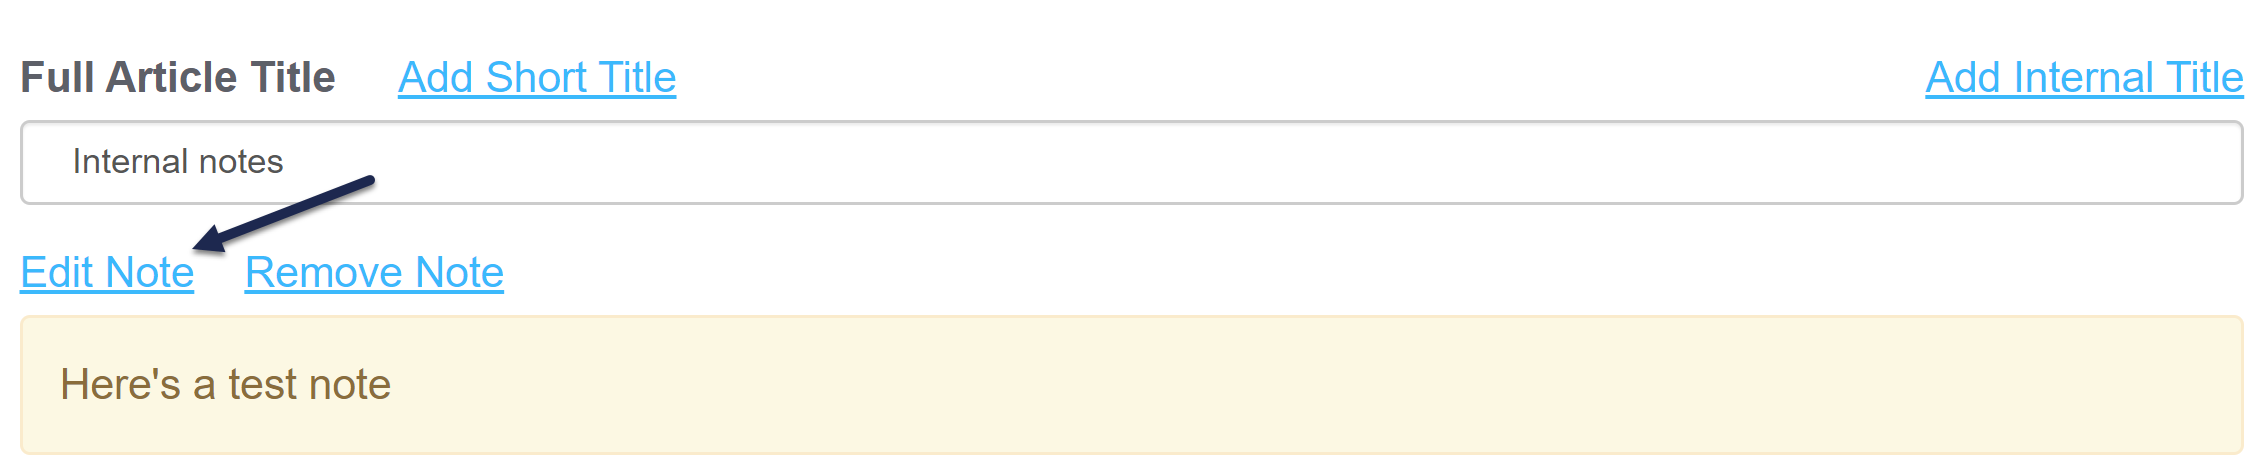 Click the Edit Note link
 - Edit the HTML or change the style as you'd like. Once you're done making changes, select Edit Note to save your changes. Here, we've added a more complex note with a list:
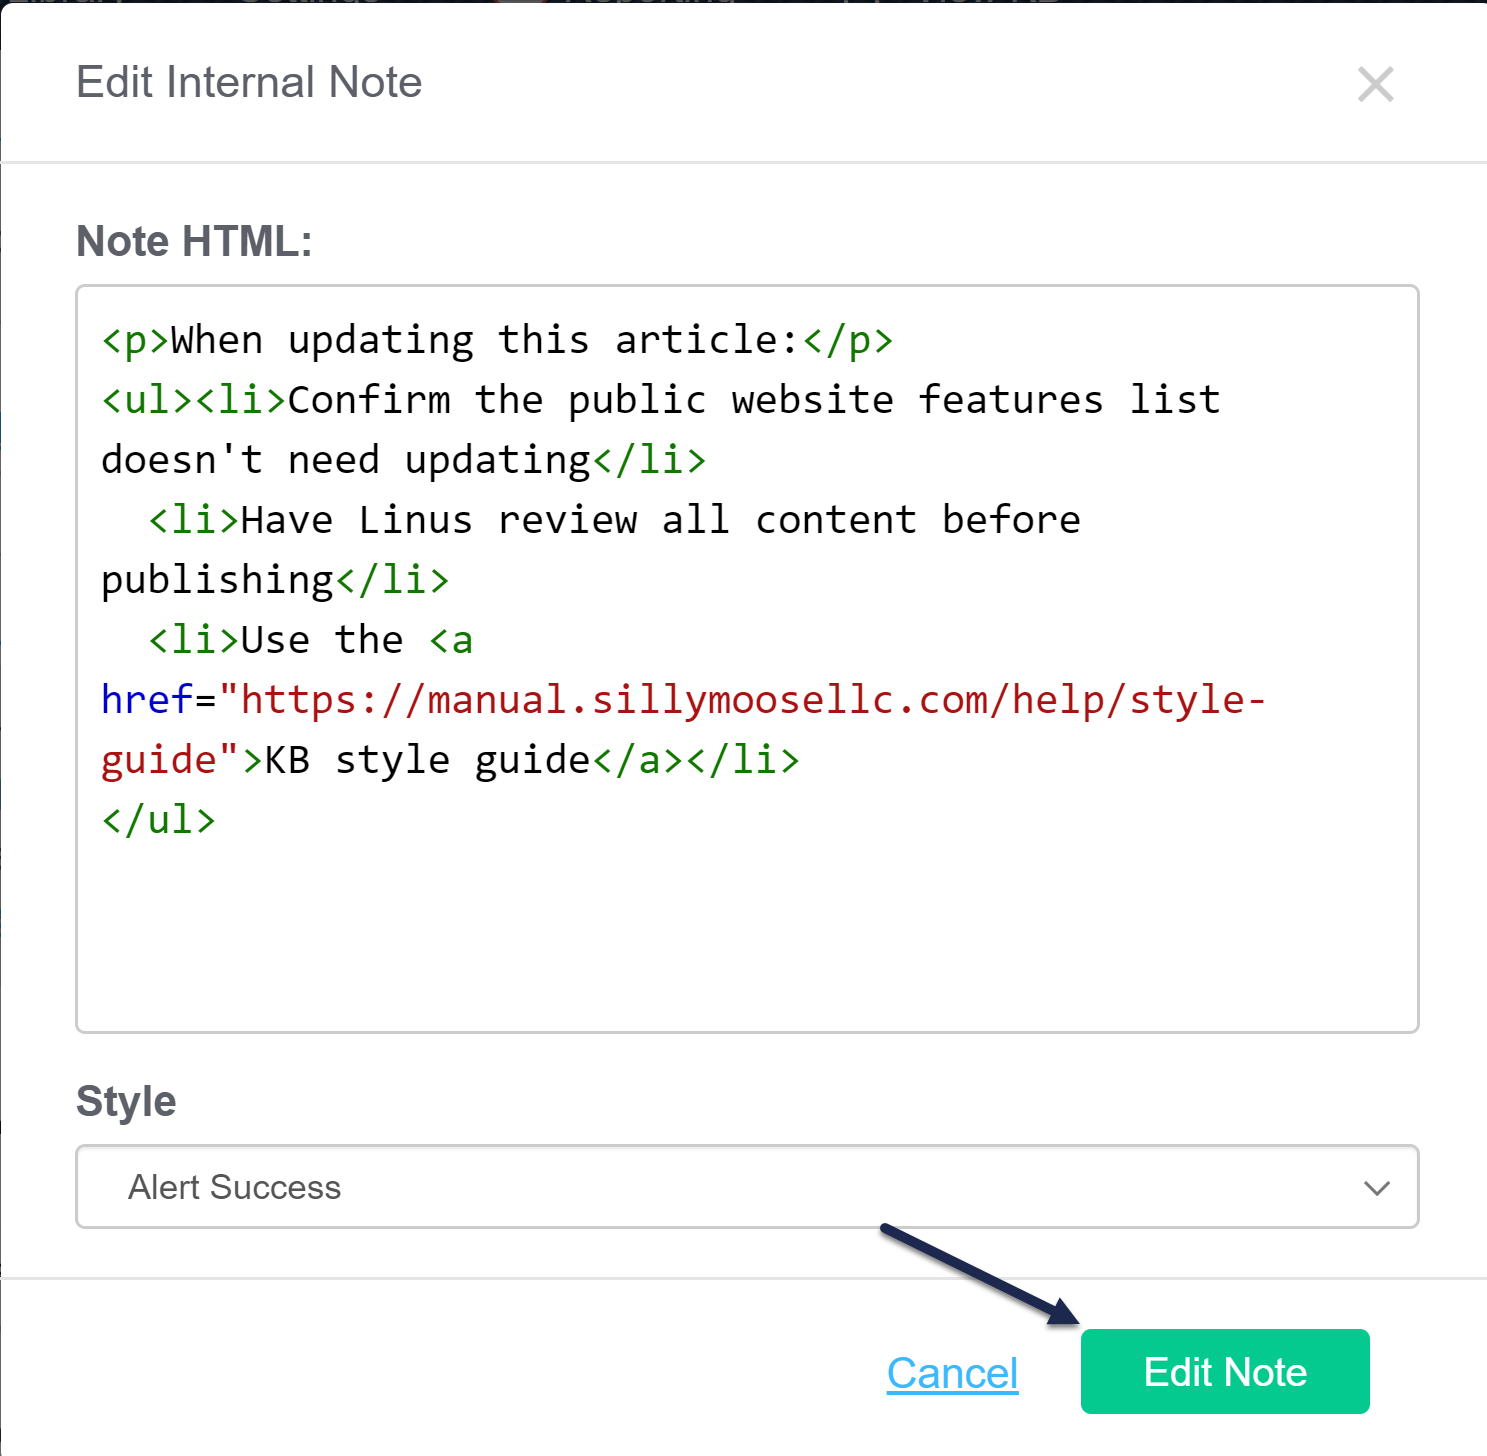 Sample edited internal note HTML. Click Edit Note to save the edit.
 - The note updates immediately based on the changes you made. You do not need to resave the article or category itself for the note to be saved.
 Sample Internal Note displayed based on the HTML in the previous step


Remove an internal note
Authors with the default Editor or Writer role can remove internal notes. If you're using a custom role, you'll need to have the Internal Notes Permission to Remove internal notes.
Authors who don't have permissions to create, edit, or delete internal notes will still be able to see internal notes created by other authors who do.
To delete an internal note completely:
- Select the Remove Note link that appears just above the note:
 Click the Remove Note link
 - A confirmation window will pop-up to be sure you want to delete the note. Select OK to delete the note.
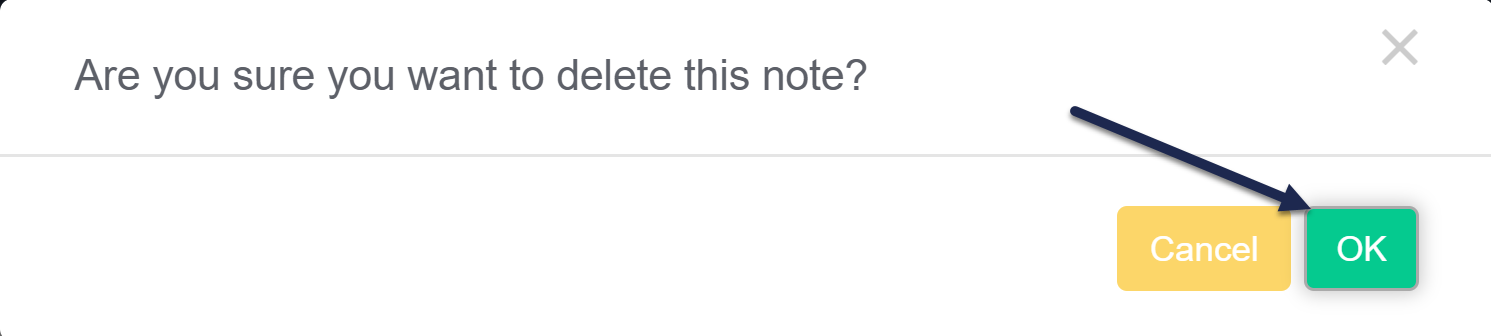 Click OK to delete the note
 - The note is deleted immediately; you do not need to resave the article or category for the deletion to complete.


What HTML is supported in internal notes?
We've kept these notes pretty lean. They will support HTML:
- Paragraph
<p> - Numbered list
<ol> - Bulleted list
<ul> - List items
<li> - Hyperlinks
<a href="www.mylink.com">Link text</a> - Bold text
<b> or <strong> - Italics
<i> - Paragraph breaks
<br> - Headers, e.g.
<h1>
For each article, besides adding a short title to be used in the table of contents, you can also add an internal title. Internal titles are used only within app.knowledgeowl.com - they aren't things your readers see when viewing the knowledge base.
Internal titles can be useful when you have a lot of articles with very similar names, just in different categories, and you want to be sure you're selecting the correct article when you use:
- The Insert Link to Article option in Modern Editor
- The Related Articles section
They can also be useful when you want to call an article one thing to your readers, and something else to your content contributors.
 Sample internal article title. Readers will see "It's owl good" as the title, but within app.knowledgeowl.com, the article appears as "Search announcement".
KnowledgeOwl displays the internal title instead of the full article title in these places within app.knowledgeowl.com:
- The Articles hierarchy
- The Find Articles search in the lower left corner
- The Manage Articles interface (search and article list)
- The Manage Articles CSV export > Customizations > Internal Title column
- The Insert Link to Article pop-up/search
- The Related Articles search
- The Add Article > Copy from existing search
- The Add Article > Share content from an existing article search
- If the article is a shared content article, the internal title will be used in the shared content messages in the editor
To add an internal title:
- With the article open in the editor, click the Add Internal Title link to the right of Full Article Title.
- Enter the title you want to use in the Internal Article Title box that appears.
- Select Save.
You can remove an internal title using the Remove Internal Title link in the editor.
All articles have a status, which determines whether the article is viewable in your live knowledge base.
Change the publishing status using the Publishing Status dropdown and then saving the article:
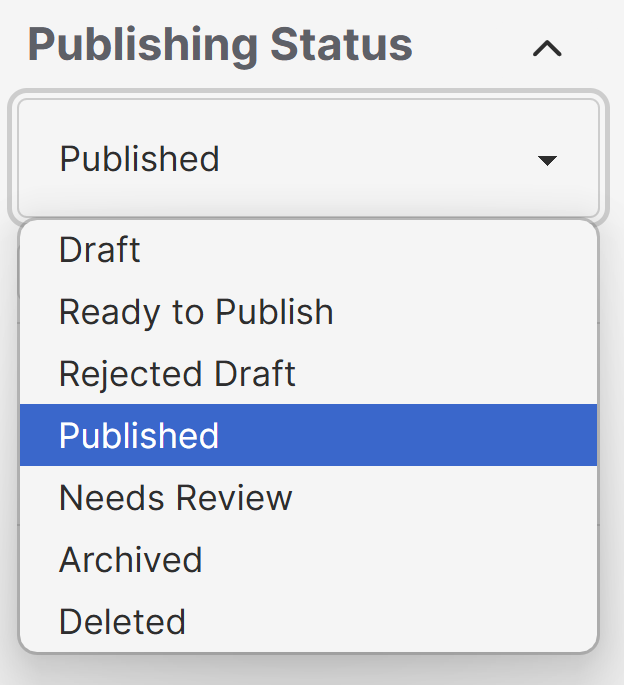 The Publishing Status dropdown
The six statuses available are:
- Draft (default status for newly created articles)
- Ready to Publish
- Rejected Draft
- Published
- Needs Review
- Deleted
Refer to the more detailed sections below on what each status means.
Draft
An article in Draft status is not visible to readers. This is the default status when you create a new article.
Ready to Publish | Rejected Draft
The Ready to Publish and Rejected Draft statuses are optional draft statuses, supporting your documentation editing and review workflow. Both of these statuses keep the article hidden from readers, like a Draft.
As an example, some articles need to be approved before being published. You can switch the status to Ready to Publish once it is ready for approval. The approver then reviews the article, and either changes the status to Published if approved, or switches it to Rejected Draft if it still needs work.
Published
A Published article is visible in your live knowledge base. If the article is restricted to specific Reader Groups, it will only be visible to readers who belong to those groups; otherwise, it is visible to anyone who has access to your knowledge base.
Needs Review
A Needs Review article is an optional Published status. Needs Review articles are still visible in your knowledge base, but you can use the status as a way to identify articles that need to be reviewed to be sure they're up to date, accurate, etc.
You can view all articles with the Needs Review status in Manage. This status is a great way of keeping your knowledge base up to date and relevant. You can regularly check for articles that require review, update them if necessary, and switch them back to Published status.
To set an article to Needs Review:
- Manually set an article's status to Needs Review as a reminder to review it.
- Configure your knowledge base to automatically switch published articles to Needs Review if the article hasn't been updated within a specified period of time. To do so:
- Go to KB settings > Article editor.
- Under Article review, check the box to Automatically set articles to "Needs Review" if older than the below date.
- Use the dropdowns to select the time period. For example, select "6" in the first dropdown, and "Months" in the second, to set the time period to six months.
- Be sure to Save your changes.
Refer to Article editor settings for more information on these settings.
Archived
Archived articles are not visible in your knowledge base. You can access them by navigating to Manage > Archived.
Most authors use Archived differently from Deleted, generally to show that something was at one time published/active in the knowledge base and isn't anymore.
When you archive an article from within the Article Editor, you have the option to automatically redirect anyone hitting the archived article's URL to a different URL instead:
 Sample Archived status redirect to another article
Check the box and then search for the article you'd like your readers to be redirected to. (If you don't do this, they'll likely just get a 404 page instead.)
Sample Archived status redirect to another article
Check the box and then search for the article you'd like your readers to be redirected to. (If you don't do this, they'll likely just get a 404 page instead.)
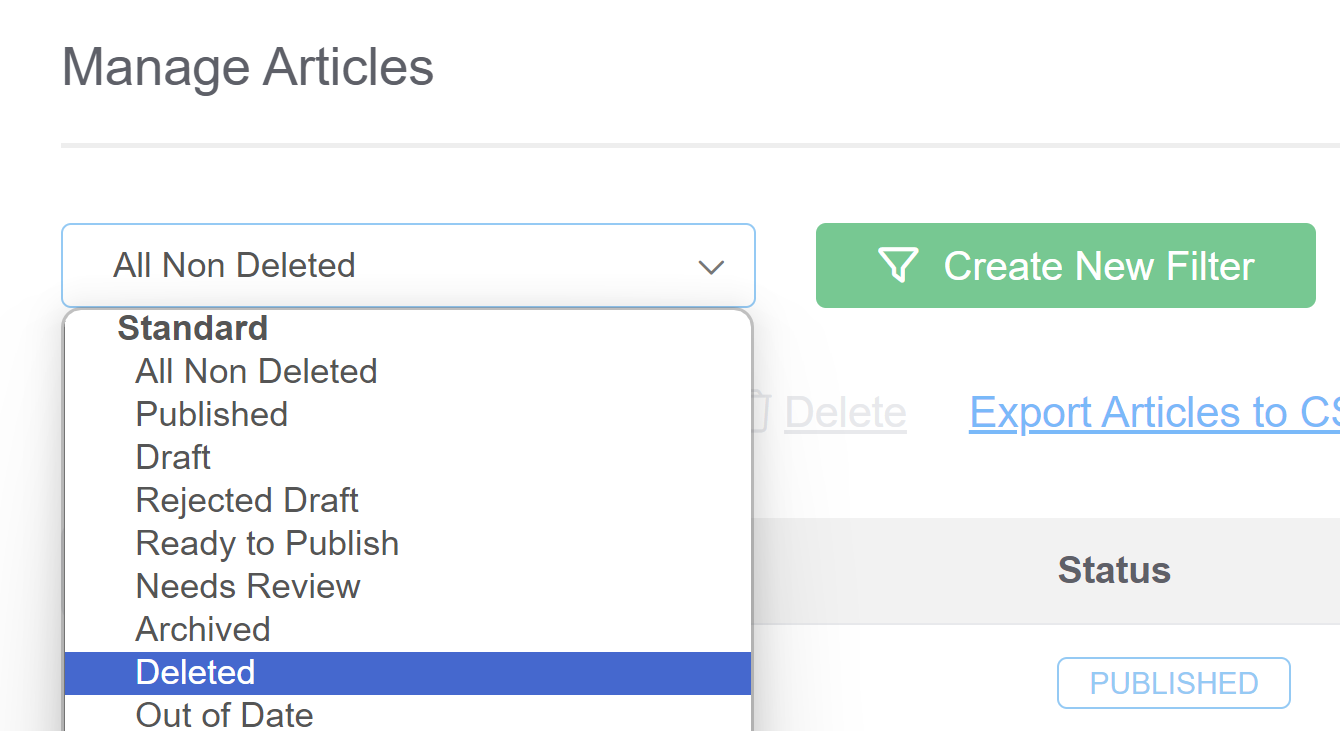
Deleted
Deleted articles are not visible in your knowledge base. You can only access them by navigating to Manage > Deleted. Refer to Recover a deleted article if you need to recover an article that was incorrectly deleted!
As with archiving, when you delete an article from within the Article Editor, you have the option to automatically redirect anyone hitting the deleted article's URL to a different URL instead:
 Sample Archived status redirect to another article
Check the box and then search for the article you'd like your readers to be redirected to. (If you don't do this, they'll likely just get a 404 page instead.)
Sample Archived status redirect to another article
Check the box and then search for the article you'd like your readers to be redirected to. (If you don't do this, they'll likely just get a 404 page instead.)
The Published Date is an optional field in your articles, though we strongly recommend using it for articles within Blog style categories so that the reverse chronological order works properly!
Published Date allows you to specify the date that an article was published. This can be helpful:
- For compliance or audit purposes
- For blog style category displays
The published date is displayed:
- Within articles displayed in blog style categories
- In Knowledge Base > Manage CSV exports when the Date Published box is checked
- Anywhere the Article Date Published merge code is used
[article("date_published")]
The Published Date is automatically set if you use the Schedule an article to be published feature.
To add a Published Date to an article:
- Open the article in the editor.
- Select the Add Published Date option underneath the Publishing Status.
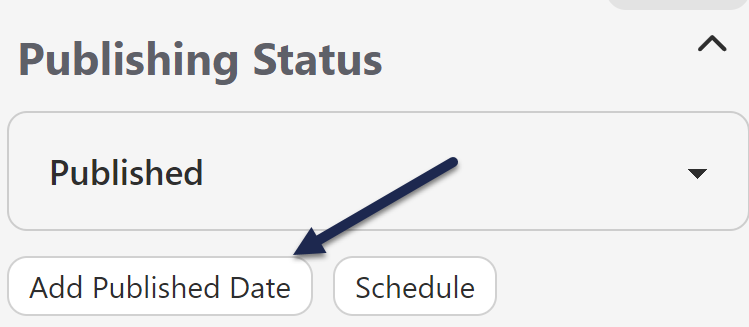 The Add Published Date button
 - Use the datepicker to find the date you'd like to use. You can only select today's date or dates in the past.
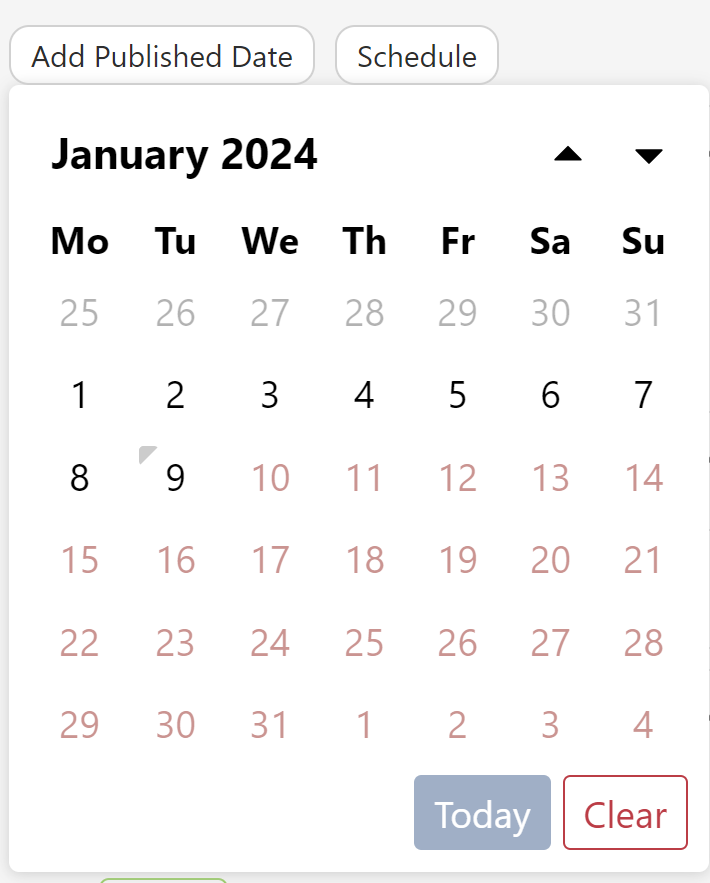 The Published Date date picker
- To pick a date in a previous month or year, click on the month + year label at the top of the date picker.
- Once you click on a date, the picker will disappear and the selected date will display.
- Be sure to Save changes to your article so the date fully updates!


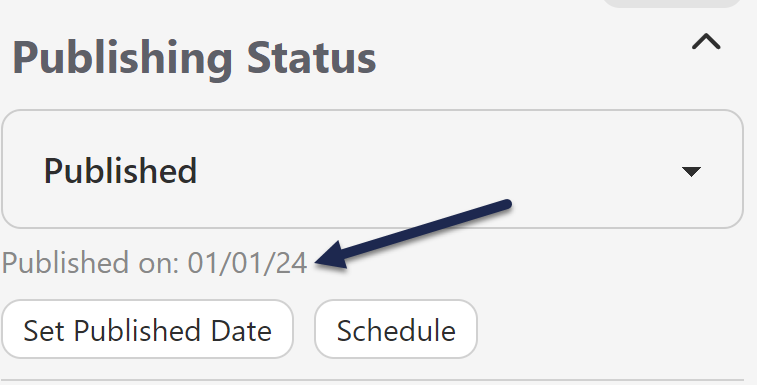
Change or remove a Published Date
If you already have a published date added to an article, you can change it or remove it completely by clicking on the Set Published Date option:
- Open the article in the editor.
- Click the Set Published Date option just below the Publishing Status.
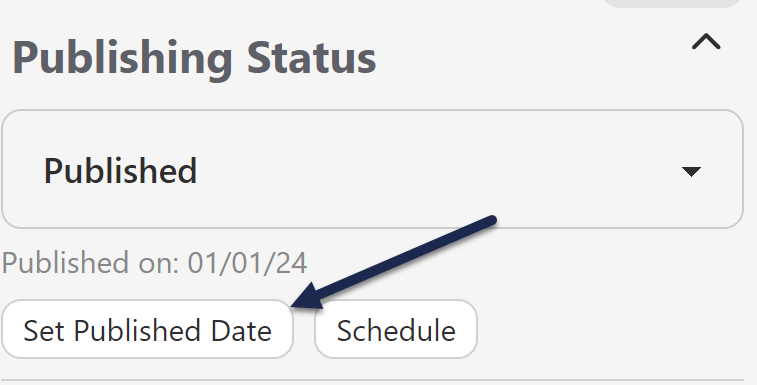
- To update the Published Date, select the new date.
- To remove the Published Date, click the Clear option in the lower right of the picker.
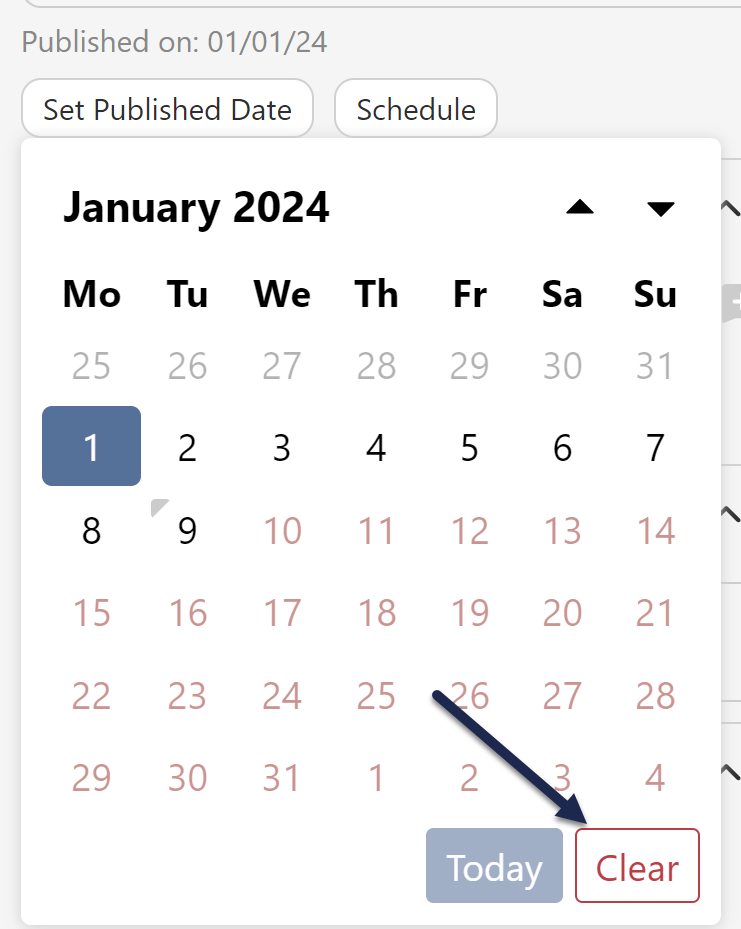 Use the Clear button in the Published Date date picker to remove the Published Date completely!
 - Be sure to Save your changes!

If you'd like to publish a new article, there are several ways you can do so:
- Edit the article directly to change the Publishing status to Published.
- Bulk edit several articles at once in Manage, to publish them all at once.
- Schedule the article to be published at a future day/time. This option is detailed more below.
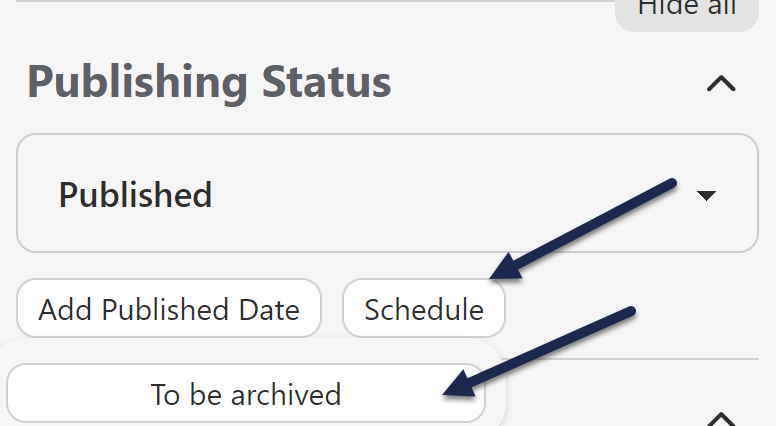
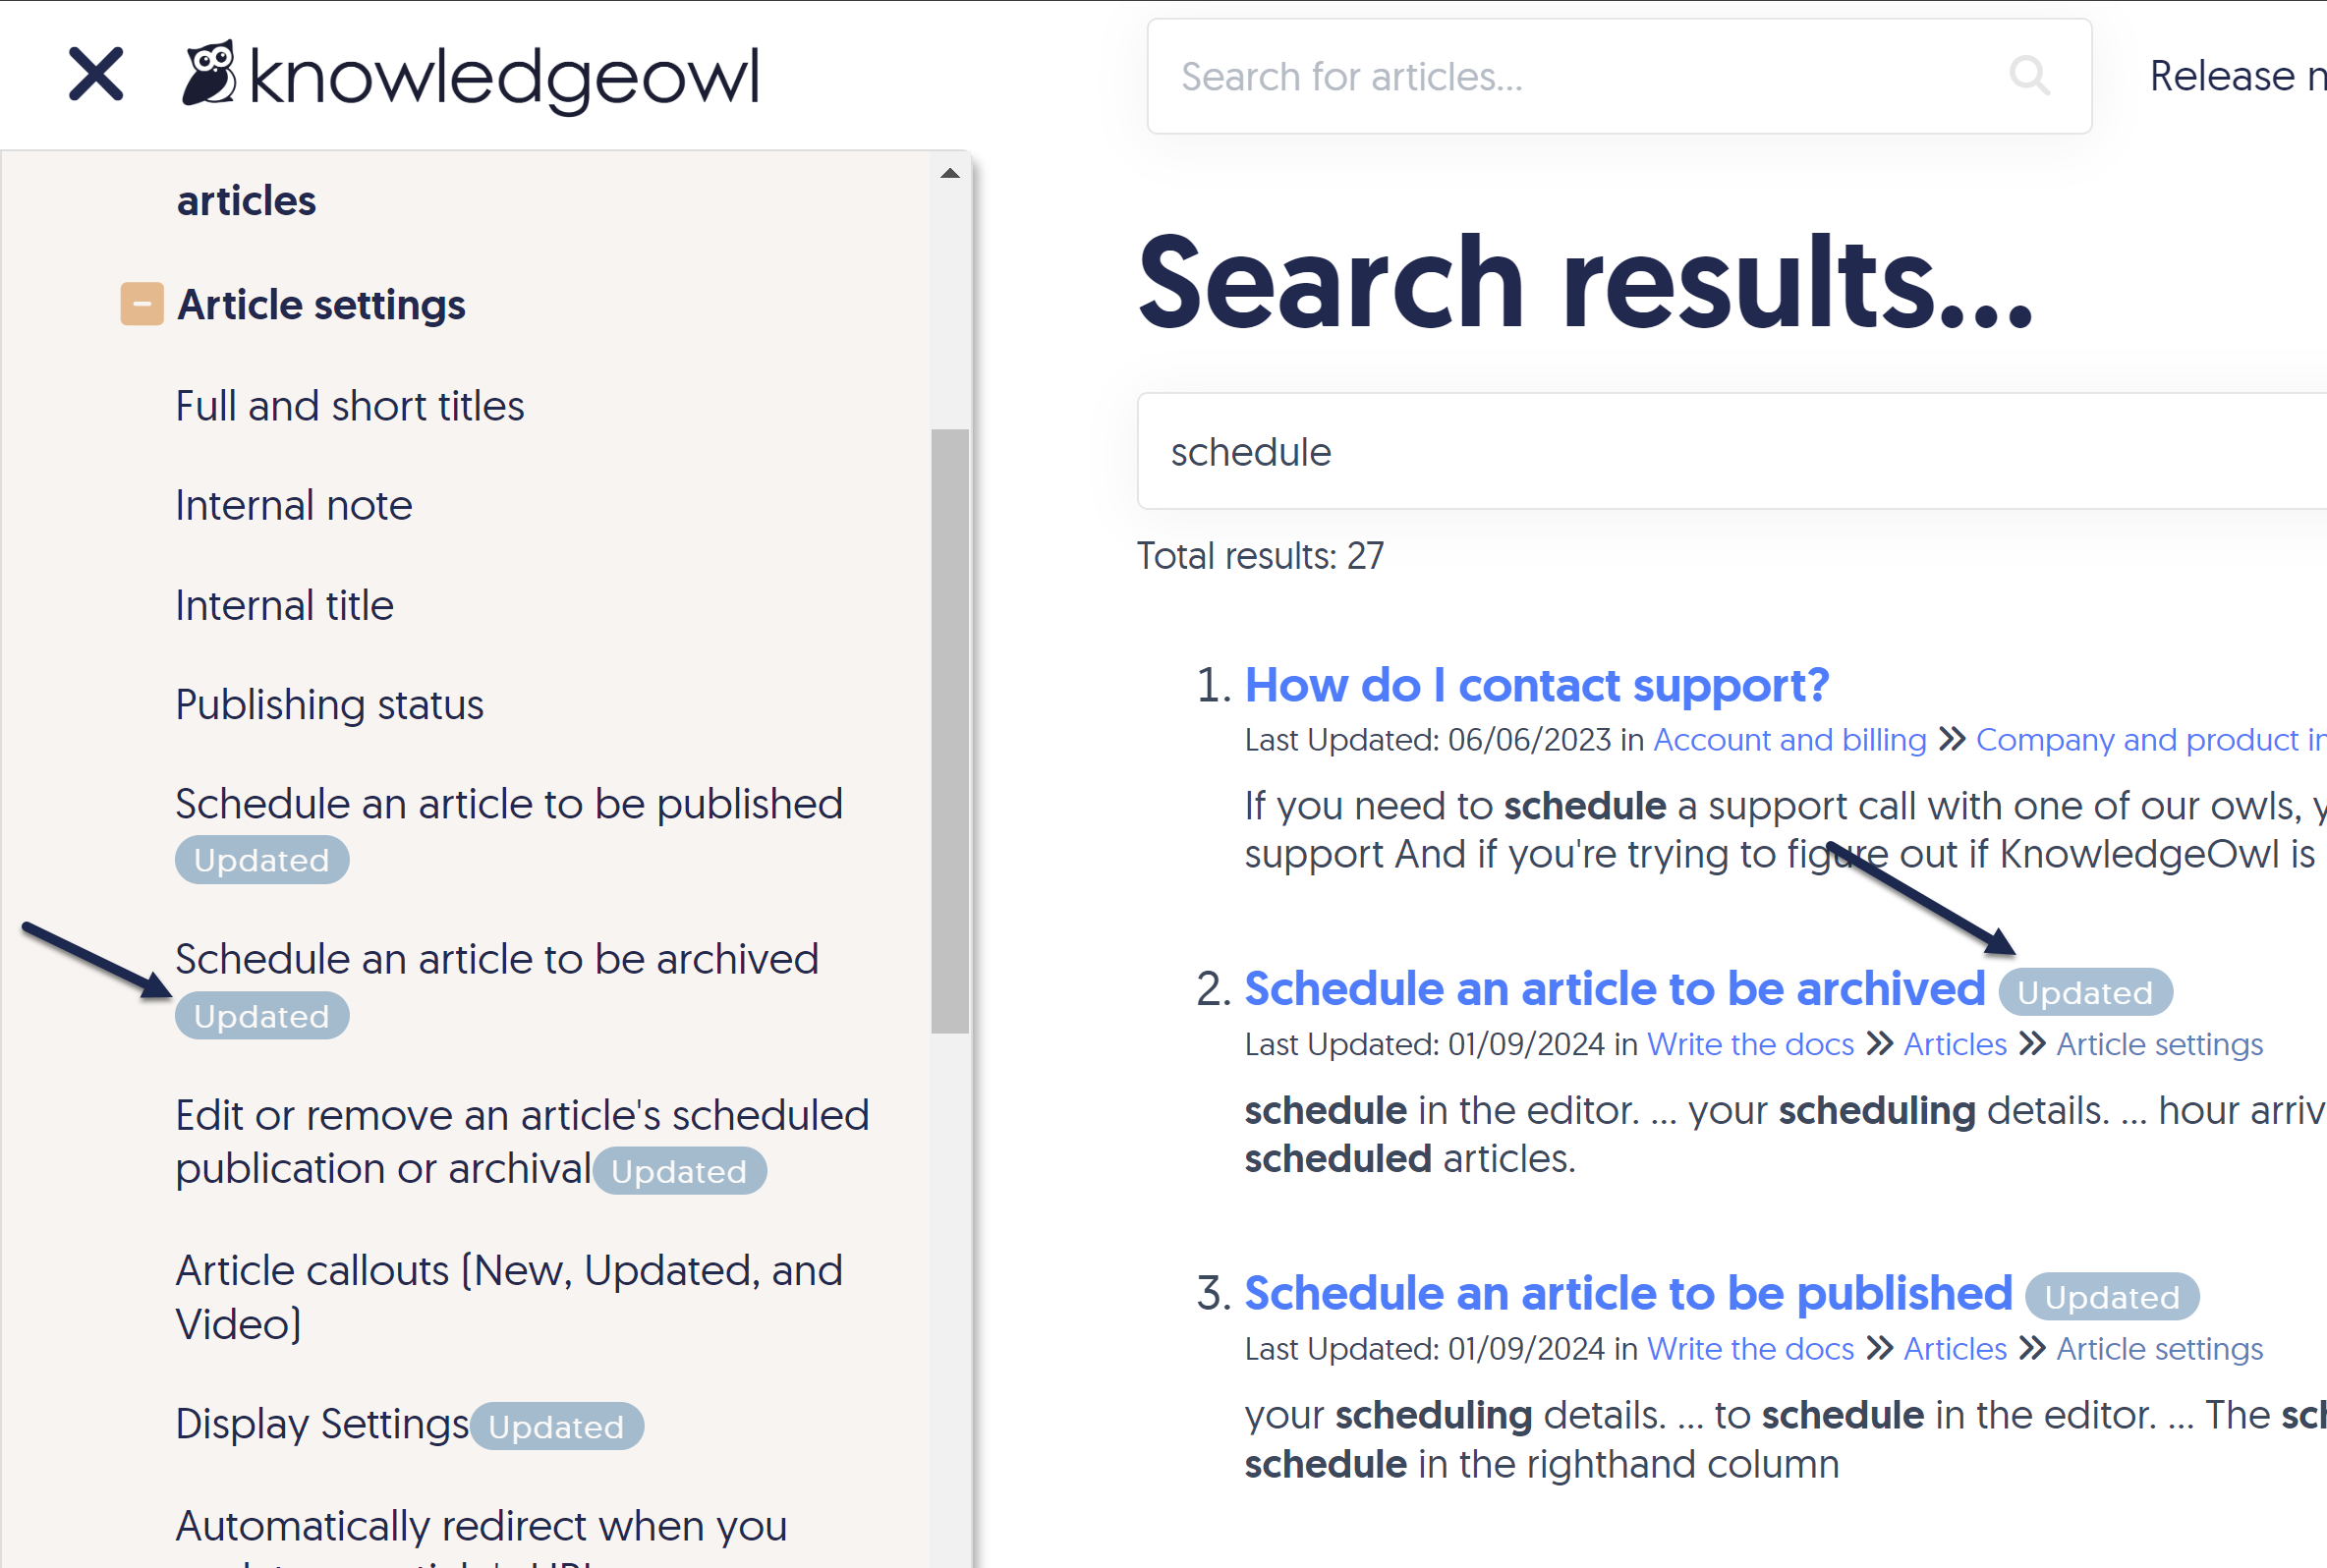
All undeleted articles have the Schedule option just below the Publishing Status dropdown. Any article that is unpublished (doesn't have a publishing status of "Published" or "Needs Review") has the To be published option.
Using this option will prompt you to select a future day and time for the publication. Articles that are scheduled for publication will display:
- An alert across the top of the editor letting you know what/when they've been scheduled.
- The scheduled date/time and an option for you to remove them from the schedule in the righthand column of the editor.
Schedule an article for publication
To schedule an article for publication:
- Open the article you'd like to schedule in the editor.
- In the upper right, just below the Publishing Status dropdown, select Schedule.
- In the dropdown that appears, select To be published. (You won't see this option if the article is already Published or in a Needs Review status.)
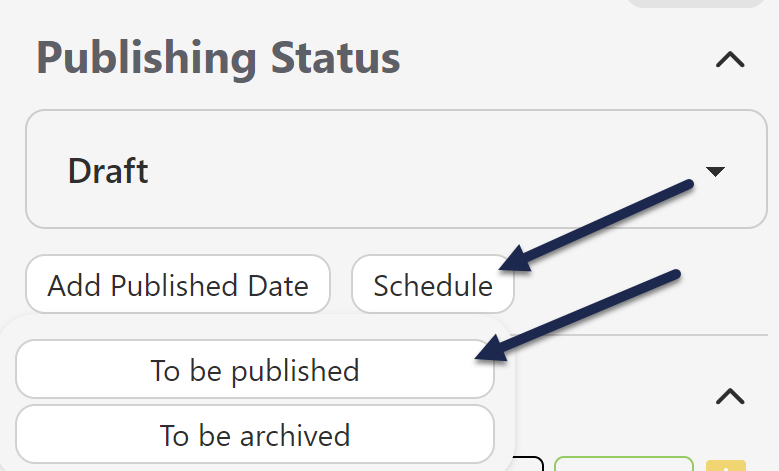 Select Schedule > To be published.
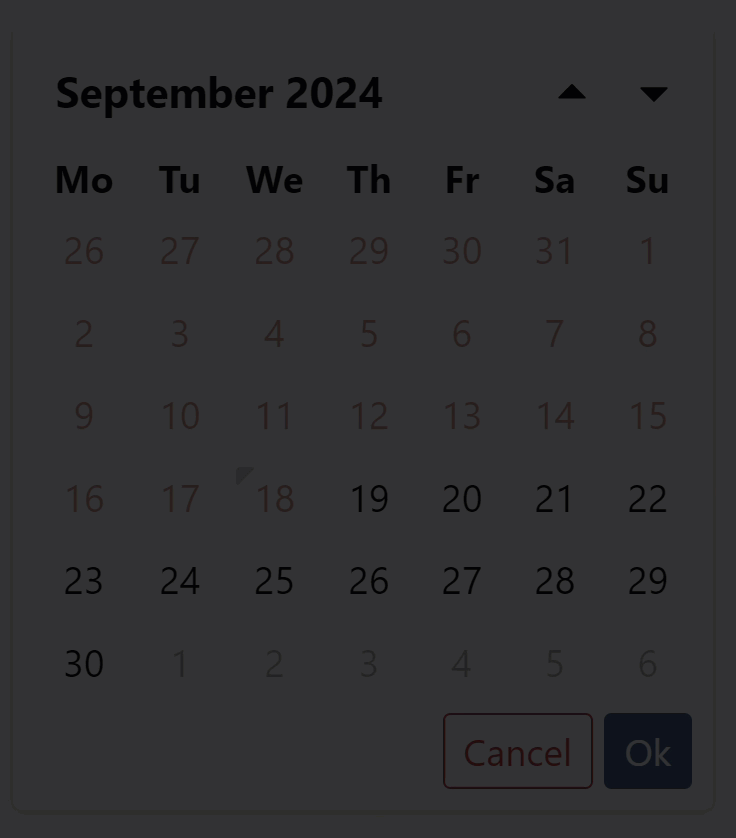
 - This will open a calendar picker where you can complete your scheduling details.
- First, use the date picker select the date you'd like your article to be published on. This must be at least one day in the future, but you can schedule as far out as you'd like.
- By default, the picker shows the current month; you can jump to a different month by selecting the <month year> label at the top and then selecting the month you'd like.
 Sample gif showing the above steps. Hover to play.
 - To jump to a different year, select the <month year> label at the top and select the year.
 Sample gif showing the above steps. Hover to play.
- By default, the picker shows the current month; you can jump to a different month by selecting the <month year> label at the top and then selecting the month you'd like.
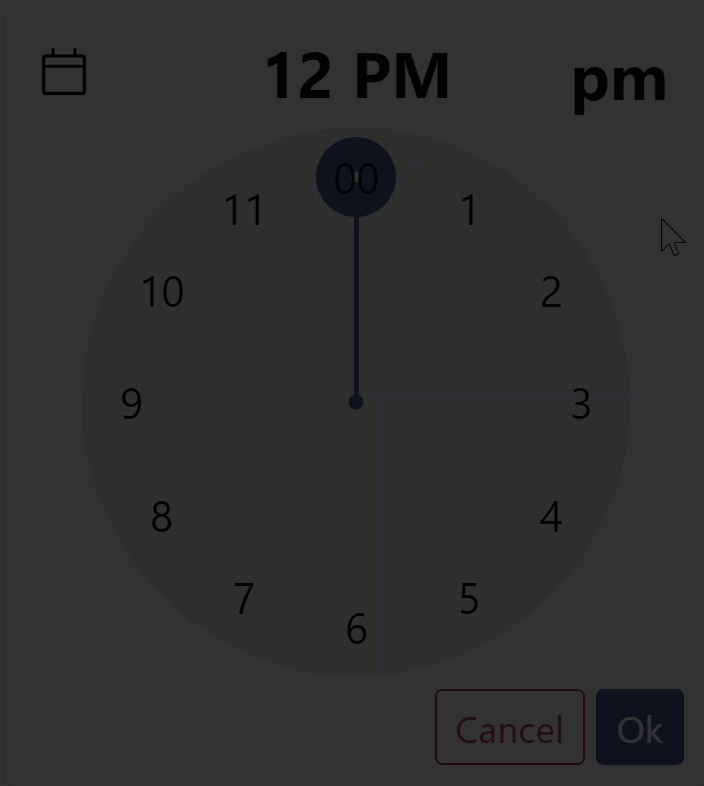
- Once you find the date you'd like to use, select it. This will select the day and move you into the time picker. The time zone displayed and used depends on the time zone set for your knowledge base in Settings > Basic.
- Select the hour you'd like to publish the article. Actual publication generally occurs 10-15 minutes after the selected hour in the displayed time zone.
- To toggle between AM or PM, select the lowercase "am" or "pm" in the upper right corner of the picker.
 Sample gif showing the above steps. Hover to play.
- To toggle between AM or PM, select the lowercase "am" or "pm" in the upper right corner of the picker.
- Once you've finished making your selections, select Ok in the lower right to finalize the schedule.
- Once your schedule is added, the editor displays an alert across the top with the details of the schedule:
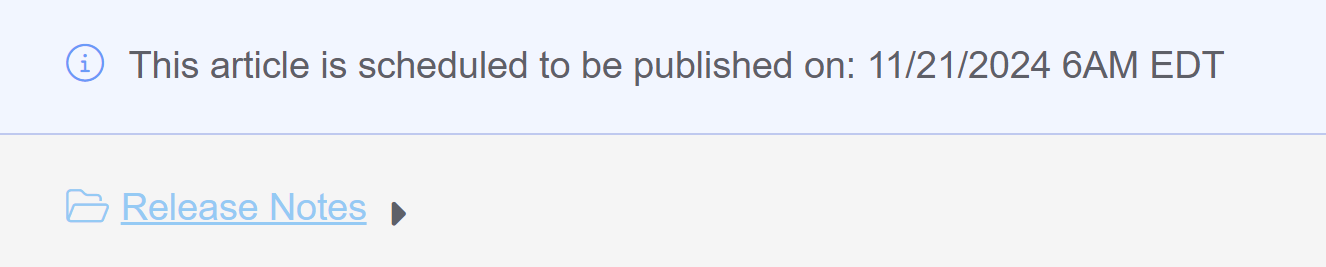 Sample publication statement at the top of the editor
 - The righthand column also shows the scheduled publication date. If you need to cancel or edit the schedule in any way, remove it by selecting the trashcan icon there. Refer to Edit or remove an article's scheduled publication or archival for more information.
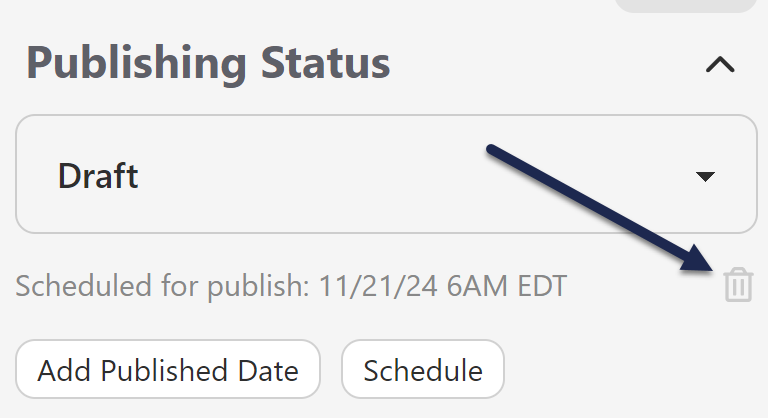 Select the trash can icon next to the Scheduled for publish date to cancel the publication.


How publication schedules work
When the day and hour arrives, we run a scheduled job in the background to process your scheduled articles. Typically you'll see the scheduled article publish around :10 or :15 after the hour you selected.
What you can expect to see:
- The status will change to Published.
- The Published Date will automatically update to use the date you scheduled the publication.
- The Last Modified date will update when the schedule has run.
- If you added a New or Updated callout, it will display when the article is published. (As long as the callout's expiration date isn't in the past!)
- If you use webhooks, the
article.statuschangeandarticle.publishwebhooks should update to reflect the change. - If you use Subscriptions and included a New or Updated callout, this article will be included in your next scheduled subscription notification email. (As long as the callout's expiration date hasn't passed!)
You can archive an existing article in several ways:
- Edit the article directly to change the Publishing status to Archived.
- Bulk edit several articles at once in Manage to archive them all at once.
- Schedule the article to be archived at a future day/time. This option is detailed more below.
All undeleted articles have the Schedule option just below the Publishing Status dropdown and have the option to To be archived within it.
Using this option will prompt you to select a future day and time for the archival. Articles that are scheduled for archival will display:
- An alert across the top of the editor letting you know what/when they've been scheduled.
- The scheduled date/time and an option for you to remove them from the schedule in the righthand column of the editor.
Schedule an article for archival
To schedule an article for archival:
- Open the article you'd like to schedule in the editor.
- In the upper right, just below the Publishing Status dropdown, select Schedule.
- In the dropdown that appears, select To be archived.
- This will open a calendar picker where you can complete your scheduling details.
- First, use the date picker select the date you'd like your article to be archived on. This must be at least one day in the future, but you can schedule as far out as you'd like.
- By default, the picker shows the current month; you can jump to a different month by selecting the <month year> label at the top and then selecting the month you'd like.
Sample gif showing the above steps. Hover to play. - To jump to a different year, select the <month year> label at the top, select the year, then select the year you'd like to switch to.
Sample gif showing the above steps. Hover to play.
- By default, the picker shows the current month; you can jump to a different month by selecting the <month year> label at the top and then selecting the month you'd like.
- Once you have the correct month and year open, select the day you'd like to use. The picker updates to the time picker. The time zone displayed and used depends on the time zone set for your knowledge base in Settings > Basic.
- Select the hour you'd like to archive the article. Archival generally occurs 10-15 minutes after the selected hour in the displayed time zone.
- To switch between AM or PM, select the lowercase am or pm in the upper right corner of the picker.
Sample gif showing the above steps. Hover to play.
- To switch between AM or PM, select the lowercase am or pm in the upper right corner of the picker.
- Once you've finished making your selections, select Ok in the lower right to finalize the schedule.
- Once your schedule is added, the editor displays an alert across the top with the details of the schedule:
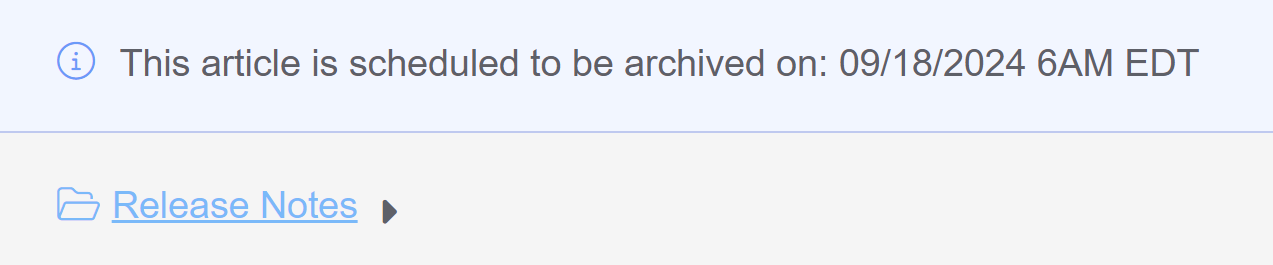 Sample scheduled archival callout at the top of the editor
 - The righthand column also shows the scheduled publication date. If you need to cancel or edit the schedule in any way, remove it by selecting the trashcan icon there. Refer to Edit or remove an article's scheduled publication or archival for more information.
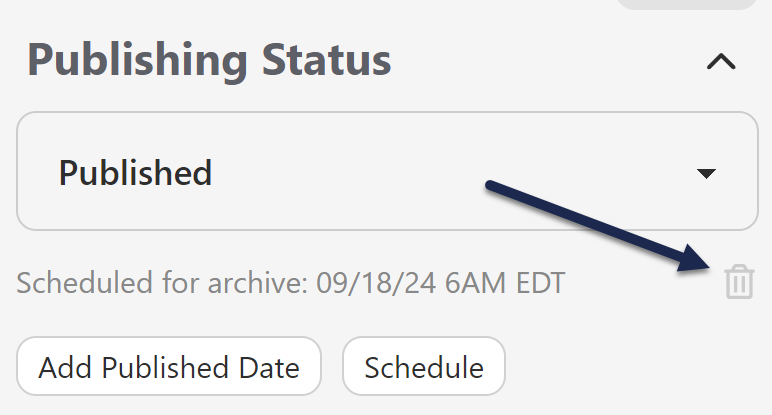 Scheduled for archive information in righthand column


How archival schedules work
When the day and hour arrives, we run a scheduled job in the background to process your scheduled articles. Typically you'll see the scheduled article archive around :10 or :15 after the hour you selected.
What you can expect to see:
- The status will change to Archived, and the article will no longer be available in your live knowledge base. Refer to Publishing status for more details on the Archived status.
- The Last Modified date will update when the schedule has run.
- If you use webhooks, the
article.statuschangeandarticle.archivewebhooks should update to reflect the change.
If you've scheduled an article to be published or scheduled an article to be archived, the only way to edit that schedule is to remove it entirely and create a new one.
You might also want to remove the article's schedule completely.
In both situations, you'll first need to remove the existing schedule. To do so:
- Open the article in the article editor.
- Look for the text in the righthand column that provides details on the scheduled archival/publication. The wording is slightly different for each, but the format and location are the same, directly underneath the Publishing Status dropdown.
- Select the trashcan icon to the right of the "Scheduled for..." statement:Scheduled for publish trashcan iconScheduled for archive trashcan icon
- This will automatically remove the scheduled archival or publication from the article.
- If you'd like to set a new schedule, you can follow the steps to add one. See Schedule an article to be published and Schedule an article to be archived, respectively.
Want to draw attention to video content, or content that is brand-new or recently updated?
KnowledgeOwl gives you several Article Callout options to do just this. Callouts are a great way to visually let your readers know about video content, newly-published content, and changes to existing content!
Callout display
Callouts are displayed:
- In the table of contents next to the article
- For New/Updated callouts, these callouts will also roll-up to the category to indicate the category contains New/Updated content
- In Article Lists
- Next to the article when it is displayed in search results (video content will display to the left; New/Updated to the right)
- In default category landing pages
Callout types
There are three callout types. One is designed to identify the type of content; the others are designed to provide time-relevant notification of New/Updated content:
- Video Content: This adds a video icon to the left of the article title. It will display until you manually remove it and will display everywhere the article title is used:
 Sample video callout in table of contents and search results
 - New: This adds a green "New" badge next to the article title and will automatically be removed after the expiration date. This callout will trigger Subscriptions notifications if that feature is enabled:
 Sample New callout in the table of contents and search results
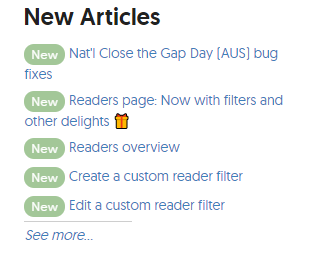 Sample New callout in an article list
 - Updated callout: Adds a blue "Updated" badge next to the article title and is automatically removed after the expiration date. This callout will trigger Subscriptions notifications if that feature is enabled:
 Sample Updated callout in the table of contents and search results


Using callouts
To add callouts:
- Open your article for editing.
- Select the callout(s) you want from the Article Callouts menu:
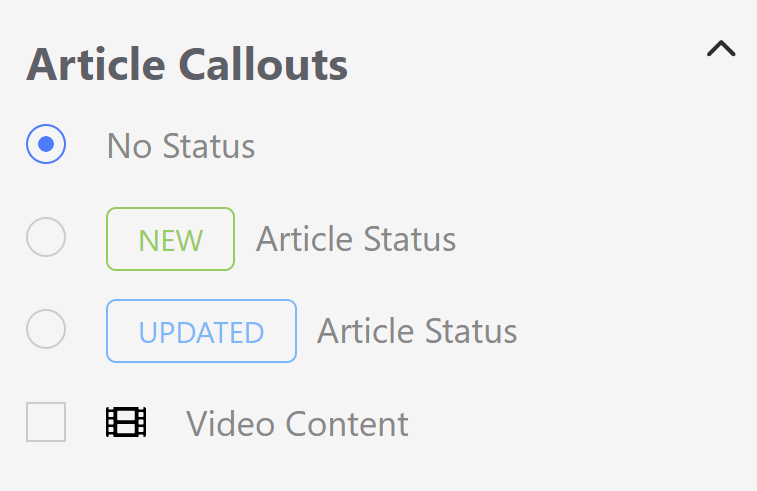 Sample Article Callouts section
- For New or Updated status, a Status Expiration date will be automatically added based on your knowledge base's settings. Once the status expires, the callout is automatically removed from the article.
- You can manually override the date by clicking in the date field and using the date picker that appears.
- Be sure to Save your article. The callout is immediately visible to your readers.

The Video Content callout can be checked in addition to any one of the No Status, New and Updated callouts.
Setting up default expiration dates for New/Updated callouts
By default, all New and Updated callouts will expire in one week.
You can change the default used across your knowledge base:
- Go to Settings > Basic.
- Scroll to the Editor Settings section.
- Change the Article Callout dropdowns to set the number and measure of your choice. (Options include numbers 1-12 and durations of days, weeks, or months.)
- Save your changes.
This will update the default date that gets generated whenever a callout is added; authors can manually edit/override that date. See Basic Settings for more information.
Using the Display Settings options in an article, you can limit where the article is displayed in the knowledge base and some functionality within the article itself. The Display Settings section is available in the right hand column of the article editor, near the bottom of the page:
 Available article Display Settings
The available restrictions are:
- Exclude from search results: when this box is checked, the article is always hidden from your knowledge base search results. It's still available by URL, and may be available in other navigation and lists depending on the settings you check below.
- Hide from the table of contents: this hides the article from the table of contents. If you're using the Contextual Help Widget 2.0, it also hides the article from the Knowledge tab in that widget.
- Hide from homepage / category landing page: this hides the article from the landing page for the category it's found in, or the homepage if the article isn't within a category landing page.
- Hide from article lists: this hides the article from the homepage/right hand column New Articles List, Popular Articles List, and Updated Articles List. It doesn't hide the article from the Recent Articles List or Article Favorites.
- Remove "PDF" icon: this option removes the PDF download icon from the article. (This might be a good idea for video content, for example.)
- Remove feedback ability: this option removes the Ratings section in the article.
- Remove comment ability: this option removes the Comments section from the article.
When you change the permalink of an article, what happens when someone navigates to that old URL?
If you use the Old Links feature, they'll be seamlessly 301-redirected to the new URL. You have two options for using old links:
- Adding old links manually
- Turning on a setting that checks if you've changed the permalink and asks you if you want to add the old link
Here, we talk about how to enable automatic permalink detection/old link updates.
With this setting turned on, if you edit an article or category to change its permalink, when you Save your changes, you'll be prompted to add the permalink you just removed as an Old Link automatically. This saves you work and keeps your content redirecting smoothly.
This setting is turned on in new knowledge bases by default. If you have an older knowledge base, we recommend you use it too!
To turn it on:
- Go to KB settings > Article editor.
- Under Content editor, check the box to Automatically prompt to create a redirect link when changing the content's current permalink.
- Save your changes.
With this turned on, once you edit a permalink in an article or category and Save it, a modal opens to ask if you'd like to add the previous permalink as an old link:
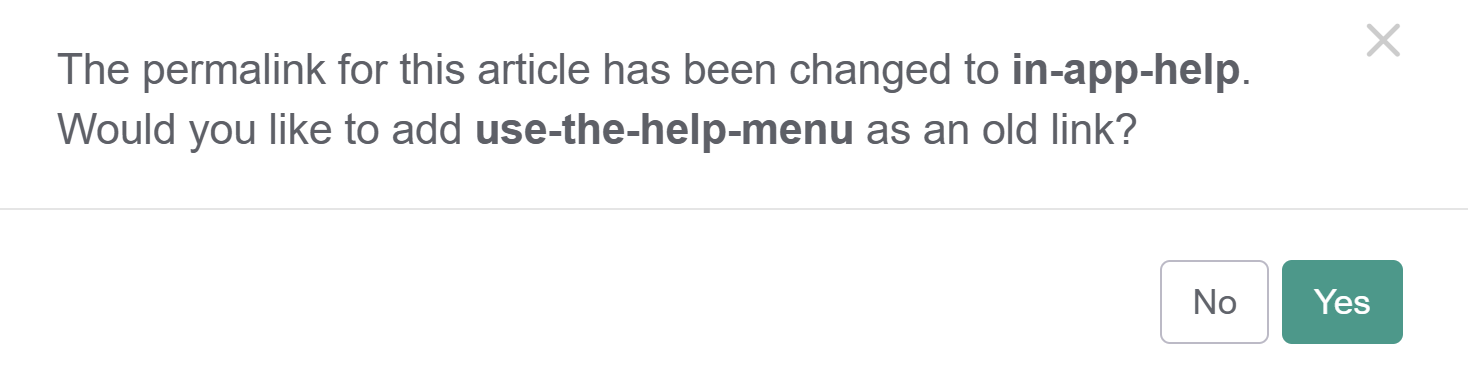 Sample permalink changed modal
If you select Yes, KnowledgeOwl automatically adds the old link for you.
If you select No, no old links are created.
You can use the old links feature to 301 redirect retired permalinks and articles to a new location. You have two options for using old links:
- Enabling a setting so that when you change a permalink and save the article or category, we will prompt you to automatically add the previous permalink as an old link
- Adding old links manually
Here, we'll show you how to manually add an Old Link.
To manually add old links:
- Open the article or category in the editor.
- Click on the Old Links hyperlink at the top of the editor.
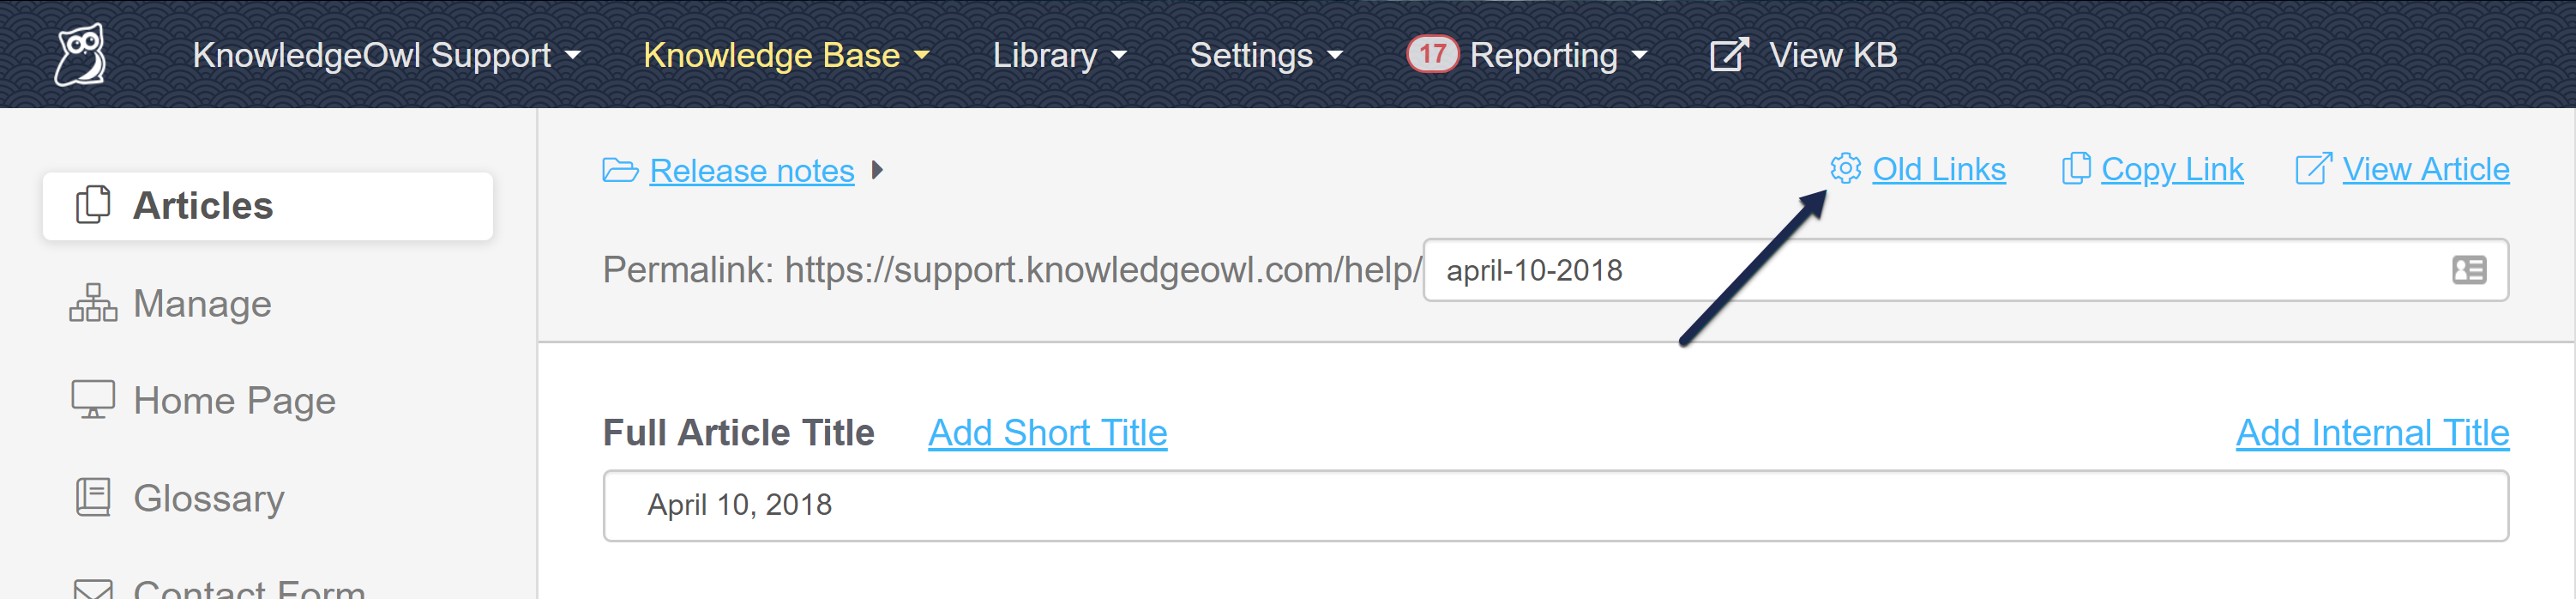
- Specify the old permalinks that should redirect to this new article.
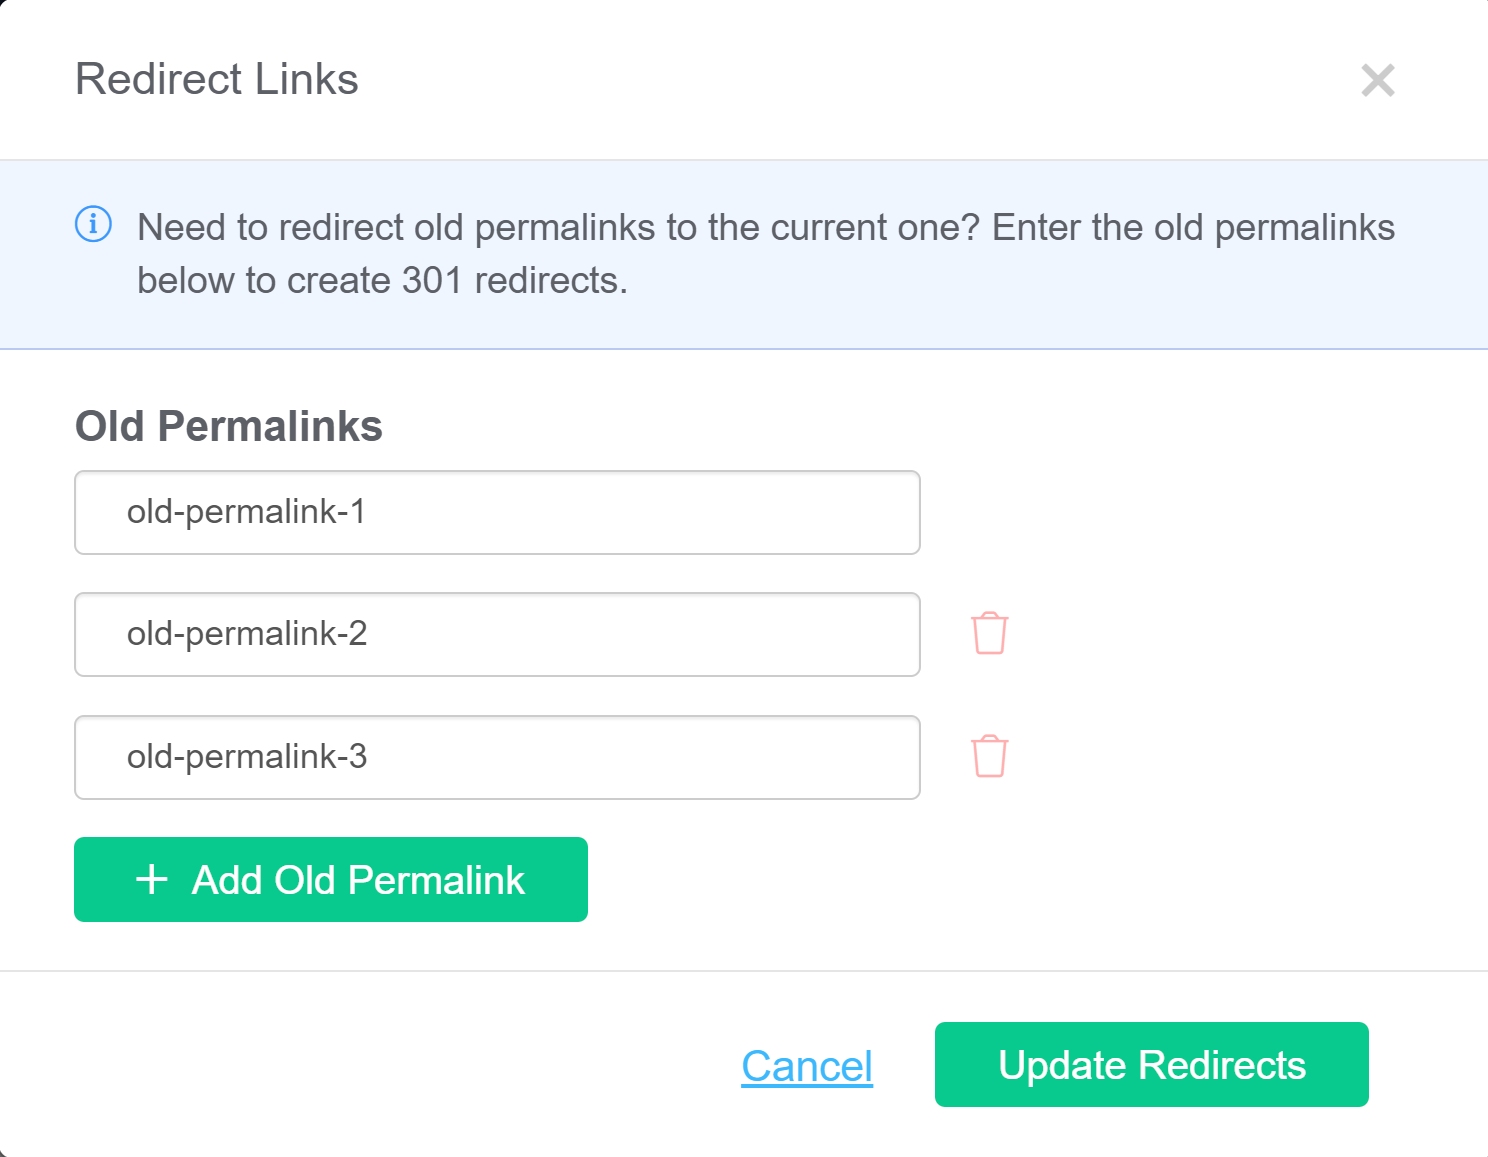
- Click on the Update Redirects button to save those redirects.
- Save your article or category in the editor.


Note: You only need to copy the editable portion of the permalinks (for example, april-10-2018, not https://support.knowledgeowl.com/help/april-10-2018). So in this example, old-permalink-1, old-permalink-2, and old-permalink-3 are the previous permalinks I want to redirect to april-10-2018. If you try to add a full permalink, you'll see a warning message:
For old link redirects referencing a separate article (the first use case below), the old link articles you want to redirect need to be in an unpublished status--either Draft or Deleted.
Use cases
Old links let you redirect permalinks for old/outdated links to a current article. There are two primary use cases for old links:
- When you've written a new article that "replaces" an existing article.
- When you've updated an article's permalink due to title or content changes.
Let's look at each of these in turn.
Replacing an existing article
Linus, our trusty owl, has written an article called Giving a hoot about knowledge, and the permalink was something like:
https://support.knowledgeowl.com/help/giving-a-hoot-about-knowledgeAfter that article was published, his marketing team used that permalink in a public blog post on owls and wisdom.
Now, let's suppose that Linus has since written a new and better version of this content called Docs or it didn't happen:
https://support.knowledgeowl.com/help/docs-or-it-didnt-happenBut Linus isn't sure all the places out in the wide world that referenced that giving a hoot article. And what if it was so brilliant that other people also referenced it, linked to it, or bookmarked it?
Old links to the rescue! Instead of trying to track down every instance of the original permalink for Giving a hoot about knowledge, Linus can set Giving a hoot about knowledge to a deleted status and enter the giving-a-hoot url as an old link for Docs or it didn't happen. When people try to go to the giving-a-hoot URL, we'll auto-redirect them to docs-or-it-didnt-happen instead.
Updated permalink
In other cases, maybe Linus didn't write an entirely new article but, instead, he changed the title on an existing article and wants to change the permalink, too. Let's say Linus has an article whose permalink has always been this:
https://support.knowledgeowl.com/help/a-hooting-good-time
But that permalink was generated from the article's old title (A Hooting Good Time). When Linus updated this article to a new version, he renamed it to "Why Knowledge Management Matters." He wants to update the permalink to:
https://support.knowledgeowl.com/help/why-km-mattersBut he also want any links or bookmarks to a-hooting-good-time to still work.
First, Linus can edit the current permalink to why-km-matters.

Then, he adds an old link to a-hooting-good-time so that the old URL will automatically redirect to why-km-matters:
 Sample manually-created Old Link
Once Linus clicks Save Redirects and re-saves the article, anyone visiting
https://support.knowledgeowl.com/help/a-hooting-good-time
will be redirected to
https://support.knowledgeowl.com/help/why-km-matters
In a nutshell, old links are here to make it easier for you to keep older/public article permalinks but have them point to the most recent relevant content.
Note: this is exactly the workflow that the automatic permalink option in Settings > Basic handles for you!
Search phrases can help your readers discover your content.
When to use search phrases
Search phrases are useful in the following situations:
- You've configured your knowledge base search to weight search phrases to rank higher than other fields. This allows you to artificially boost an article up the search results list. Refer to Search weights for more information on configuring search weights. For example:
You have three articles about taming owls: "Introduction to owl taming", "Best owl breeds for taming", and "Dangers of owl taming". The default search places "Dangers of owl taming" at the top of the results when readers search for "owl taming". You want your readers to start with the introduction (and not be scared off!) You can configure your search settings to favor search phrases, then add the phrase "owl taming" in the Search Phrases field in the "Introduction to owl taming" article. - You want readers to find the article when they search for a phrase or term that doesn't occur in the content itself. However, you should consider using the Synonyms feature for this use case.
You don't need to use search phrases if you are happy with the order of search results, and the phrase is present in the title, permalink, body, or meta description fields.
Adding individual search phrases
- Open the article for editing.
- Type the term or phrase you want to use in the Search Phrases field.
- Press
EnterorTabto add the phrase. You can now type another phrase, or save the article.

Adding multiple search phrases at once
You will need to have your search phrases in a comma-separated list, formatted like: phrase1,phrase 2,phrase3,phrase four.
- Open the article for editing.
- Paste your comma-separated list of searches in the Search Phrases field.
- Press
EnterorTabto add the phrases. You can now type additional phrases, or save the article.
Here, we're copying the tags field and pasting it into the search phrases field (this is not a best practice, but it does allow you to see the functionality!):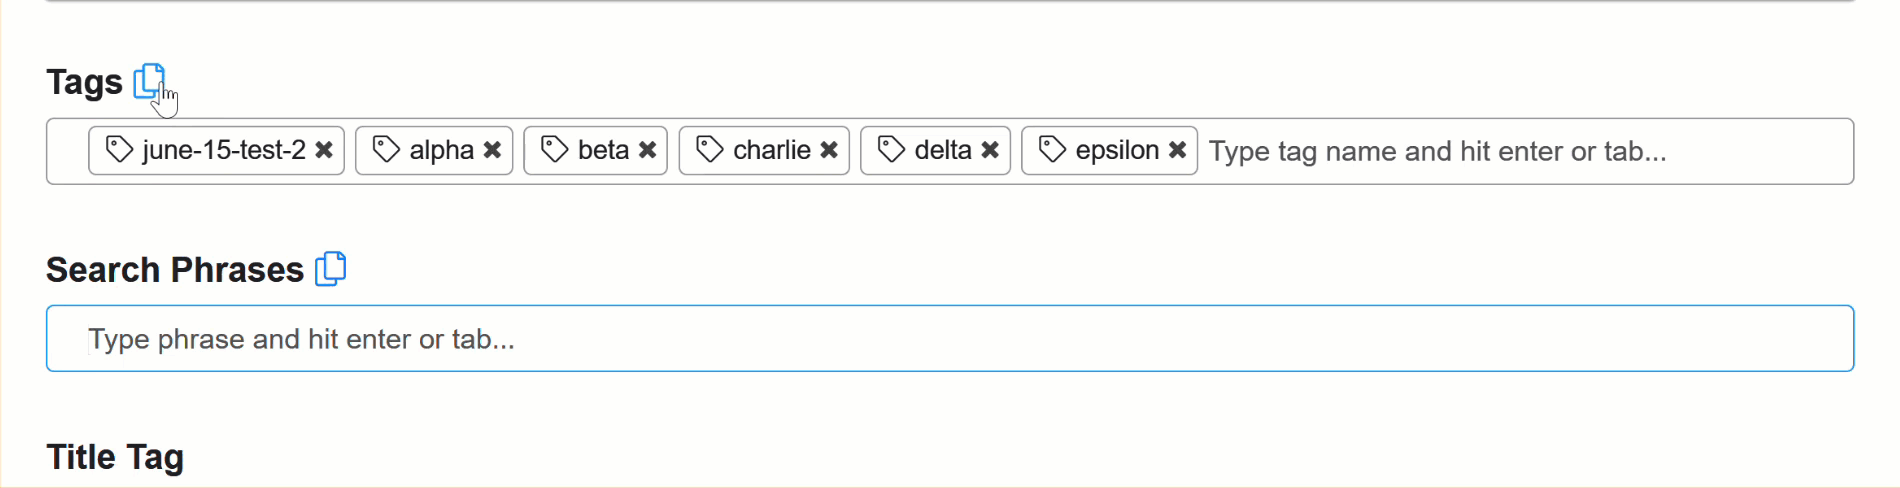 Sample gif showing copying tags and pasting search phrases. Hover to play.

A title tag is an HTML element that specifies the title of a webpage. They're one of the most powerful tools for Search Engine Optimization (SEO) for publicly available knowledge bases.
This is not the title of the article or category displayed at the top of the page--for that, we use the article or category's Full Article Title. The title tag isn't actually displayed on the page—instead, this HTML element is tucked into the "head" of the page, like this:
 Title tags are found in the <head> of a webpage, in the <title> element.
If you don't enter an explicit Title Tag for an article or category, KnowledgeOwl automatically generates one, formatted as: Article Title | Knowledge Base Name
The title tag should be an accurate and concise description of a page's content, but it gets used in a few additional ways:
- Browsers display the title tag as the browser tab title/label when someone views the page.
- Search engines either use the full title tag or a truncated version of it to display in the Search Engine Results Page (SERP).
- Most social media platforms display either the full title tag or a truncated version of it when the page is shared.
This is a very small field that has a LOT of reach, and we strongly encourage you to use it for Search Engine Optimization (SEO) in publicly available knowledge bases!
Add or edit a title tag
To add or edit a custom title tag to your article or category:
- Open the article or category for editing.
- Enter or update the Title Tag, located below the article body editor pane:
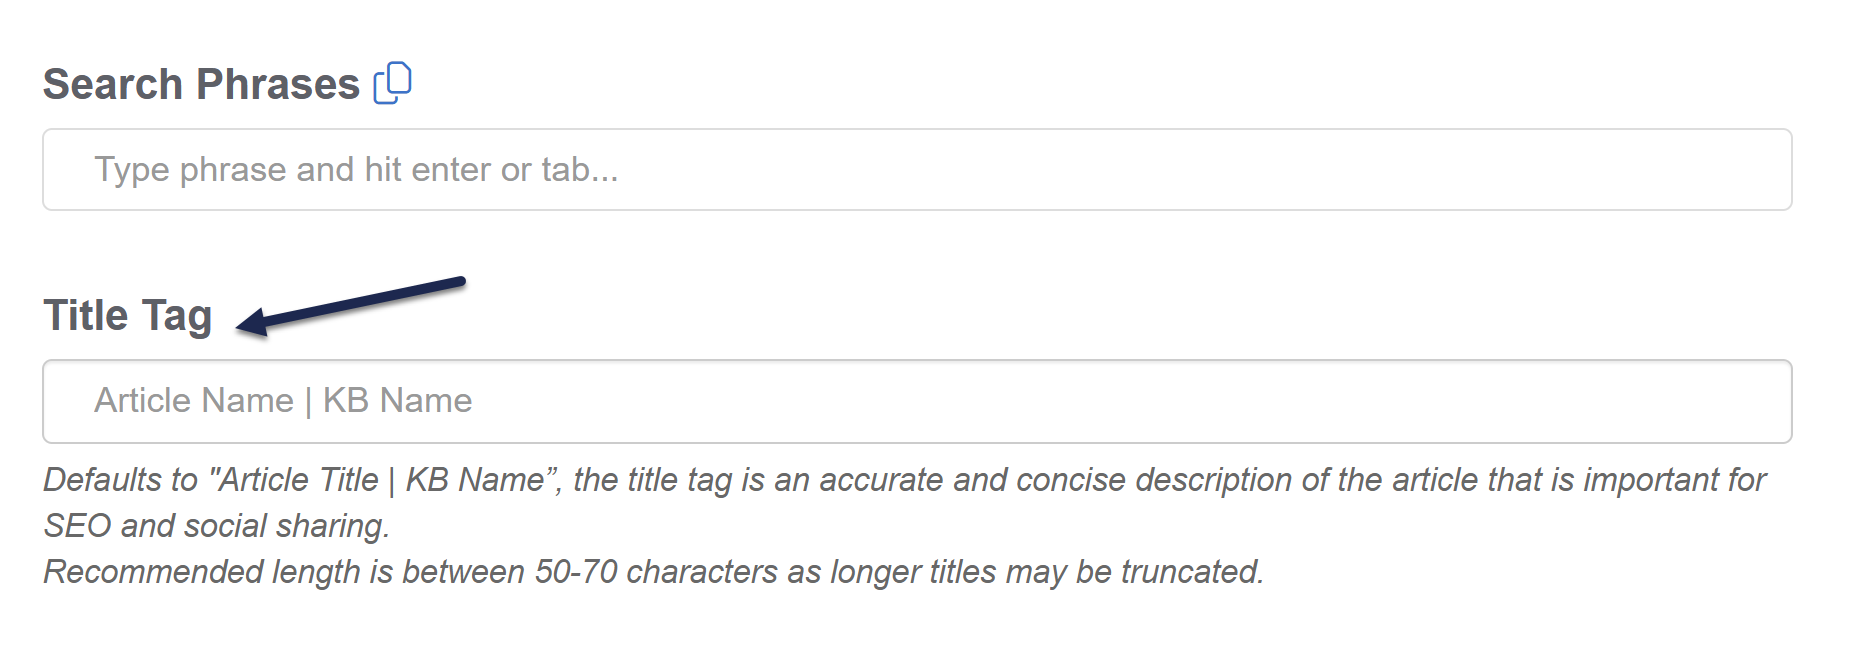
- Be sure to Save your changes.

Tips for writing a good title tag
Here are a few tips to get the most out of your title tags:
- Get into the habit of manually adding a title tag to your articles, so you become aware of it as a field you need to use.
- Consistently use either Sentence case or Title Case for your title tag. This should match your style guide settings.
- Write the title for a human, not for the search engine bots or crawlers. Your title tag should be descriptive and accurate and help readers know if they actually want to view the page.
- Write a unique title tag for each article and category in your knowledge base.
- Don't repeat the same keyword multiple times in a title tag.
- When all else fails, match your article title. (Google and other search engines will sometimes rewrite your title tag; for some reason, having the title match the first Heading 1 on the page seems to decrease their tendency to do so.)
- As you edit or update articles, especially when you update the actual title or substantively update the content, review your title tag.
- Focus on keeping your title tags at 60 characters or less. Our editor allows you to add up to 100 characters, but pretty much every tool will truncate it down to around 55-60, so it's good to get into the habit of shortening it.
Let us help you be succinct
If you'd like to encourage yourself to write concise article titles, head to KB settings > Domain. Under SEO settings, check the box to Ensure that page titles do not exceed 55 characters and Save. 😉
- To preview how your title tag will appear when it's used by a search engine, moz.com has a Title Tag Preview tool that's fairly useful.
Learn more
Here are two additional resources to help you dig into title tags more:
- moz.com's Title Tag
- ahrefs.com's How to Craft the Perfect Title Tag (Our 4-Step Process)
And if you're working on SEO optimization, check out Kate's blog post Knowledge base SEO tips for those of us who hate SEO.
A meta description is an HTML element that briefly summarizes the content of a web page. Like the title tag, it's not actually displayed while you view the page—instead, this HTML element is tucked into the "head" of the page, like this:
 Meta descriptions are found in the <head> of a webpage, in the <meta name="description"> element.
Social media platforms use the meta description as the text preview for your article or category, so like the title tag, it's a field that has a lot of reach. If you don't have a meta description, social media platforms generally just grab the first 150-ish characters they find.
Search engines will often use the meta description, but not always—sometimes they'll display a relevant fragment from the page based on the end-user's search query, instead.
KnowledgeOwl may use or display the meta description in a few places, too:
- Search results order: The meta description is one of the Search fields we automatically index, and you can adjust the Search field weights to increase or decrease how important it is. If you've
- Search results: Depending on how you've configured KB settings > Search and synonyms > Search page display > Meta description article blurbs, meta descriptions may be used as the article blurb in your knowledge base's search results.
- Category landing pages: Some category types and layouts will display an article's meta description on the page. This is especially true for blog style categories and a couple of the default categories display types. Blog style categories always display an article blurb for their articles, as in our Release notes category. If no meta description exists, these category landing pages will generally display the first sentence or two from the article itself, which may not be the most accurate summary.
The good news is that all of these use cases will benefit from you writing intentional, well-crafted meta descriptions. Following SEO best practices can also improve your readers' experience of your knowledge base in general.
KnowledgeOwl doesn't do anything to auto-populate the meta description field, so unless you've been aware of it and using it, you're missing a key SEO/social sharing opportunity.
Add or edit a meta description
To add or edit a custom meta description to your article or category:
- Open the article or category for editing.
- Enter or update the Meta Description, located below the article body editor pane:
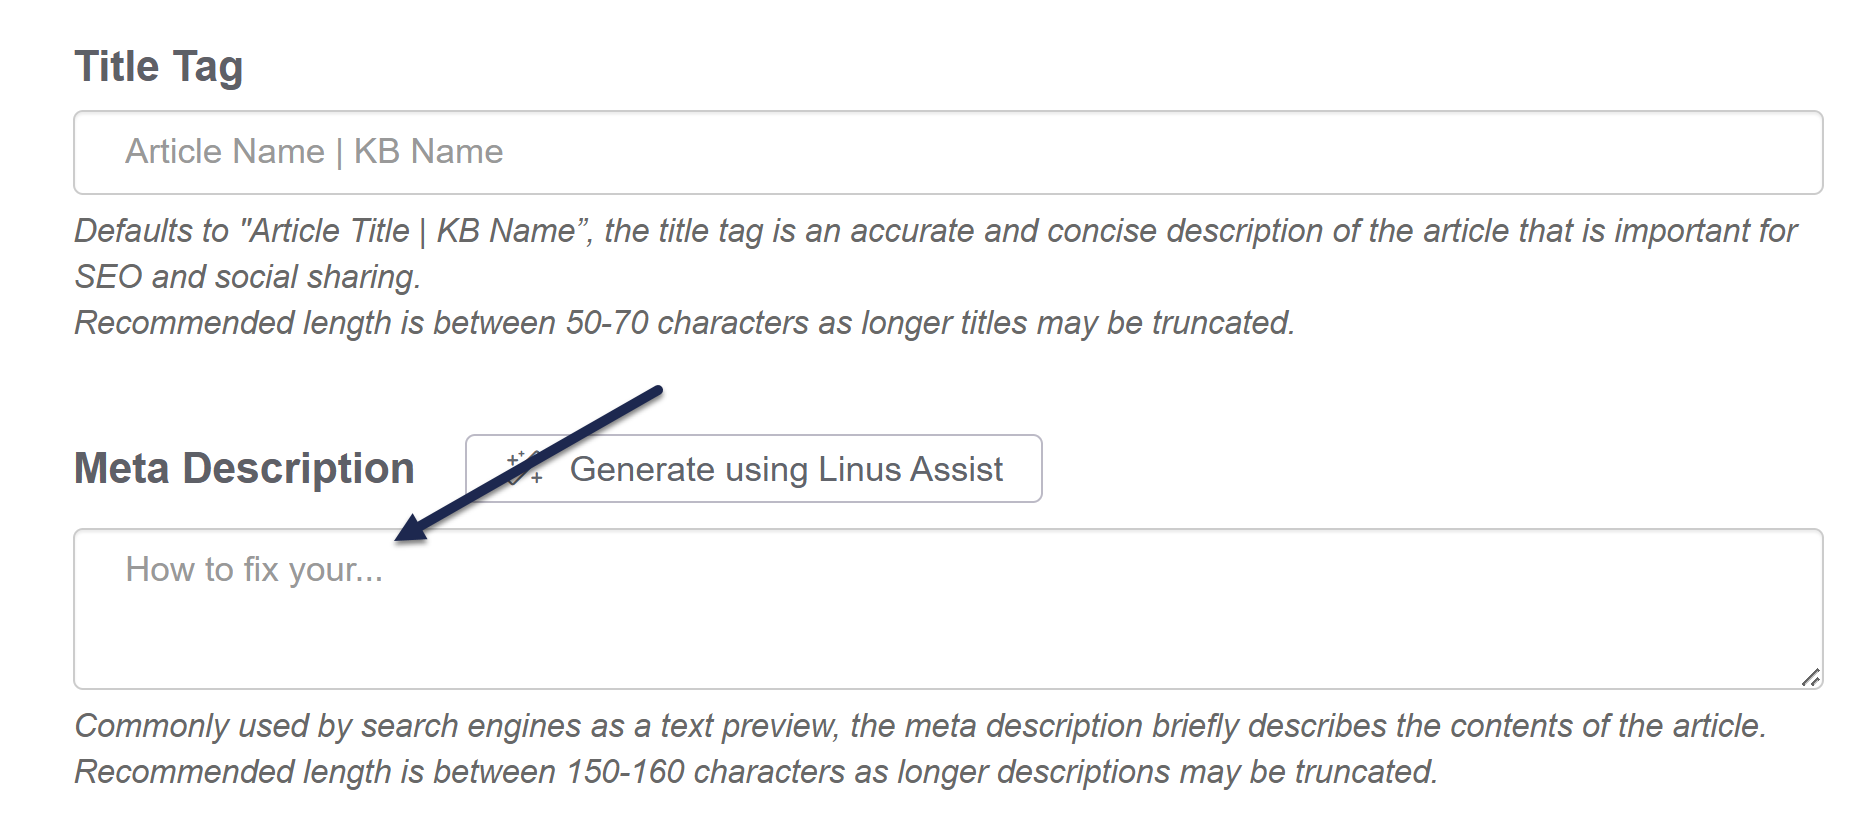
- Be sure to Save your changes.

Tips for writing good meta descriptions
Here are some general tips on getting the most out of your meta descriptions:
- Meta descriptions should build on the title tag, expanding on it in more detail.
- Treat meta descriptions as both informative and as advertising copy: describe what's in the article or category AND encourage people to open it. Think about why someone might be looking for this article and try to address that why.
- Aim for something between 50 and 150 characters.
- Most search engines truncate meta descriptions around the 150-160 character mark. You want them to be long enough to provide a good description but not so long that the important details get truncated out.
- Write a unique meta description for each article and category in your knowledge base.
- Avoid standard/double quotation marks ("...") in meta descriptions. Google and other search engines will often truncate the description where these exist.
- Use an active voice.
- Not sure where to begin? If you're using Google Search Console or any other SEO/search tracking tool, find the articles and categories that are generating the most clicks or organic traffic for you and focus on improving those meta descriptions first.
Learn more
Here are two resources to help you dig further into meta descriptions:
- moz.com's Meta Description
- ahrefs.com's How to Write the Perfect Meta Description
And if you're working on SEO optimization, check out Kate's blog post Knowledge base SEO tips for those of us who hate SEO.
