
With the biggest portion of our infrastructure upgrades winding down, our developers are digging back in to requests and bug reports.
Our first new feature enhancement post-upgrade is for all you Manage Article bulk edit fans: we've added the New/Updated article callouts into the Bulk Edit options!
You'll see the new section in the Bulk Edit pop-up, beneath the Author dropdown:
 Check out the new Update Article Call Outs section, on the left The Update Article Call Outs has four options:
- Keep Current Status: This is the default selection; it will basically ignore the article's callout field during the bulk edit.
- No Status: This will set all articles to have No Status (removing any New/Updated callout that they currently have). This is the bulk edit equivalent to selecting "No Status" in Article Editor and saving.
- New Article Status: This will assign the selected articles the New article callout. If selected, the status expiration date field will appear, pre-populated using your knowledge base's default status expiration date. You can edit this as-needed, just like in Article Editor.
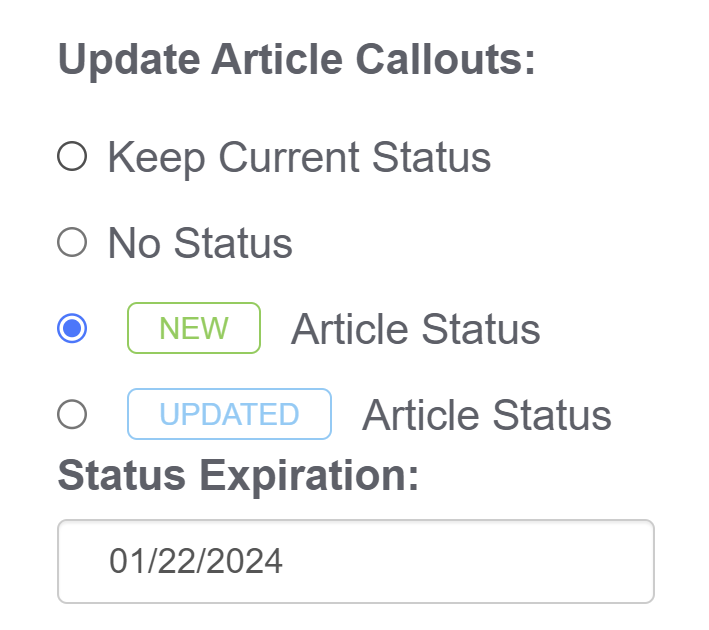 With a callout selected, the Status Expiration date appears
 - Updated Article Status: This will assign the selected articles the Updated article callout. If selected, the status expiration date field will appear, pre-populated using your knowledge base's default status expiration date. You can edit this as-needed, just like in Article Editor.

If you're using Subscriptions: yes, setting the callouts in bulk here will trigger subscription notification emails exactly like setting the callouts in Article Editor!
We've updated all of our Manage articles documentation to reflect these changes. Let us know what you think!
Version activation with bulk callouts
If you've used the versions bulk activation process, you may be delighted to learn that you can use the Update Article Call Outs field to add New/Updated callouts as you activate versions, too! To do so, you'd want to:
- Check the box to "Activate next version marked ready for review"
- Select the New Article Status or Updated Article Status and be sure the status expiration date looks correct.
- Click the Update Articles button.
We hope this change in particular helps simplify some of your bulk activation workflows.