
Authors with the standard Editor and Writer roles can customize text strings; if you're using custom author roles, you'll need to have the Customize default text custom author role permission to Customize default text.
To add a new customized text string or edit an existing customized text string:
- Go to Customize > Default text.
- Review the available Knowledge Base Sections and select the section your text string belongs to. (This may require some trial and error!)
- Find the string you'd like to update.
- Select the gear cog icon in the Actions column to the right of the string:
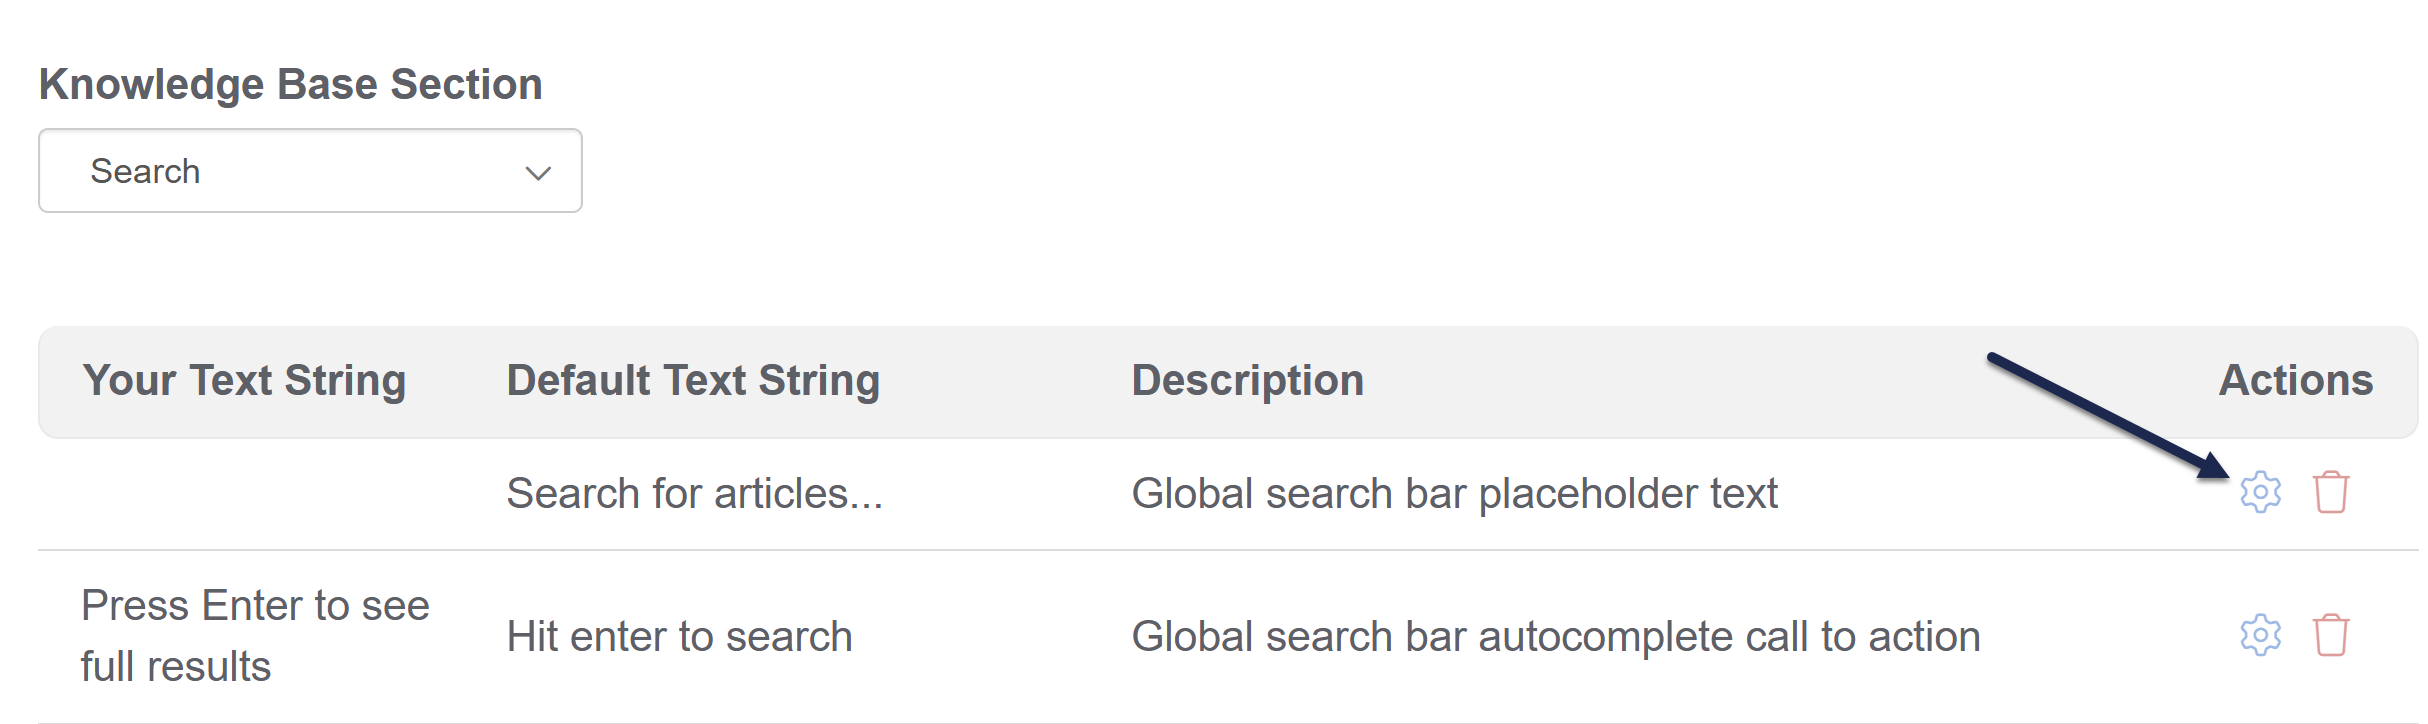 Select the gear cog icon in the Actions column to the right of the text string
 - This will open the Edit Text String pop-up, where you can enter or edit the text string.
- Once you've added the text you'd like used in Your Text String, select Update Text String to save your change.

These changes will immediately be live in your knowledge base, though if you were already viewing your knowledge base you may need to refresh to see them!
Some tips on adding text strings:
- You cannot enter a blank/empty text string or a text string that is all spaces.
- In most places, you can insert an emoji and it will work properly!
- Raw HTML entered here will not render as HTML, but will instead display as an encoded text string.
Authors with the standard Editor and Writer roles can update customized text strings. If you're using custom author roles, you'll need to have the Customize custom author role permission to Customize default text.
Resetting a customized text string will remove whatever text you've entered for the string and switch your knowledge base back to using the Default Text String.
To reset a customized text string:
- Go to Customize > Default text.
- Find the customized text string you'd like to remove.
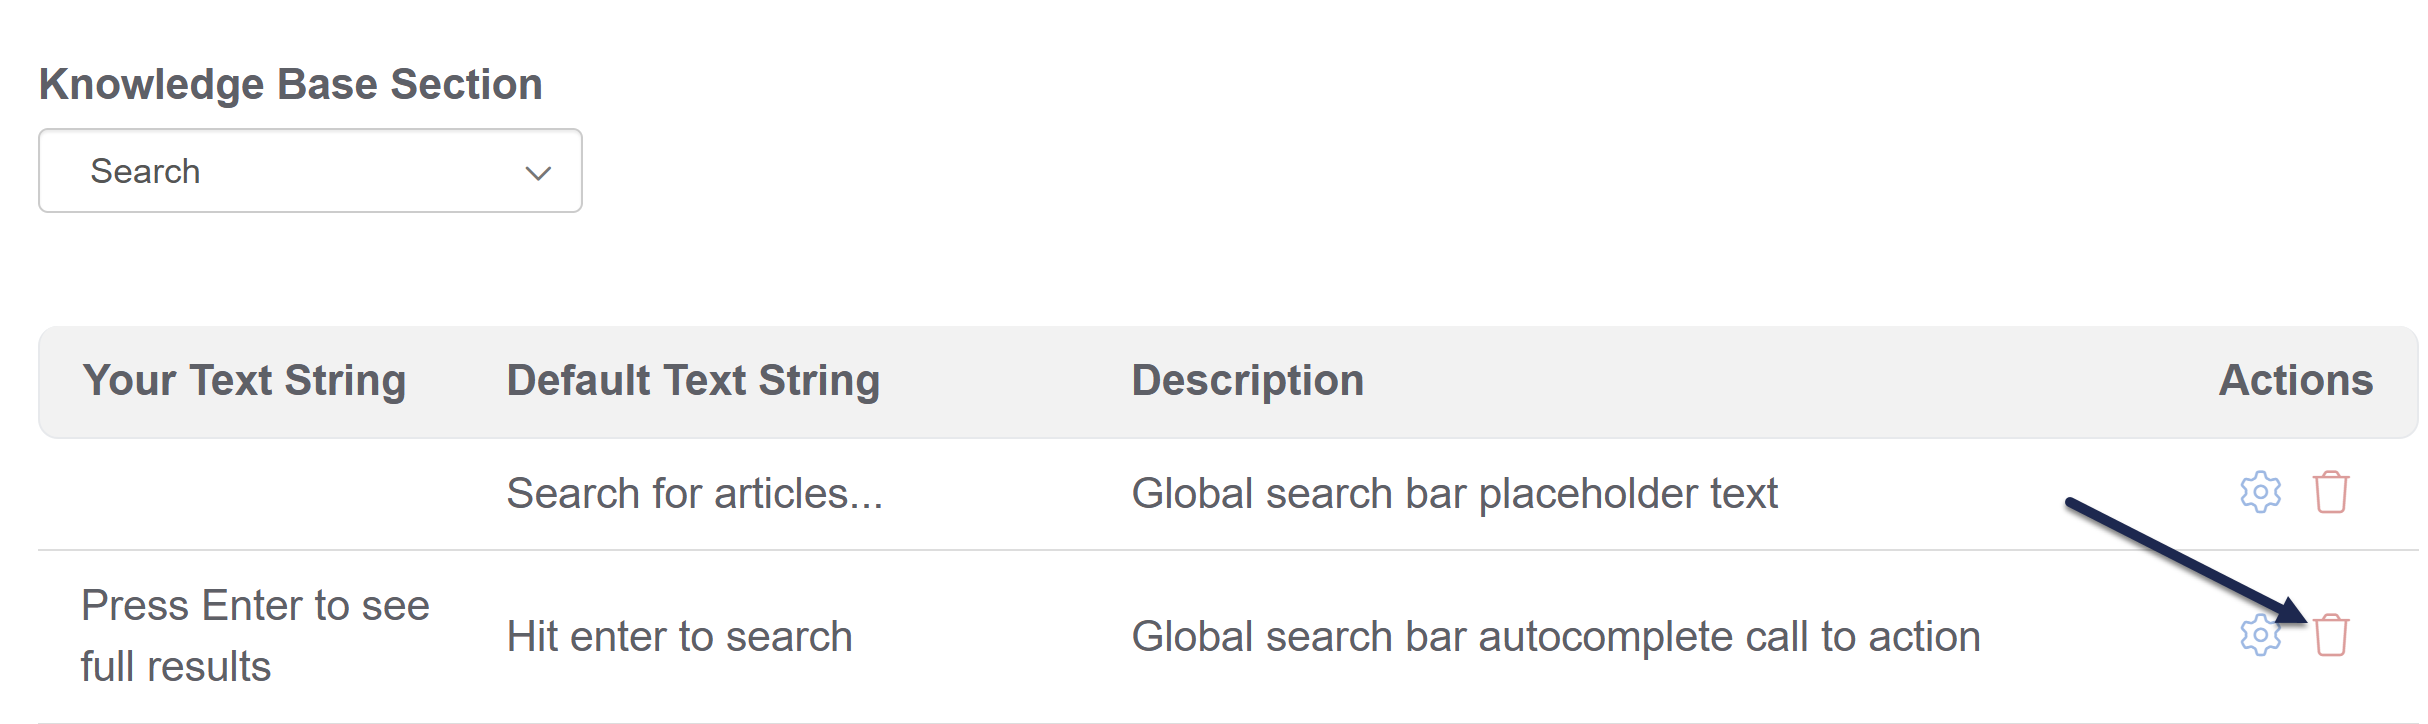
- Find the text string you'd like to remove. In the Actions column to the right of the string, select the trashcan icon:
- A modal opens asking you to confirm that you really want to remove your customized text string. Verify that you've selected the correct term and select OK to complete the text string reset.
- Your text string will be removed and your knowledge base will immediately start using the Default Text String again.

In some cases, when you edit a text string in Customize > Default text, the Edit Text String modal displays a warning like this:
To display this text string, update your knowledge base theme or homepage to use the appropriate Customize Text Merge code. Learn more
The warning appears because before the Customize Text merge codes existed, we hard-coded these text strings into the Custom HTML templates used in Customize > Style (HTML & CSS) and in Customize > Homepage.
It will take a little bit of sleuthing to update the text accordingly. If you're unsure what to update, contact us and one of our support owls will happily help you!
Here's an overview of what you'll need to do if you see this warning:
- Select the knowledge base theme link or navigate to Customize > Style (HTML & CSS).
- Open the appropriate Custom HTML template (Article or Top Navigation).
- Find the previously hard-coded text and replace it with a merge code.
- Save your changes.
We have more detailed instructions for each scenario below!
Relevant text strings
This warning message may display for these knowledge base sections' text strings. Select the text string you're editing to jump to instructions on it:
- Article: Last Modified on
- Article: Related Articles
- Top Navigation: Toggle navigation
- Top Navigation: Table of Contents
- Article Lists: Popular articles list heading
- Article Lists: Updated articles list heading
- Article Lists: New articles list heading
- Article Lists: Recent articles list heading
- Article Lists: Favorite articles list heading
Article: Last Modified on
If you try to edit the default text string for Last Modified on in the Article section and receive the warning:
- Select the knowledge base theme link in the warning or navigate to Customize > Style (HTML & CSS).
- In the Customize HTML, CSS, and JS section, select Custom HTML.
- Select Article from the Select HTML section to edit dropdown.
- Identify the text that needs to be replaced. The Last modified on statement is usually near the top, in the
<div class="metadata">section, which begins on row 4. Here, we see it in row 4:<div class="hg-article"> <div class="hg-article-header"> <h1 class="hg-article-title">[article("title")][article("action_icons")]</h1> <div class="metadata">Last Modified on [article("date_modified")] by [author("name")]</div> </div> <div class="hg-article-body"> [article("body")] - Select the "Last modified on" text and delete it.
- Copy the merge code below and paste it where the text was:
[translation("article:last-modified-on-label")] - Your Custom HTML should now look something like this:
<div class="hg-article"> <div class="hg-article-header"> <h1 class="hg-article-title">[article("title")][article("action_icons")]</h1> <div class="metadata">[translation("article:last-modified-on-label")] [article("date_modified")] by [author("name")]</div> </div> <div class="hg-article-body"> [article("body")] - Be sure to Save your changes when you're done.
Individual article PDFs
If you use individual article PDFs and you update the Last Modified on text string, the article PDFs will update as you save changes to the articles. Contact us to regenerate your individual article PDFs in bulk so they display the new text!
Article: Related Articles
If you try to edit the default text string for Related Articles in the Article section and receive the warning:
- Select the knowledge base theme link in the warning or navigate to Customize > Style (HTML & CSS).
- In the Customize HTML, CSS, and JS section, select Custom HTML.
- Select Article from the Select HTML section to edit dropdown.
- Identify the text that needs to be replaced. The Related Articles heading usually appears near the bottom, in the
<div class="hg-article-footer">within an h3. Here, we see it in row 6:<div class="hg-article-body"> [article("body")] </div> <div class="hg-article-footer"> <div class="ko-related-articles text-center"> <h3>Related Articles</h3> [template("related")] - Delete the original "Related Articles" text, but keep the <h3></h3> tags on either side.
- Copy the merge code below and paste it where the text was:
[translation("article:related-articles-heading")] - Your Custom HTML should now look something like this:
- Be sure to Save your changes when you're done.
    <div class="hg-article-body">
        [article("body")]
    </div>
    <div class="hg-article-footer">
        <div class="ko-related-articles text-center">
            <h3>[translation("article:related-articles-heading")]</h3>
[template("related")]Top Navigation: Toggle navigation
If you try to edit the text string for Toggle navigation in the Top Navigation section and receive the warning:
- Select the knowledge base theme link in the warning or navigate to Customize > Style (HTML & CSS).
- In the Customize HTML, CSS, and JS section, select Custom HTML.
- Select Top Navigation from the Select HTML section to edit dropdown.
- Identify the text that needs to be replaced. The Toggle navigation text is usually about halfway down the pane below a slideout-right-toggle template. Here, it's in row 3:
[template("slideout-right-toggle")] <button type="button" class="navbar-toggle" data-toggle="collapse" data-target=".navbar-collapse"> <span class="sr-only">Toggle navigation</span> <span class="icon-bar"></span> <span class="icon-bar"></span> <span class="icon-bar"></span> </button> - Delete the original "Toggle navigation" text.
- Copy the merge code below and paste it where the text was:
[translation("top-navigation:toggle-navigation")] - Your Custom HTML should now look something like this:
- Be sure to Save your changes when you're done.
    [template("slideout-right-toggle")]
    <button type="button" class="navbar-toggle" data-toggle="collapse" data-target=".navbar-collapse">
        <span class="sr-only">[translation("top-navigation:toggle-navigation")]</span>
        <span class="icon-bar"></span>
        <span class="icon-bar"></span>
        <span class="icon-bar"></span>
</button>Top Navigation: Table of contents
If you try to edit the text string for Table of in the Top Navigation section and receive the warning:
- Select the knowledge base theme link in the warning or navigate to Customize > Style (HTML & CSS).
- In the Customize HTML, CSS, and JS section, select Custom HTML.
- Select Top Navigation from the Select HTML section to edit dropdown.
- Identify the text that needs to be replaced. The Table of Contents text involves two sections of text you'll need to replace. Both are fairly close to the top of the Top Navigation:
<span class="sr-only">Table of Contents</span>and<span class="browse">Table of Contents</span>. Here, they're in rows 6-7:<h1 class="hg-project-name">[template("project-name")]</h1> <div class="nav-left-searchbar hidden-xs"> [template("searchbar")] </div> <button type="button" class="navbar-toggle toc-toggle pull-left clear-left" data-toggle="collapse" data-target=".documentation-categories"> <span class="sr-only">Table of Contents</span> <span class="browse">Table of Contents</span> - Delete each original "Table of Contents" text.
- Copy the merge code below and paste it where the text was:
[translation("top-navigation:table-of-contents")] - Your Custom HTML should now look something like this:
- Be sure to Save your changes when you're done.
    <h1 class="hg-project-name">[template("project-name")]</h1>
    <div class="nav-left-searchbar hidden-xs">
        [template("searchbar")]
    </div>
    <button type="button" class="navbar-toggle toc-toggle pull-left clear-left" data-toggle="collapse" data-target=".documentation-categories">
        <span class="sr-only">[translation("top-navigation:table-of-contents")]</span>
<span class="browse">[translation("top-navigation:table-of-contents")]</span>Article Lists: Any list heading
Article list location
For the article list headings, older knowledge bases may have these lists in Customize > Homepage. If you don't see the list in Customize > Style (HTML & CSS), follow the instructions in Update Homepage with Customize Text merge code.
If you try to edit the default text string for any of the article list headings (New, Popular, Updated, Recent, Favorites) and receive the warning:
- Select the knowledge base theme link in the warning or navigate to Customize > Style (HTML & CSS).
- In the Customize HTML, CSS, and JS section, select Custom HTML.
- Select Homepage from the Select HTML section to edit dropdown.
- Identify the text that needs to be replaced. The Popular Articles, New Articles, and Updated Articles headings usually appear near the bottom. They're in rows 10-12 below:
Recent Articles and Favorites Articles lists need to be added manually, so you may need to look around a bit for them!<div class="ko-homepage-top"> <h1 class="hg-article-title xcolor">[homepage("title")]</h1> [template("large-search")] </div> <div class="hg-article"> <div class="hg-article-body"> <div>[template("icon-cats,max=8,col=4,desc=0")]</div> <div>[homepage("body")]</div> <div class="homepage-widgets row"> <div class="col-md-4 col-sm-6"><h3>Popular Articles</h3>[template("pop-articles")]</div> <div class="col-md-4 col-sm-6"><h3>New Articles</h3>[template("new-articles")]</div> <div class="col-md-4 col-sm-6"><h3>Updated Articles</h3>[template("up-articles")]</div> </div> </div> </div> - Delete the original list heading.
- Copy the appropriate merge code below and paste it where the text was:
- Popular articles list heading:
[translation("article-lists:popular-articles")] - New articles list heading:
[translation("article-lists:new-articles")] - Updated articles list heading:
[translation("article-lists:updated-articles")] - Recent articles list heading:
[translation("article-lists:recent-articles")] - Favorite articles list heading:
[translation("article-lists:favorite-articles")]
- Popular articles list heading:
- If you replaced all three of the article list headings, your Custom HTML should now look something like this:
<div class="ko-homepage-top"> <h1 class="hg-article-title xcolor">[homepage("title")]</h1> [template("large-search")] </div> <div class="hg-article"> <div class="hg-article-body"> <div>[template("icon-cats,max=8,col=4,desc=0")]</div> <div>[homepage("body")]</div> <div class="homepage-widgets row"> <div class="col-md-4 col-sm-6"><h3>[translation("article-lists:popular-articles")]</h3>[template("pop-articles")]</div> <div class="col-md-4 col-sm-6"><h3>[translation("article-lists:new-articles")]</h3>[template("new-articles")]</div> <div class="col-md-4 col-sm-6"><h3>[translation("article-lists:updated-articles")]</h3>[template("up-articles")]</div> </div> </div> </div> - Be sure to Save your changes when you're done.
In some cases, when you edit a text string in Customize > Default text, the Edit Text String modal displays a warning that reads something like this:
To display this text string, update your knowledge base theme or homepage to use the appropriate Customize Text Merge Code.
Before we introduced the customize text merge codes, we used to hard-code these text strings into either the Customize > Homepage content editor (for knowledge bases created before October 2022) or the Custom HTML templates used in Customize > Style (HTML & CSS). The warning appears to encourage you to check all places where we previously hard-coded the text strings, so you can replace them with a merge code.
It will take a little bit of sleuthing to update the text accordingly. If you're unsure what to update, contact us and one of our support owls will happily help you!
This warning message can be displayed for these knowledge base sections' text strings:
- Article Lists: Popular articles list heading
- Article Lists: Updated articles list heading
- Article Lists: New articles list heading
- Article Lists: Recent articles list heading
- Article Lists: Favorite articles list heading
Here's an overview of what you'll need to do if you see this warning:
- Figure out where the article lists are stored. Select the homepage link to navigate to Customize > Homepage and check for the lists there first. (Knowledge bases created before October 2022 often have this setup.) If you see the article list you want to edit here, keep using these instructions!
- If you don't see the lists there, they're likely in Customize > Style (HTML & CSS). Follow the instructions in Update Style Settings with Customize Text merge code instead.
- Find the previously hard-coded text and replace it with a new merge code.
- Save your changes.
Since the steps are fairly similar for all three article lists, we'll walk through how to update one list as an example:
Article Lists in Homepage
If you try to edit the default text string for the New, Popular, Updated, Recent, or Favorites Articles list headings and receive the warning:
- Select the homepage link in the warning or navigate to Customize > Homepage.
- In the Homepage content pane, look for the list title you want to update. Older knowledge bases have a Heading 3 for each list, like this:
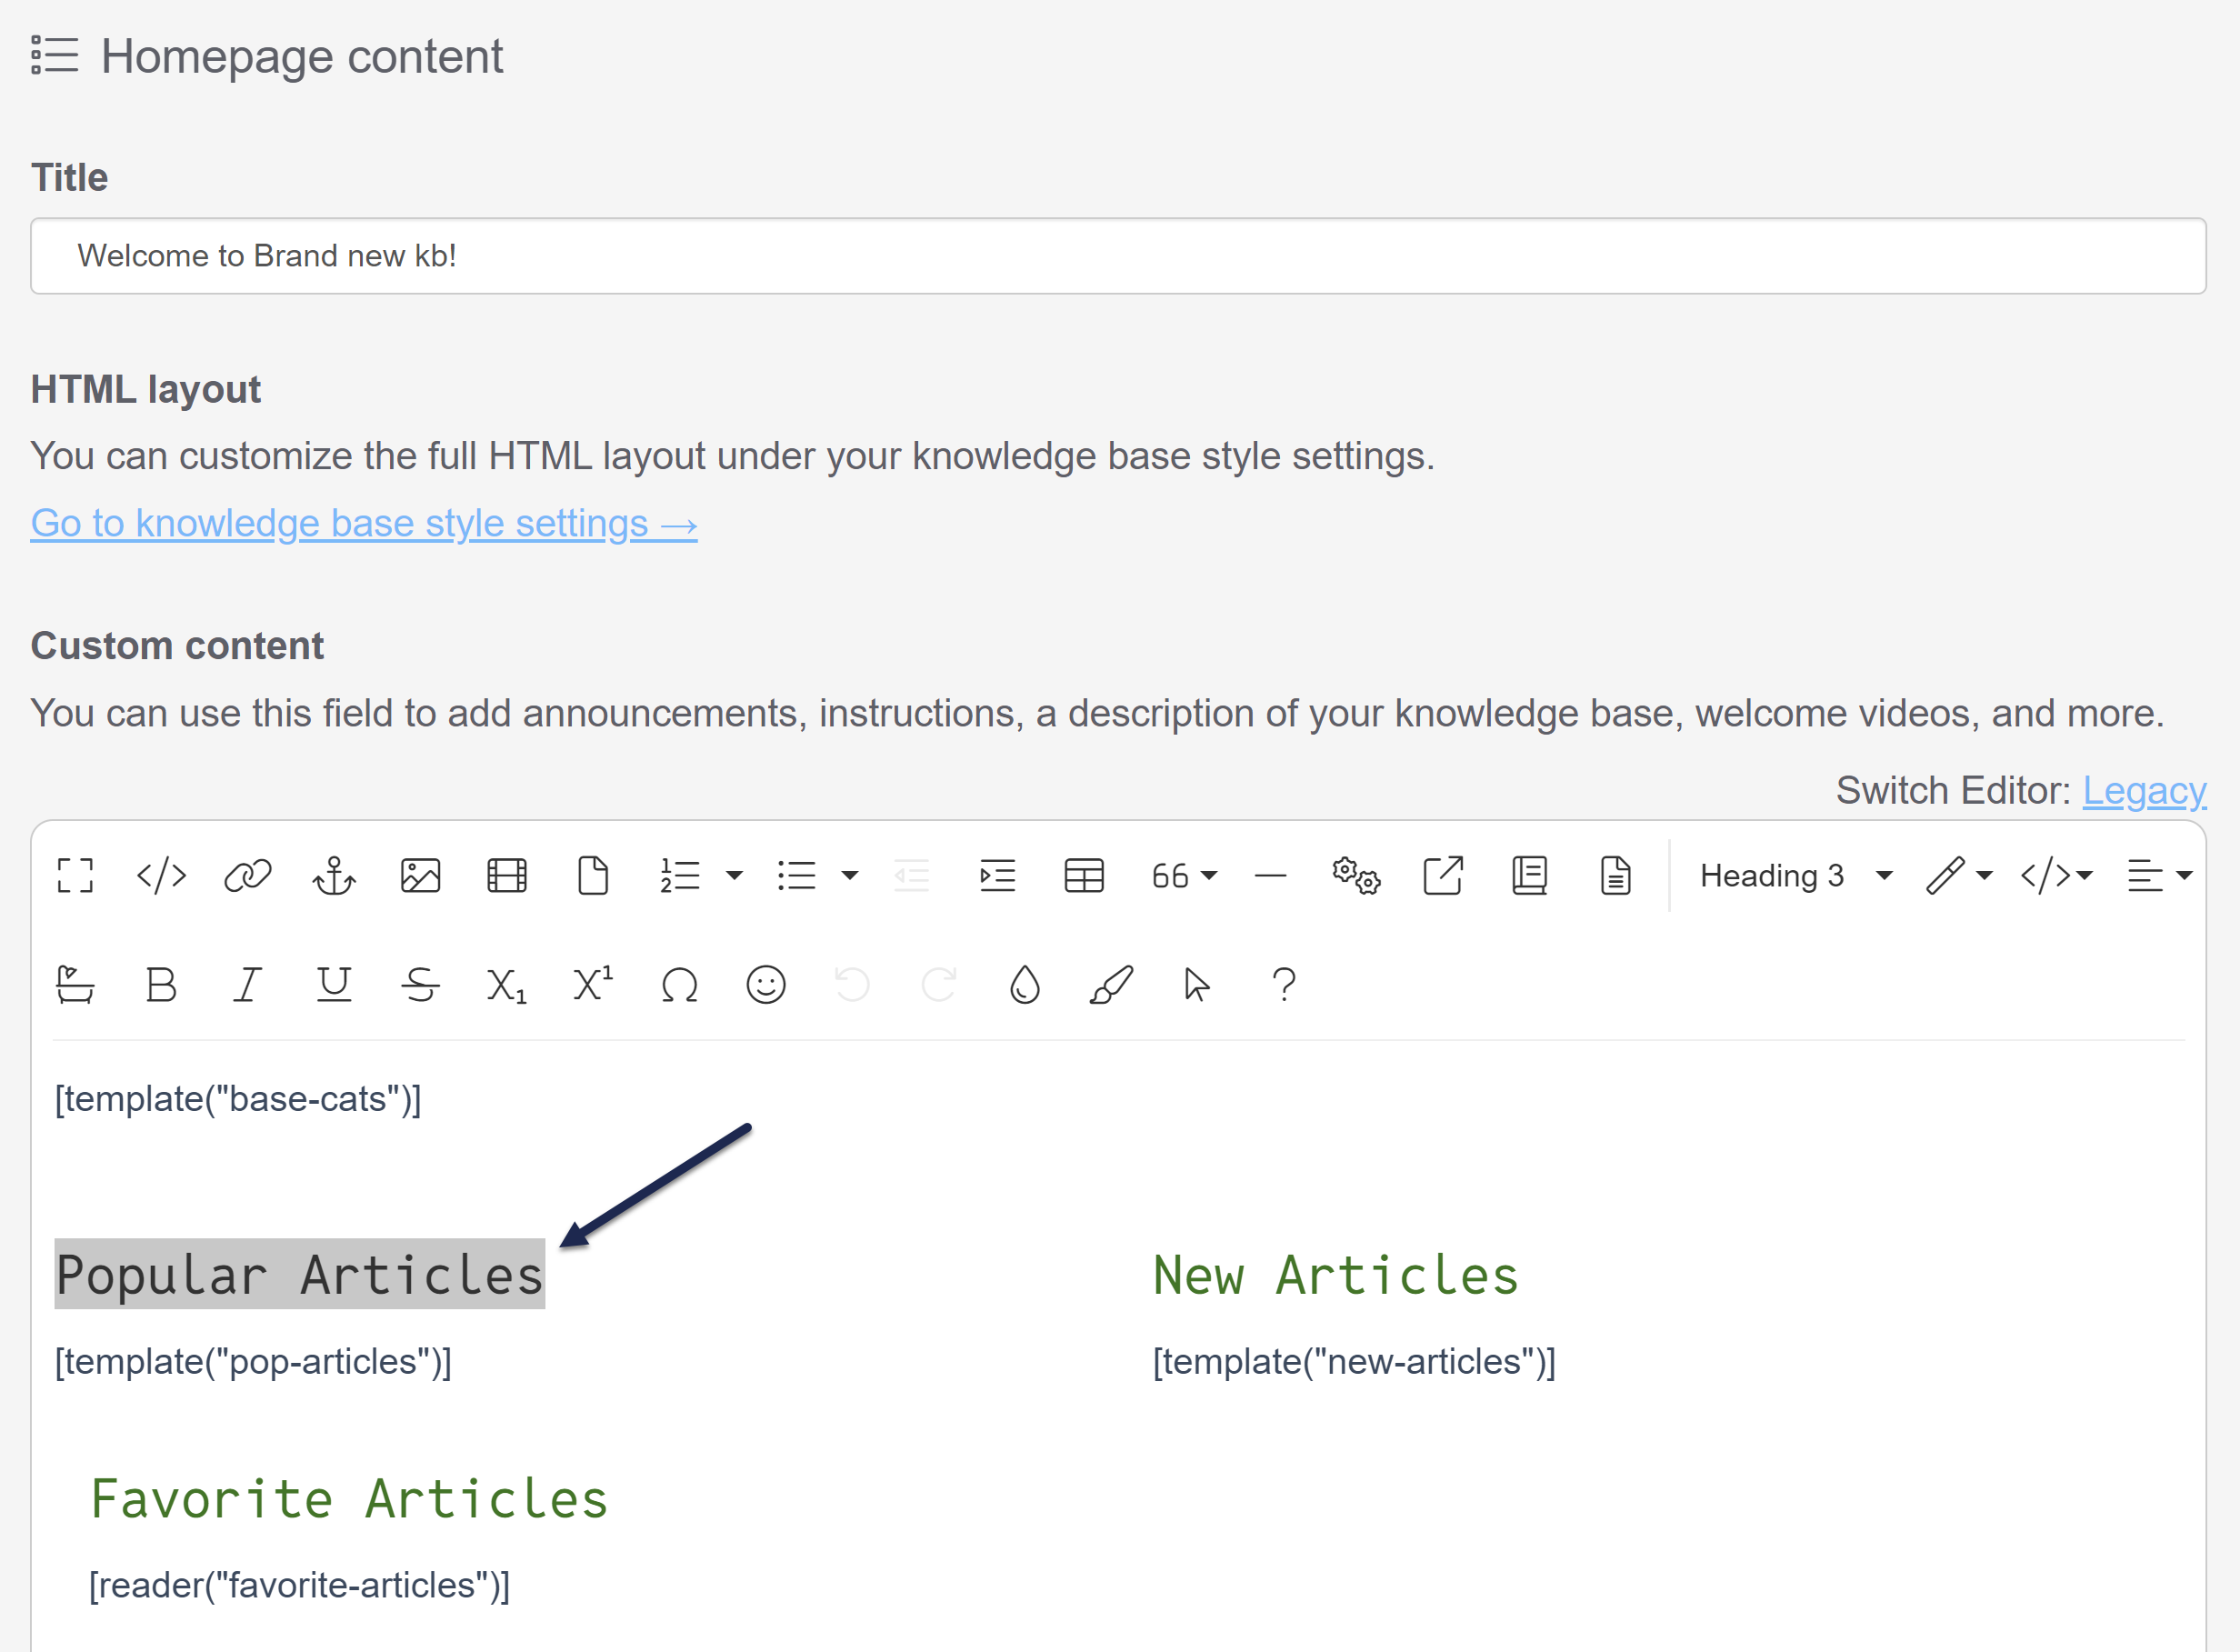 Sample Homepage Custom content editor with article lists
 - Highlight part or all of the text you want to update. Here, we'll update the Popular Articles heading.
- Select the </> (Code View) icon in the editor controls.
- With the text highlighted, the code editor will open with that same text highlighted. 😉For example:
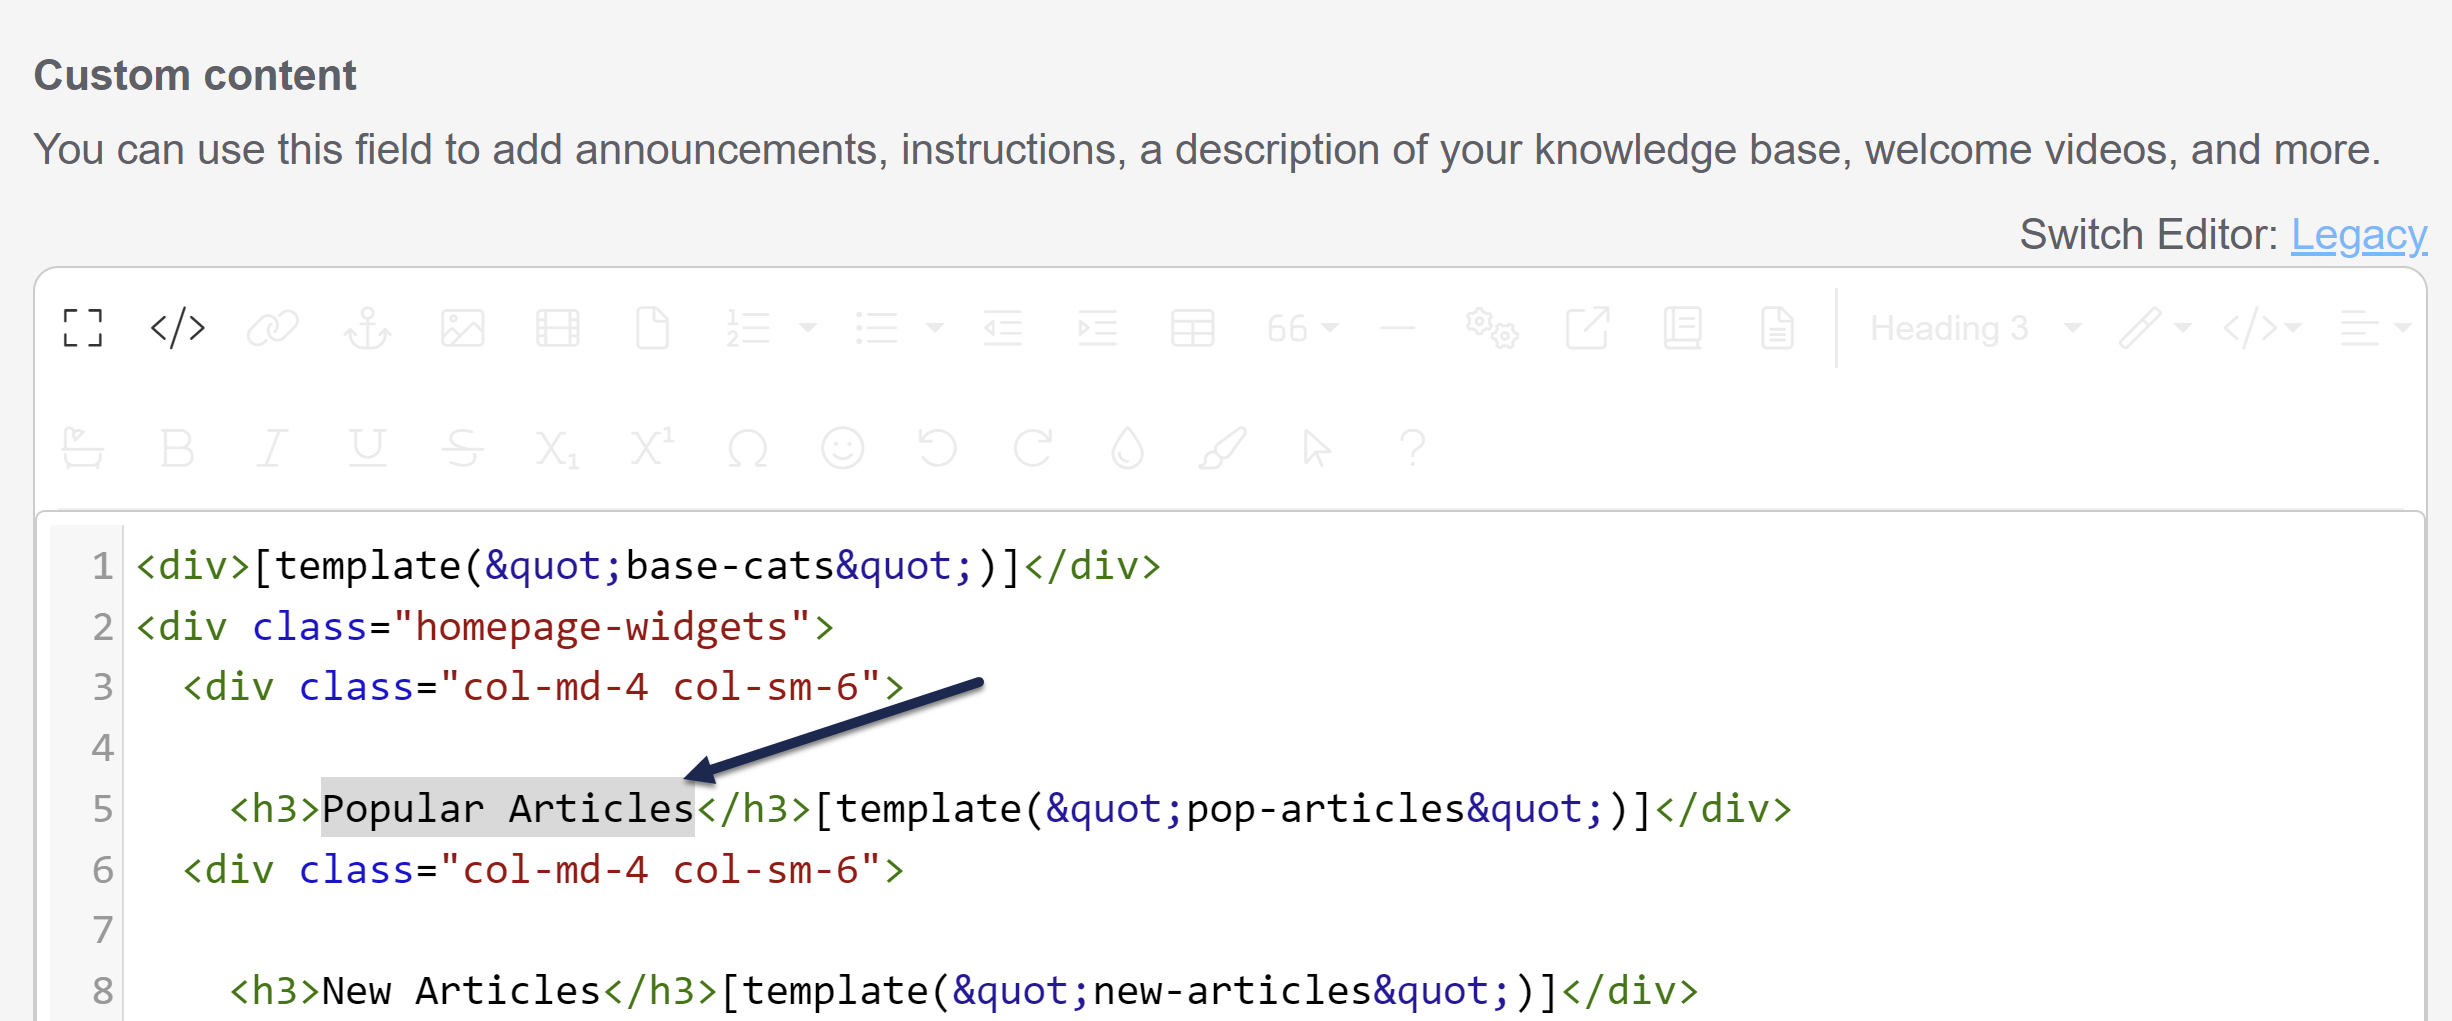 Code view opens with the same text highlighted
 - Delete that text. Be sure you keep any
<h3></h3>or other HTML tags that were already there. - Copy the appropriate merge code from below and paste it in where the text was.
- Popular articles list heading:
[translation("article-lists:popular-articles")] - New articles list heading:
[translation("article-lists:new-articles")] - Updated articles list heading:
[translation("article-lists:updated-articles")] - Recent articles list heading:
[translation("article-lists:recent-articles")] - Favorite articles list heading:
[translation("article-lists:favorite-articles")]
- Popular articles list heading:
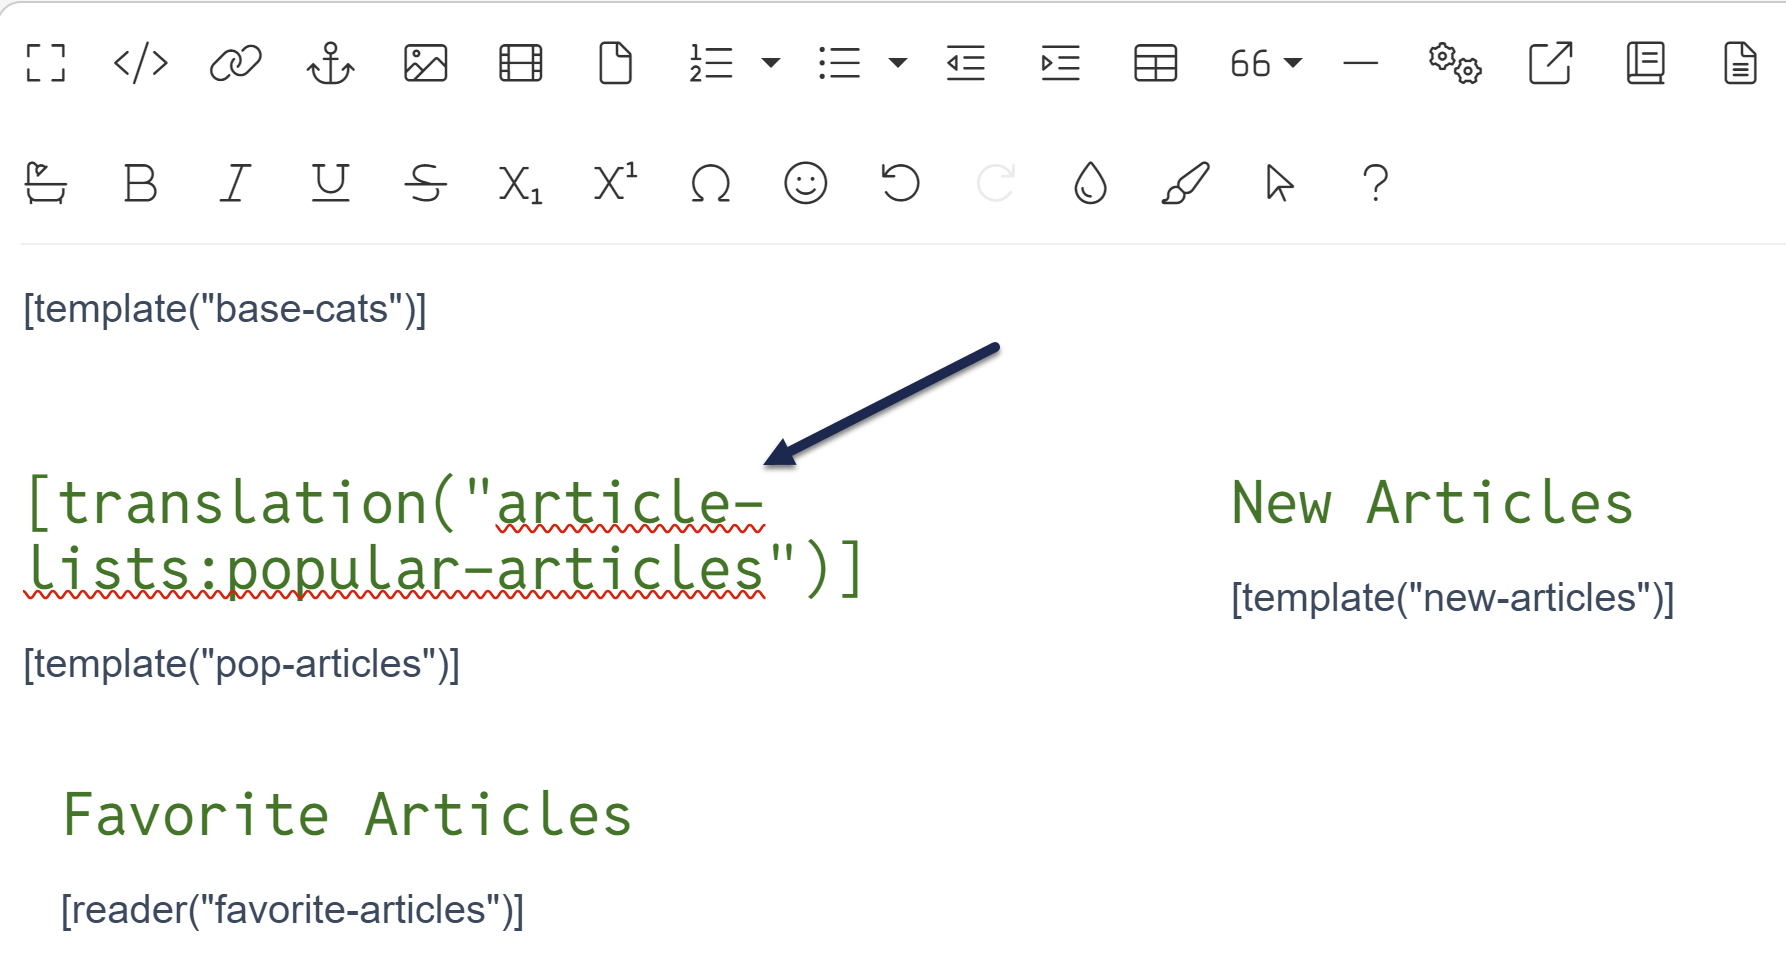
- Your code view should now look something like this:
<div>[template("base-cats")]</div> <div class="homepage-widgets"> <div class="col-md-4 col-sm-6"> <h3>[translation("article-lists:popular-articles")]</h3>[template("pop-articles")]</div> <div class="col-md-4 col-sm-6"> - If you toggle back to the regular editor, you should see the title replaced with the merge code you added:
 Sample editor with the customize text merge code used
 - Be sure to Save your changes.


At this point, any updates to Customize > Default text for the article list heading should properly show in your knowledge base!